Es hat etwas unbestreitbar Bezauberndes, einen Pilz im Garten zu entdecken – es ist, als würde man ein kleines Geheimnis der Natur selbst entdecken. Was wäre, wenn Sie denselben Zauber mit Ihren eigenen Händen erschaffen könnten?
Egal, ob Sie von einer märchenhaften Ecke, einem verspielten Farbtupfer oder einer skurrilen Waldatmosphäre träumen, diese DIY-Pilzideen bringen Charme und Kreativität in jeden Außenbereich.
Von bemalten Steinen und Zementskulpturen bis hin zu Upcycling-Wundern aus Schalen, Baumstämmen und alten Lampenschirmen – hier gibt es für jeden Stil und jedes Können das passende Projekt. Bringen wir mit jedem Pilz ein bisschen Wunder in Ihren Garten!
Dieser Artikel enthält Affiliate-Links. Wenn du über diese Links einkaufst, erhalte ich möglicherweise eine kleine Provision, ohne dass dir dadurch zusätzliche Kosten entstehen. Vielen Dank für deine Unterstützung!
#1. Verzauberter Fliegenpilz-Picknicktisch
- Zusammenhängende Posts
Ich habe dieses skurrile Trio aus wiederverwendetem Holz und Baumstümpfen gebaut und es wurde schnell zu meinem Lieblingsplatz für Tee, zum Skizzieren oder Vogelbeobachten.
Benötigte Materialien
- 2 runde Holztische als Sitzgelegenheiten (12 Zoll Durchmesser) und 1 große runde Tischplatte (24–30 Zoll)
- Baumstümpfe – etwa 30–40 cm hoch für Sitzgelegenheiten, 45–50 cm hoch für
- Rote Acrylfarbe für den Außenbereich (1 Quart) und weiße Acrylfarbe
- Lackversiegelung
- Schrauben- und Bohrerset
- Schleifpapier mit mittlerer Körnung
Schritt-für-Schritt-Anleitung
- Schleifen Sie die Holzscheiben und -stümpfe ab, um Splitter zu entfernen und sie für den Anstrich vorzubereiten. Wischen Sie sie sauber.
- Streichen Sie die Sitz- und Tischflächen mit zwei Schichten roter Außenfarbe. Nach dem Trocknen tupfen Sie mit einem Schwamm oder einer Schablone weiße Kreise auf, um den Pilz-Look zu erzeugen.
- Befestigen Sie jede bemalte Runde mit Schrauben und einer Bohrmaschine an ihrem jeweiligen Stumpfsockel. Versiegeln Sie alles mit transparentem Holzversiegelungsmittel für den Außenbereich, damit es das ganze Jahr über geschützt ist.
#2. Wunderlich bemalter Blechdosen-Pilzfreund
- Zusammenhängende Posts
Dieses fröhliche Gartenprojekt mit Pilzen und Steintieren ist eine Explosion von Persönlichkeit und Farbe.
Benötigte Materialien
- Große Blechdose (28 oz oder größer)
- Rührschüssel aus Kunststoff (10–12 Zoll Durchmesser)
- Acrylfarben-Set (mehrfarbig)
- Klares Versiegelungsspray für den Außenbereich
- Flusssteine und Kieselsteine
- Pinsel (Detail + Breit)
- Heißklebepistole + Sticks
Schritt-für-Schritt-Anleitung
- Reinigen und trocknen Sie Ihre Blechdose. Streichen Sie sie weiß an und fügen Sie dann mit Acrylfarben Ihr gewünschtes Gesicht und Blumenmotiv hinzu. Lassen Sie die Dose vollständig trocknen.
- Streichen Sie die Plastikschüssel rot an und fügen Sie große weiße Punkte für den Pilzhut hinzu. Versiegeln Sie beide Teile mit klarem Sprühversiegler.
- Kleben Sie den Deckel mit einer Heißklebepistole verkehrt herum auf die Dose.
- Sammle glatte Flusssteine und bemale sie als Marienkäfer, Würmer oder lustige Kreaturen in leuchtenden Farben. Lass deiner Fantasie freien Lauf!
- Sobald alles trocken ist, arrangieren Sie die Pilze und Steine auf einem Stück Erde oder Gras. Sie können sie um einen zentralen Stein oder ein Blumenbeet gruppieren.
#3. Bemaltes Kieselpilzbeet und Käferfreunde
- Zusammenhängende Posts
Whimsy doesn’t get cheaper or cuter than this. I made these little mushrooms and bugs from painted rocks and recycled corks over a rainy weekend, and they instantly turned my succulent border into a fairy playground.
Materials Needed
- Glatte Malsteine – verschiedene Größen, ca. 4,8–8,5 cm Durchmesser
- Weinkorken oder Bastelkorken – ca. 5 cm hoch
- Acrylfarben-Set (mehrfarbig)
- Farbstifte für Details
- Outdoor-Versiegelungsspray
- Heißklebepistole
Step-by-Step Guide
- Wash and dry your rocks thoroughly. Paint the tops in bold mushroom colors (red, yellow, teal), ladybug red, or bumblebee stripes. Let dry, then add dots, wings, and faces using paint pens.
- Paint corks in neutral or natural tones to look like mushroom stems. Glue one rock on top of each cork using a hot glue gun.
- Seal everything with an outdoor-safe sealant to keep your colors vibrant for months. Place them among succulents or along garden edges for the ultimate cheerful vibe.
#4. Fairy Toadstool House from a Cable Reel
- Pin It
Using an old cable reel as the base, I transformed it into a fairytale mushroom cottage complete with a butterfly door, buzzing bees, and mini mushrooms nestled in a grassy patch.
Materials Needed
- 1 Holzkabeltrommel (40–60 cm Durchmesser)
- Rot-weiße Außenfarbe
- Kunstrasenmatte (45 x 60 cm)
- Miniatur-Holztür mit Scharnieren
- Holzpuppen oder Pilzköpfe
- Bienen- und Blumendekoration
- Heißklebepistole und wetterfeste Klebestifte
Step-by-Step Guide
- Clean the cable reel thoroughly and paint the top red. Once dry, use a circular sponge or brush to dot white mushroom spots across the surface.
- Paint the center of the reel white to mimic the mushroom stem. You can even texture it slightly to look bark-like for more realism.
- Attach the wooden door to the base using strong glue or tiny screws. Add a small painted rock or button for a whimsical door handle.
- Cut and glue artificial grass mat around the reel’s base platform to simulate a lush forest floor.
- Use wood slices and peg dolls to make tiny mushrooms and stepping stones. Paint them or leave natural for a rustic vibe.
- Decorate with bees and butterflies, or ladybugs for added magic.
- Seal everything with outdoor spray sealant if you’re placing it in the garden.
#5. Alice in Wonderland-Inspired Garden Mushroom Chess Set
One of the mushrooms even became a mini chessboard with glued-on pieces!
Materials Needed
- Terrakotta-Blumentöpfe (15–20 cm hoch)
- Kunststoff- oder Keramikschalen (verschiedene Größen)
- Acrylfarben-Set für den Außenbereich (Schwarz, Rot, Weiß)
- Klarlack-Spray für den Außenbereich (matt oder glänzend)
- Heißklebepistole und Klebestifte
- Mini-Schachfiguren (Kunststoff oder Holz)
- Schwarzes Windspiel für den Garten (Blume)
Step-by-Step Guide
- Paint each terracotta pot in red or black. Let dry completely.
- Flip bowls upside down and paint them with your choice of checkerboards, polka dots, or swirls using outdoor paints. Let dry.
- Attach each bowl to a painted pot using hot glue. Hold until secure.
- For one special mushroom, paint a checkerboard grid on top and glue on a few mini chess pieces as decoration.
- Spray everything with a layer of clear outdoor sealer to protect from rain and sun.
- Add a garden spinner flower or any dramatic garden decor nearby to complete the fairytale aesthetic.
#6. Upside-Down Planter Mushroom Garden Stools
- Pin It
With their polka-dotted caps, these adorable mushrooms look straight out of a whimsical woodland.
Materials Needed
- 3 Servierplatten aus Kunststoff mit Rand (Orange, Blau, Grün – 30 cm Durchmesser)
- 3 große Pflanztöpfe aus Kunststoff (25–30 cm breit)
- Weiße Bastelfarbe oder Punktaufkleber
- Starker Outdoor-Kleber oder Gorilla Glue
- Klares Acryl-Versiegelungsspray
Step-by-Step Guide
- Clean and dry your planter pots and plastic platters thoroughly. Paint or spray the pots white if they aren’t already.
- Add polka dots to the platter tops using white craft paint or stickers. Let dry fully.
- Apply a thin line of strong adhesive around the top rim of each pot and press the platter onto it upside-down to form the mushroom cap.
- Once dry, spray each mushroom with acrylic sealer for water resistance.
- Set them among plants or mulch to create a magical fairy ring effect in your garden!
#7. Whimsical Mosaic Mushroom
- Pin It
The sparkle from sunlight hitting the glossy tiles is magical. It’s a perfect way to upcycle old dishes or tiles while adding a pop of art to your outdoor space.
Materials Needed
- Betonmischung (4,5 kg, schnellhärtend)
- Große Schüssel oder gewölbter Behälter (25–30 cm breit)
- Plastikflasche oder PVC-Rohr (13–15 cm hoch)
- Fliesenkleber oder Dünnbettmörtel
- Fugenmörtel (mit oder ohne Sand, weiß oder grau)
- Verschiedene Mosaikfliesen oder zerbrochene Keramikstücke
- Klares Versiegelungsspray (für den Außenbereich geeignet)
- Schutzhandschuhe + Schwamm
Step-by-Step Guide
- Mix and pour concrete into your dome mold and bottle mold to create the cap and stem. Let both cure for 24–48 hours, then carefully remove from molds.
- Use tile adhesive to attach red tiles onto the cap and beige/gray tiles onto the stem. Add circular white tiles or paint for dot details. Let dry completely.
- Grout the entire surface with a sponge, wipe away excess, then allow it to cure. Finish with a coat of clear outdoor sealant for shine and durability.
#8. Polka Dot Bowl Cap Garden Mushrooms
- Pin It
These oversized garden mushrooms add a fun cartoonish vibe to the garden and hold up well in both sun and rain.
Materials Needed
- 3 Kunststoffschüsseln (rot, grün, rosa – 23–28 cm Durchmesser)
- 3 Äste (60–90 cm hoch, 8–10 cm dick)
- Weiße Bastelfarbe
- Holzsockel oder Pflanzkasten
- Konstruktionskleber oder starker Heißkleber
- Optional: Moosplatte oder Spanisches Moos
Step-by-Step Guide
- Paint white polka dots on your plastic bowls and let them dry completely. This makes the “mushroom caps” pop and adds charm.
- Drill or glue each branch/stem firmly into the wooden base, spacing them at different angles and heights.
- Use construction adhesive to attach each bowl upside-down on top of a branch to form your mushroom cap.
- Cover the base with moss for a natural look. Place it anywhere outdoors – by the fence, under a tree, or right in your flower bed!
#9. Rustic Coco-Fiber Garden Mushrooms
These cozy, woodland-inspired mushrooms were one of the easiest yet most satisfying garden crafts I’ve ever made.
Materials Needed
Step-by-Step Guide
- Paint the metal pipes with black textured spray paint and let them dry completely. The rough texture gives them a tree-like look.
- Flip the coco liner bowls upside-down and apply strong outdoor glue around the center. Firmly press the top of each pipe onto the inside of the bowl and allow to cure overnight.
- Using a rubber mallet, insert each mushroom stem into your garden soil at a slanted angle for a more organic, natural effect.
#10. Stardust Garden Mushrooms
- Pin It
These stunning blue-hued garden mushrooms look like they landed straight from another galaxy.
Materials Needed
Step-by-Step Guide
- Paint the wooden dowels using white outdoor spray paint and let them dry fully. These will be your mushroom stems.
- Flip each ceramic or glass bowl upside-down and use heavy-duty adhesive to glue the top of each dowel to the center of a bowl. Allow to cure overnight.
- Spray a clear outdoor sealant over the finished mushrooms for long-term shine and protection. Then, insert each mushroom into the soil by gently hammering in the dowels.
#11. Enchanted Glow Mushroom Pathway
- Pin It
I made these for my shaded garden path, and honestly, the soft light makes it feel like a magical forest at dusk.
Materials Needed
- Warmweiße LED-Lichterkette (solarbetrieben, 50+ Glühbirnen)
- Plastiklöffel oder weiße Einweg-Schnapsgläser (50 Stück)
- Schwarzer oder grüner Blumendraht (22 Gauge)
- Heißklebepistole und Klebestifte
- Drahtschneider oder stabile Schere
- Optional: Gartenstecker
Step-by-Step Guide
- Cut and bend floral wire to your desired mushroom height (6–10 inches works well). Use hot glue to attach a plastic spoon bowl (cut off the handle) or a shot glass over each LED bulb to form the mushroom cap.
- Twist or wrap the wire stems around the light strand spacing evenly, adjusting the height for a natural cluster effect. Glue the LED into the cap if needed for secure fit.
- Place the entire set along garden borders, moss beds, or under shrubs. Secure each wire stem into the soil, and hide the solar panel where it receives light.
#12. River Rock Garden Mushroom
- Pin It
If your garden’s missing a little magic, this stone mushroom might be exactly what it needs.
Materials Needed
- 1 mittelgroße Glasschale (20–25 cm Durchmesser)
- 1 Glasvase (15–20 cm hoch)
- 1,5–2 kg verschiedene polierte Flusssteine (2,5–5 cm)
- Wasserfester Kleber (E6000 oder ähnlich)
- Reinigungsalkohol und fusselfreies Tuch
Step-by-Step Guide
- Begin by wiping the bowl and vase thoroughly with rubbing alcohol. This removes dust and oil so the stones stick securely.
- Flip the bowl upside down and glue river stones one by one starting from the bottom edge, slowly working toward the top. Do the same with the vase, placing smaller stones near the top and larger ones near the base for a natural look.
- Once both are dry and set (allow 6–8 hours), attach the vase (stem) to the center of the upside-down bowl (cap) with a generous bead of glue. Let cure overnight.
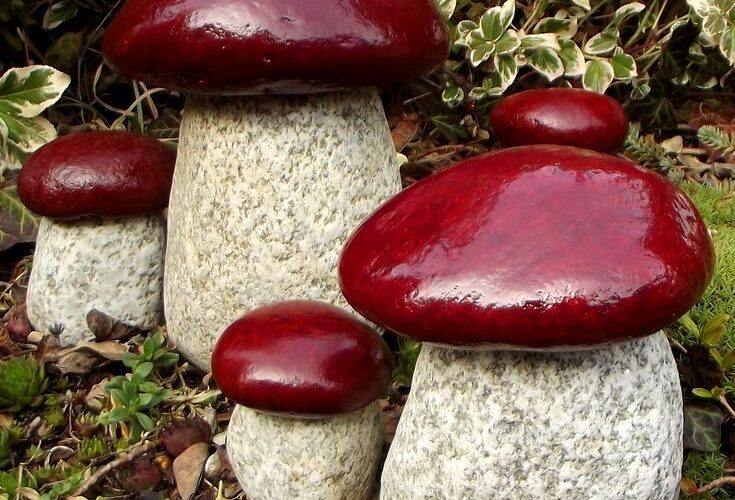
#13. Painted Stone Toadstool Family
- Pin It
The contrast between the bold red tops and the natural stone texture is so satisfying.
Materials Needed
- 5–6 glatte, flache Steine (10–20 cm breit)
- 5–6 abgerundete, aufrechte Steine oder Ziegel (15–25 cm hoch)
- Acrylfarbe für den Außenbereich in Dunkelrot
- Wetterfestes Versiegelungsspray
- Starker Konstruktionskleber oder Epoxidkleber
- Pinsel (1 mittelgroßer, flacher Pinsel + 1 Pinsel mit Detailspitze)
Step-by-Step Guide
- Rinse and dry all rocks thoroughly. If needed, lightly sand flat surfaces where the top and base will join for better adhesion.
- Paint only the tops of the cap stones with red acrylic paint. You may need 2–3 coats for full coverage. Let each coat dry fully before applying the next. Once dry, spray with clear sealant and allow to cure for 24 hours.
- Using strong outdoor adhesive, attach the painted “cap” to the flat side of the “stem” stone. Press and hold firmly, then let it cure for at least 6 hours before moving.
#14. Shimmering Glass Mushroom Pair
- Pin It
These glowing glass mushrooms are pure joy to make and they light up your garden with a whimsical, fairy-tale feel.
Materials Needed
- Glasschalen (15–20 cm breit)
- Strukturglasvasen (10–13 cm hoch)
- Flache Glasmurmeln oder Cabochons (450 g, verschiedene Größen)
- Acrylfarben-Set (glassicher)
- E6000 Kleber oder starker Glaskleber
Step-by-Step Guide
- Clean and dry the bowls and vases. Paint the inside of each bowl with a glass-safe acrylic paint. Let it dry completely – 2–3 coats may be needed for vibrancy.
- Using strong adhesive, attach glass marbles evenly around the top of each bowl, and dots or spots if desired. Let cure overnight.
- Attach the bowl to the upside-down vase using E6000 glue. Center it carefully for balance.
#15. Glass Garden Mushroom Sculptures
- Pin It
These dazzling glass mushrooms are weather-resistant, low-maintenance, and budget-friendly if you shop secondhand or raid your kitchen! No power tools needed, just a bit of glue and a creative eye.
Materials Needed
- Farbige Glasschalen – eine pro Pilz
- Glasvasen für Knospen
- Starker, wasserfester Kleber (z. B. E6000)
- Optional: Solar-Gartenleuchten
Step-by-Step Guide
- Clean your glassware thoroughly, removing any labels or residue. Let them dry completely before assembling.
- Apply a generous ring of E6000 glue around the rim of the vase, then gently press the bowl upside down on top to form the mushroom cap. Let it cure for 24 hours.
- Place your mushrooms directly into garden beds, rock corners, or use as patio art.
#16. Cute Wooden Toadstool Garden Marker
- Pin It
This charming little wooden toadstool is weather-resistant, easy to customize, and perfect for lining pathways, hiding among herbs, or adding to fairy corners.
Materials Needed
- Pilz-Ausschnitt aus Holz (15–20 cm)
- Rote Acrylfarbe für den Außenbereich
- Weiße Farbe für den Außenbereich oder Malstift
- Feines Schleifpapier (120er Körnung)
- Wetterfestes Klarlack-Spray
- Kleine Bastelpinsel (Detailset)
Step-by-Step Guide
- Start by lightly sanding your wooden mushroom cutout to remove rough edges and splinters. Wipe clean with a dry cloth.
- Paint the cap portion red, and the base/stem white. Let dry for about 30 minutes or until fully set.
- Using a detail brush or white paint pen, add dots of various sizes to the red cap. Go freehand for a whimsical look or use a round sponge brush for perfect circles.
- Once dry, apply a generous coat of clear weatherproof sealant to make sure your mushroom lasts through rain and shine.
#17. Forged Copper Spoon Mushrooms
- Pin It
These vibrant garden mushrooms are made from upcycled copper spoons, and I’ll be honest—they might be my favorite little accents in the whole garden.
Materials Needed
- Vintage Kupferlöffel (5–10)
- Metallfarbe – Außenbereich/Rostschutz
- Klarlack für Außenbereich
- Feinschleifpapier (400–600er Körnung)
- Hammer und Handtuch
Step-by-Step Guide
- Prep your copper spoons by gently scrubbing off any oxidation with fine sandpaper. You can leave some patina if you want that aged look to peek through.
- Use a hammer to shape the spoon bowls into dome-like mushroom caps. Some can stay rounded; others can be gently flattened for variety.
- Paint the tops of the caps with outdoor metal paint. Think vivid colors—red, orange, cobalt, even a bit of gold! Add speckled white dots for a whimsical feel.
- Let everything dry completely, then apply a layer of clear matte sealer. This protects your paint and lets the copper develop its natural patina slowly.
#18. Whimsical Paper Mâché Mushroom Garden
- Pin It
Whether you’re building a fairy tale scene for kids or just love playful art, this project offers color, joy, and a little personality to your garden.
Materials Needed
- Pappmaché-Paste (oder selbstgemacht mit Mehl und Wasser)
- Zeitungspapier oder braunes Kraftpapier
- Luftballon oder Plastikschüssel (30 cm Durchmesser)
- Karton-Versandrolle (30–45 cm hoch)
- Acrylfarben (rot, weiß, grün, braun)
- Heißklebepistole und Klebestifte
- Dekoratives Zubehör: Raupenspielzeug, Kunstblumen, Schmetterlingsdeko
- Steckschaumunterlage oder Holztafel (25 cm im Quadrat)
- Klarer Acryl-Sprühversiegler
Step-by-Step Guide
- Inflate a balloon or flip a bowl upside down. Layer it with strips of paper and paste to form the mushroom cap. Apply 3–4 layers, letting each dry fully.
- Use a mailing tube or thick roll as the stem. Cover it with paper mâché for texture and strength.
- Once dry, paint the cap red and the stem white. Add signature white dots using a sponge or round brush.
- Mount both parts together using hot glue, and secure them onto a foam or wooden base.
- Attach decorative elements: a smiling caterpillar peeking from the cap, a butterfly on a side mushroom, and plenty of faux greenery and flowers.
- Seal the whole sculpture with a coat of clear outdoor spray to weatherproof it.
#19. Whimsical Tie-Dye Garden Mushrooms
- Pin It
If you love a little magic in your garden, these colorful mushrooms bring all the fairytale charm you could want.
Materials Needed
Step-by-Step Guide
- Clean and dry your metal bowls, then flip them over and spray paint each one with layered bursts of color. Try holding cans at various angles for a soft blend.
- Once dry, coat the bowls with clear sealant spray to protect against rain and sun damage.
- Attach each bowl to a wooden post or log using construction adhesive. You can also drill and screw from inside the bowl into the wood for extra hold.
- Press the wooden stems into the soil at various angles for a natural look.
#20. Glowing Fairy Mushroom Lamps
- Pin It
I made mine using plastic bowls, sheer curtain fabric, and battery-powered lights, and the soft ambient lighting they give off at night is honestly magical.
Materials Needed
- Rührschüsseln aus Kunststoff (25–30 cm Durchmesser)
- Batteriebetriebene LED-Lichterkette
- Gardine oder Tüll (weiß, 1,8 m)
- Stabile, durchsichtige Plastikfolie oder großes Einmachglas (15–20 cm hoch)
- Acrylfarben-Set (rot & weiß)
- Künstliches Moos oder dekorative Farne
- Klebepistole & -stifte
- Doppelseitiges Klebeband oder Klebehaken
- Weiße Plakatwand oder Schaumstoffplatte (optional)
Step-by-Step Guide
- Flip the plastic bowl upside down and paint it red with large white spots to mimic a toadstool cap. Let it dry thoroughly.
- Wrap a clear container or a plastic cylinder in sheer fabric, securing it with a glue gun to create the mushroom stem.
- Insert LED fairy lights inside the stem cylinder, taping them to the inner wall or tucking between layers of fabric.
- Place the cap on top, either gluing it on or making it removable for battery access.
- Decorate the base edge with moss or faux greenery for that forest-floor look.
#21. Giant Cement Toadstools
- Zusammenhängende Posts
These oversized white mushrooms look like they sprouted right out of a fairytale forest. I made a trio using cement and a few upcycled items from my garage.
Materials Needed
- Schnellbetonmischung (4,5–7 kg pro Pilz)
- Kunststoffeimer (20–30 cm breit)
- PVC-Rohr (60–90 cm lang, 7,5 cm Durchmesser)
- Frischhaltefolie oder altes Handtuch
- Weiße Acrylfarbe für den Außenbereich oder Fassadenfarbe
- Betonkleber (optional)
- Arbeitshandschuhe + Rührstab
Step-by-Step Guide
- Mix the quick-set concrete according to instructions. Spray your bucket and PVC pipe lightly with cooking spray or rub with oil so the molds release easily.
- Pour the concrete into the bucket (cap) and the upright pipe (stem). Cover the top of the cap mold with plastic wrap and gently press to create ridges and wrinkles like a mushroom. Let cure 24–48 hours.
- Once set, remove molds. Use strong concrete adhesive if attaching caps to stems. Then, paint the entire mushroom with white weatherproof paint. Let it dry fully before placing outdoors.
#22. Mini Stick and Clay Garden Mushrooms
- Pin It
I placed mine in a wooden planter box, and now it looks like a tiny enchanted grove that fairies might visit at night.
Materials Needed
- Air Dry Clay (White or Red, 1 lb)
- Acrylic Paint Set (Red, White)
- Twigs (about 3–5 inches long)
- Small Wooden Planter Box (6–8 inches)
- Reindeer Moss or Decorative Moss Mat
- Hot Glue Gun + Glue Sticks
- Paint Sealer Spray (optional)
Step-by-Step Guide
- Rollen Sie kleine Stücke lufttrocknenden Tons zu Kuppeln für die Pilzkappen. Machen Sie 10–15 in verschiedenen Größen. Lassen Sie sie 24 Stunden trocknen.
- Sobald die Kappen trocken sind, bemalen Sie sie rot und fügen Sie mit Acrylfarbe weiße Punkte hinzu. Versiegeln Sie sie mit Klarlackspray, wenn Sie sie im Freien aufstellen möchten.
- Während die Farbe trocknet, nimm deine Zweige und schneide sie auf ähnliche Längen. Befestige die Kappen mit Heißkleber auf jedem Zweig.
- Füllen Sie Ihre Holzkiste mit Moos und drücken Sie dann jeden Pilz in die Moosunterlage. Befestigen Sie ihn bei Bedarf mit Heißkleber an der Unterseite.
#23. Wunderlicher Mosaik-Gartenpilz
- Zusammenhängende Posts
Wie das Glas das Sonnenlicht reflektiert und Regentropfen einfängt? Zauberhaft! Falls du noch Reste von früheren Bastelprojekten übrig hast, ist dies die perfekte Verwendungsmöglichkeit.
Benötigte Materialien
- 6–8 Zoll Glas- oder Keramikschüssel
- Schnell abbindende Betonmischung (1–2 lbs)
- Mosaikfliesenstücke oder Glassteine (verschiedene Farben)
- Fliesenkleber
- Fugenmörtel (vorzugsweise vorgemischt)
- Einweghandschuhe + Fugenschwamm
- Versiegelungsspray (für den Außenbereich geeignet)
Schritt-für-Schritt-Anleitung
- Mischen Sie schnell abbindenden Beton und gießen Sie ihn in einen hohen Plastikbehälter oder eine Form, um den Pilzstiel zu formen. Lassen Sie ihn vollständig aushärten (normalerweise 24 Stunden), nehmen Sie ihn dann heraus und legen Sie ihn beiseite.
- Reinigen Sie Ihre Schüssel gründlich. Befestigen Sie Mosaikfliesen, Edelsteine oder Spiegelstücke mit Fliesenkleber an der Außenfläche.
- Sobald der Kleber getrocknet ist (mindestens 12 Stunden), tragen Sie Fugenmörtel auf die gesamte Oberfläche auf und drücken Sie ihn in alle Risse. Wischen Sie überschüssigen Mörtel mit einem Fugenschwamm ab und lassen Sie ihn trocknen.
- Besprühen Sie das gesamte Stück mit einem für den Außenbereich geeigneten Versiegelungsmittel, um es vor Witterungseinflüssen und Verblassen zu schützen
- Zusammenhängende Posts