Egal, ob Sie ein Siedler, Gärtner oder einfach jemand sind, der gerne clevere Heimwerkerarbeiten erledigt: Das Sammeln von Regenwasser ist eine der einfachsten Möglichkeiten, Geld zu sparen, Ressourcen zu schonen und Ihrem Außenbereich mehr Charme zu verleihen.
In dieser Liste finden Sie 19 kreative Ideen zum Sammeln von Regenwasser, die nicht nur funktionieren, sondern dabei auch noch toll aussehen.
Von rustikalen Fässern bis hin zu skulpturalen Fallrohren und netzunabhängigen Anlagen beweist jedes Projekt, dass Funktionalität und Schönheit durchaus Hand in Hand gehen können.
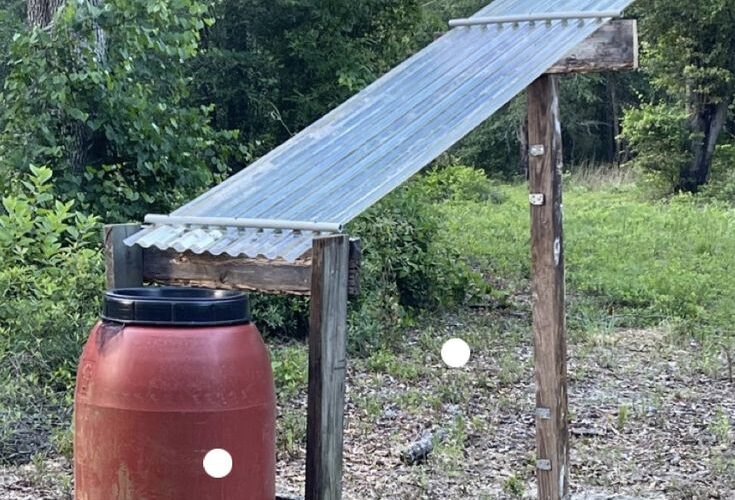
#1. Doppelfass-Überlauf-Regenstation
Dank eines kompakten Welldachs, das in eine primäre rote Tonne und eine sekundäre graue Überlauftonne mündet, geht Ihnen selbst bei einem starken Regenguss kein Wasser verloren.
Benötigte Materialien:
- 2 Regentonnen (je 55 Gallonen)
- Welldachplatten (Metall oder Kunststoff)
- 4 Holzpfosten (10 x 10 cm, 1,8 m hoch)
- 8–10 Holzbretter (2″x4″)
- Dachrinne oder Fallrohr
- Schlauch (1–1,5 Zoll Durchmesser, für Überlauf)
- Schlauchschelle
- Zapfensatz
- Schrauben, Klammern
- Säge, Bohrer, Schraubendreher
Schritt-für-Schritt-Anleitung:
Schritt 1: Bauen Sie einen einfachen Rahmen aus vier Holzpfosten und Querbalken, um das Dach zu stützen. Heben Sie eine Seite leicht an, damit das Wasser abfließen kann. Befestigen Sie ein Wellblechdach darauf.
Schritt 2: Stellen Sie die Hauptregentonne auf eine stabile Palette oder Plattform unter der Dachkante. Installieren Sie ein Fallrohr oder eine Dachrinne, um das Regenwasser in die Tonne zu leiten.
Schritt 3: Bohren Sie oben am ersten Fass ein Überlaufloch und schließen Sie einen Schlauch an, der zum zweiten Fass führt. Befestigen Sie ihn mit einer Klammer.
Schritt 4: Bringen Sie am unteren Teil jedes Fasses einen Zapfhahn an, um den Zugang zum Wasser zu erleichtern, und versiegeln Sie anschließend alle Anschlüsse, um Lecks zu vermeiden.
#2. Erhöhter Regenfasssammler
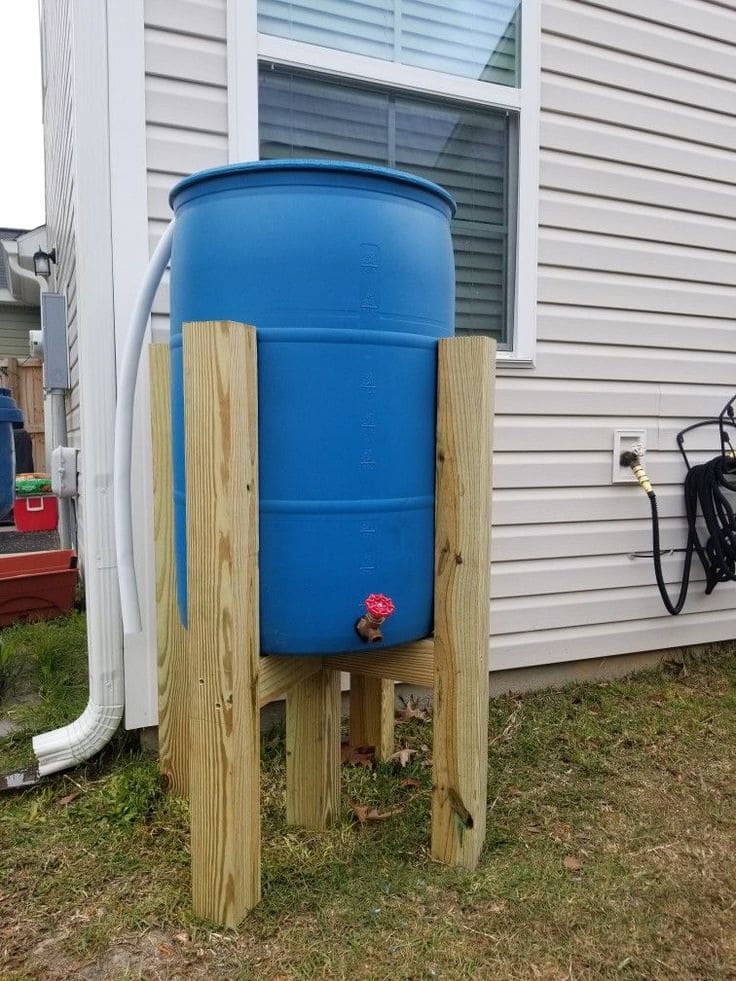
Manchmal sind die einfachsten Ideen die effizientesten. Diese erhöhte Regentonne nutzt einen stabilen Holzständer, um die Tonne anzuheben und so den Wasserdruck durch die Schwerkraft zu erhöhen.
Benötigte Materialien:
- 1 blaues 55-Gallonen-Kunststofffass
- 4 druckimprägnierte Holzpfosten (4″x4″, 3–4 Fuß)
- 2–3 Holzstützbretter (2″x4″)
- Zapfensatz
- Schrauben oder Zuganker
- Bohrer, Säge, Schraubenschlüssel
- Fallrohrumlenkung oder flexibles Rohr
Schritt-für-Schritt-Anleitung:
Schritt 1: Bauen Sie einen quadratischen Ständer mit den vier Holzpfosten als Beinen und 2×4 Brettern zur Verstrebung in der Mitte und am Boden. Stellen Sie sicher, dass der Ständer eben und stabil ist.
Schritt 2: Stellen Sie das Fass senkrecht auf den Ständer. Markieren und bohren Sie unten ein Loch für den Zapfhahn, setzen Sie ihn ein und verschließen Sie ihn fest.
Schritt 3: Schließen Sie die Dachrinne oder das Fallrohr mithilfe eines Umlenkstücks oder eines flexiblen Rohrs an die Oberseite des Fasses an. Stellen Sie sicher, dass das Wasser sauber in das Fass geleitet wird.
Schritt 4: Optional können Sie oben ein kleines Überlaufloch bohren und einen Schlauch anschließen, um überschüssiges Wasser von Ihrem Fundament wegzuleiten.
#3. Regentonnenfänger für Gewächshausbänke
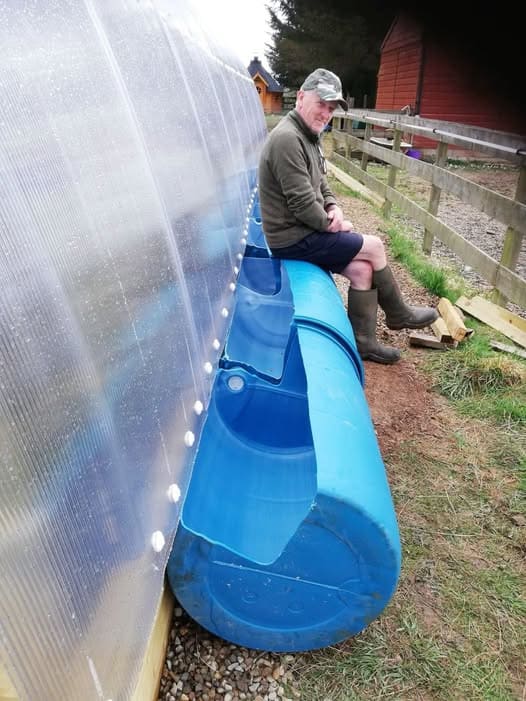
This upcycled rain barrel bench is more than just a place to sit, it’s a smart, sustainable way to collect water while making the most of your greenhouse setup.
Materials Needed:
- 2 or more 55-gallon plastic barrels (standard size: 35″ height x 23″ diameter)
- Jigsaw
- Drill
- Screws or bolts (1″–2″)
- Waterproof sealant
- Brackets (optional)
- Fine sandpaper
Step-by-step Guide:
Step 1: Place the barrels on their sides where rain naturally flows off your greenhouse or shed. Use chalk or marker to outline a large U-shaped section across the top.
Step 2: Carefully cut along the outline using a jigsaw. Remove the section and sand the cut edges.
Step 3: Push the barrels snug against the structure to collect rain runoff. Use wood planks or brackets to secure them in place if needed.
Step 4: Add a drainage hole or faucet at one end if you want to redirect or store the collected water.
#4. Funnel-Top Rain Barrel Collector
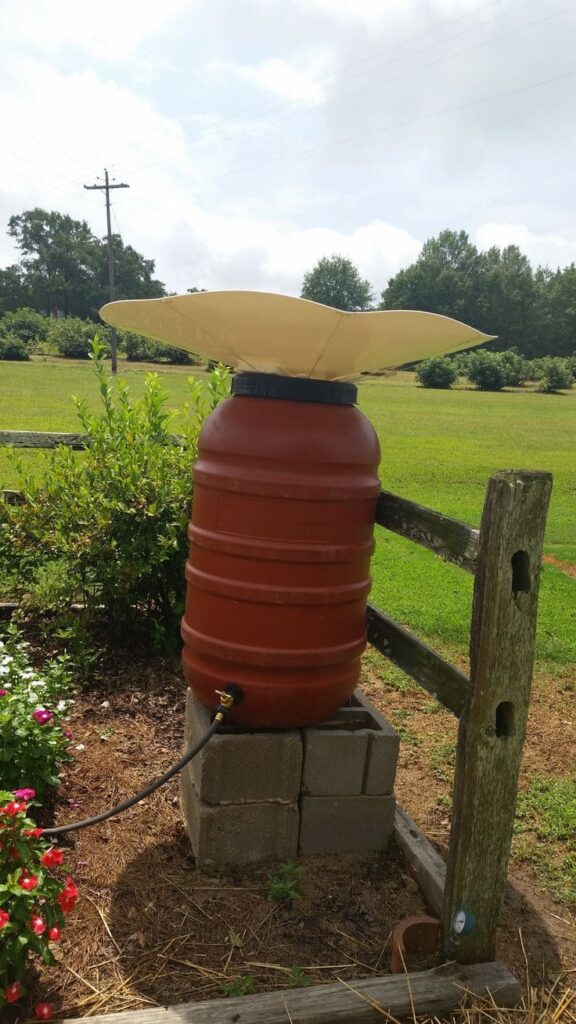
Perched on top of a red barrel, the wide plastic basin captures even light rainfall and channels it straight into the tank.
Materials Needed:
- 1 red 55-gallon plastic barrel
- Wide plastic funnel or rigid basin (3–4 ft diameter)
- Hose bib/spigot
- 4 concrete blocks
- Hose (optional)
- Drill, sealant
Step-by-step Guide:
Step 1: Place the barrel on a sturdy base made from stacked concrete blocks. This gives height for hose pressure and spigot access.
Step 2: Drill a hole near the base and install a spigot, sealing tightly to prevent leaks. Attach a hose if needed for garden use.
Step 3: Cut or adjust the barrel lid to allow the funnel to rest securely on top. Make sure the center directs water into the barrel.
Step 4: Secure the funnel with ties or weight if in a windy area, and position the setup in an open spot with good sky exposure.
#5. Heavy-Duty IBC Tote Rain Collector
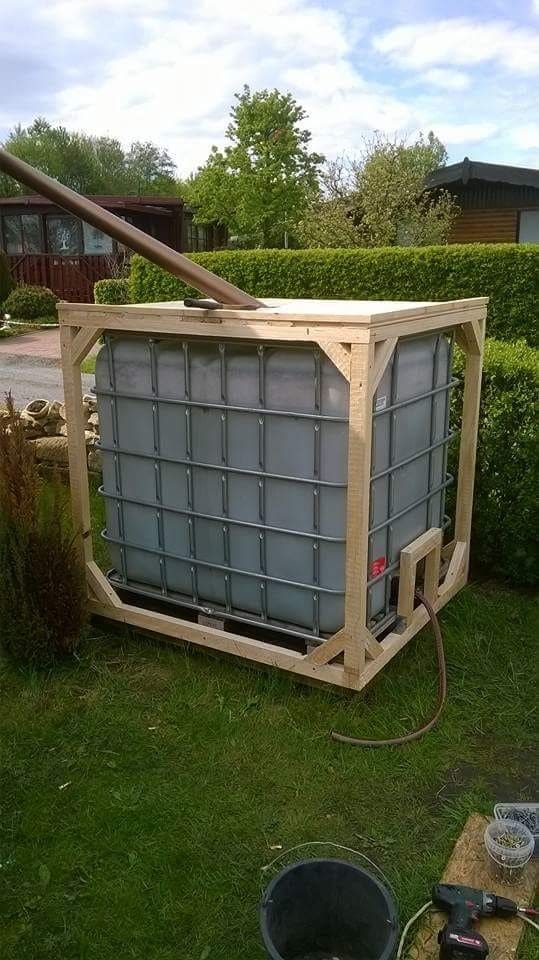
When serious water storage is your goal, an IBC (Intermediate Bulk Container) tote is the way to go. This setup features a massive 275-gallon tank encased in a custom wood frame for added strength and stability.
Materials Needed:
- 1 IBC tote (275 or 330-gallon capacity)
- 2″–3″ diameter PVC pipe or downspout
- 6–8 wood beams (2″x4″ and 4″x4″)
- Screws, brackets, and L-plates
- Saw, drill, level
- Hose and fittings
Step-by-step Guide:
Step 1: Build a wooden frame around the IBC tote using 4″x4″ posts for corners and 2″x4″ planks for cross bracing. Use brackets and screws for reinforcement.
Step 2: Position the tote near a roof runoff point. Angle a PVC pipe or downspout from the roof into the tote’s top port to collect rainwater.
Step 3: Ensure the tank is level and stable. Use bricks or pavers underneath if needed.
Step 4: Connect a hose or spigot to the bottom valve for easy water access. Secure all joints and fittings to avoid leaks.
#6. Disguised Downspout Rain Barrel
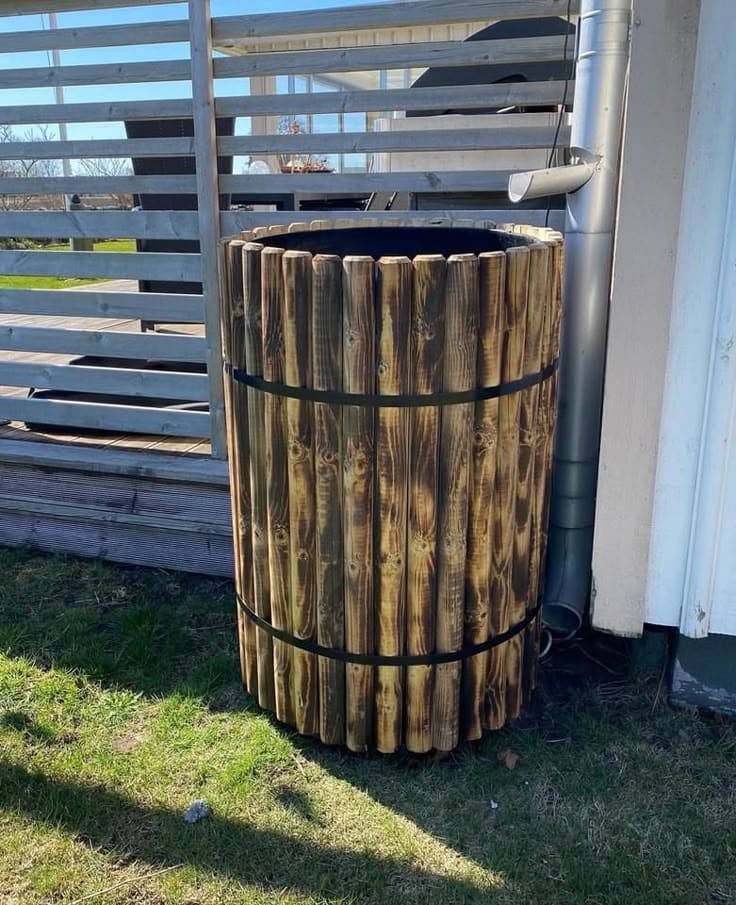
Wrapped in vertically mounted, charred wooden slats and accented with black metal bands, it gives the look of a classic wine cask while functioning as a discreet water storage system.
Materials Needed:
- 1 plastic rain barrel (50–65 gallons)
- 20–30 vertical wood slats
- 2 metal or plastic bands (optional)
- Screws or nails
- Downspout diverter kit
- Drill, saw, woodburner
Step-by-step Guide:
Step 1: Place the barrel under a downspout and install a diverter to feed water directly into it. Cut an opening in the lid if needed.
Step 2: Cut wood slats to match the height of the barrel. Optionally, char the wood using a torch for that beautiful scorched look.
Step 3: Screw or nail the slats vertically around the barrel, spacing them evenly. Wrap metal bands around the top and bottom for a polished finish.
Step 4: Ensure the spigot is still accessible, and test the system during a light rain to check flow.
#7. Vertical Rain Barrel Tower System
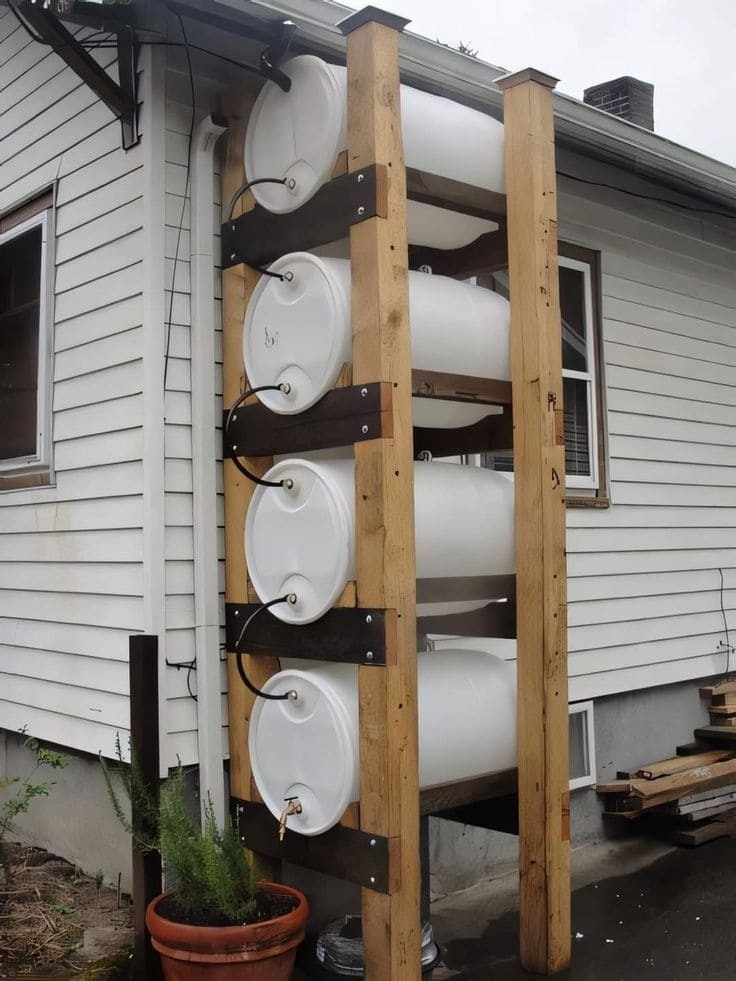
When space is tight but your thirst for rainwater isn’t, this vertical barrel system is a game-changer. Water flows down from the roof through a gutter into the top barrel and connects through tubing into each one below.
Materials Needed:
- 4 white 55-gallon plastic barrels (horizontal placement)
- 4 heavy-duty wooden posts (4″x4″, 8 ft+)
- 8 wooden cross-beams (2″x6″)
- Metal brackets and bolts
- Hose or PVC tubing
- Spigots and fittings
- Gutter
- Drill, saw, wrench
Step-by-step Guide:
Step 1: Build a tall rectangular frame using four vertical posts and cross-beams spaced to hold each barrel horizontally. Reinforce with metal brackets and bolts.
Step 2: Cut holes and install a spigot at the base of the bottom barrel and overflow/drain fittings on each of the others.
Step 3: Stack the barrels on the frame, securing each one between the beams. Connect them using tubing or hose so water flows from the top down.
Step 4: Position a gutter or downspout to feed directly into the top barrel’s inlet. Seal all fittings and connections for watertight flow.
#8. Field Funnel Rain Harvester

Whether you’re collecting water for camping, permaculture, or backwoods emergencies, this setup shows how simplicity can be incredibly effective.
Materials Needed:
- 8–10 bamboo or lightweight wooden poles (6–8 ft)
- Large waterproof fabric (5’x5′ or more)
- Nylon rope
- 1 plastic bucket with lid (2–5 gallons)
- Ground stakes (optional)
Step-by-step Guide:
Step 1: Drive the wooden poles into the ground in a wide circular pattern, creating a teepee-like structure. Tie the tops together with rope.
Step 2: Attach the fabric inside the frame to form a wide funnel. Ensure it’s deep enough to guide water down to a central point.
Step 3: Tie the funnel’s bottom securely above the collection bucket. Make sure the water exits cleanly into the container without leaks.
Step 4: Place the bucket in the center under the funnel. Cover it with a loose lid or mesh to keep debris out while allowing water in.
#9. Decorative Rain Cup Garden Catchers
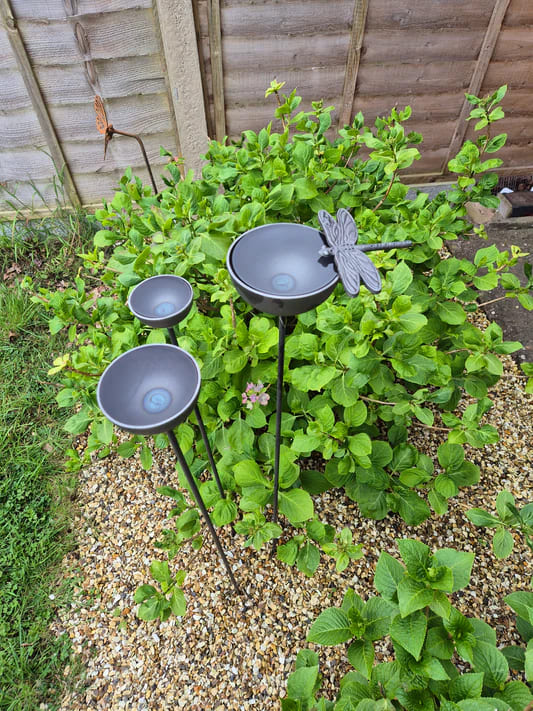
Strategically placed among your plants, these decorative rain catchers collect small amounts of water for pollinators or birds and add a whimsical touch to any flower bed.
#10. Rain Chain Water Catcher
There’s something poetic about this setup. A delicate rain chain leads water from the roof to a beautifully glazed ceramic urn below, turning a simple function into a gentle visual feature.
Materials Needed:
- 1 rain chain (length to match gutter height)
- 1 large glazed ceramic pot (20–30 gallons)
- Small screen (optional)
- Downspout adapter
- Gravel or bricks
Step-by-step Guide:
Step 1: Remove the downspout at the corner of the roof and install a rain chain hanger or hook in its place. Make sure it’s securely anchored.
Step 2: Hang the rain chain so it gently touches or hovers slightly above the base of the container. Adjust the length if needed.
Step 3: Place the large ceramic pot directly beneath the chain. Level the bottom using gravel or bricks if the ground is uneven.
Step 4 (Optional): Add a screen or mesh insert inside the pot to catch leaves or debris while allowing rainwater to collect cleanly.
#11. Hidden IBC Tank with Wooden Privacy Cladding
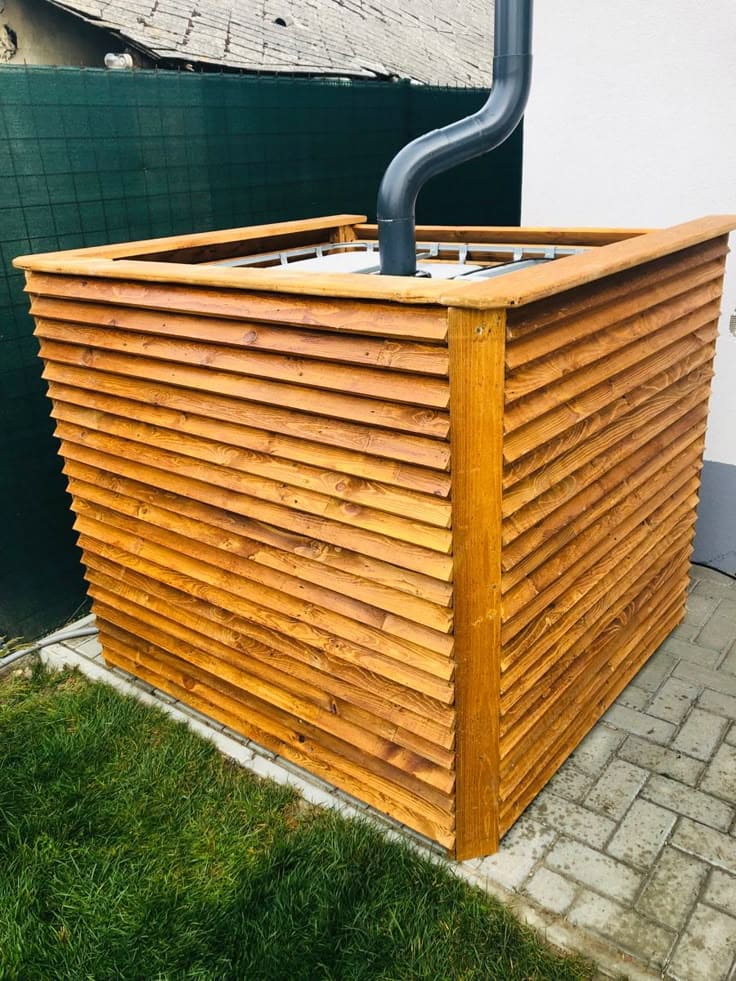
This sleek design disguises a bulky IBC tank with custom slatted wood cladding, turning an industrial solution into a backyard feature.
Materials Needed:
- 1 IBC tote (275–330 gallons)
- 20–30 wooden slats
- 4 corner posts (2″x2″ or 2″x4″)
- Screws and L-brackets
- Downspout
- Drill, saw, level, sealant
Step-by-step Guide:
Step 1: Place the IBC tote on a level concrete or paver surface near your downspout. Ensure the bottom valve is accessible.
Step 2: Build a square wooden frame around the tank using corner posts. Leave top access for the inlet pipe and occasional maintenance.
Step 3: Attach slats horizontally around the frame with even spacing, allowing ventilation and partial visibility if desired.
Step 4: Insert the downspout or pipe directly into the tank’s opening. Add a screen or filter to keep out debris, and seal as needed.
#12. Rainwater Display Tank with Funnel Collector
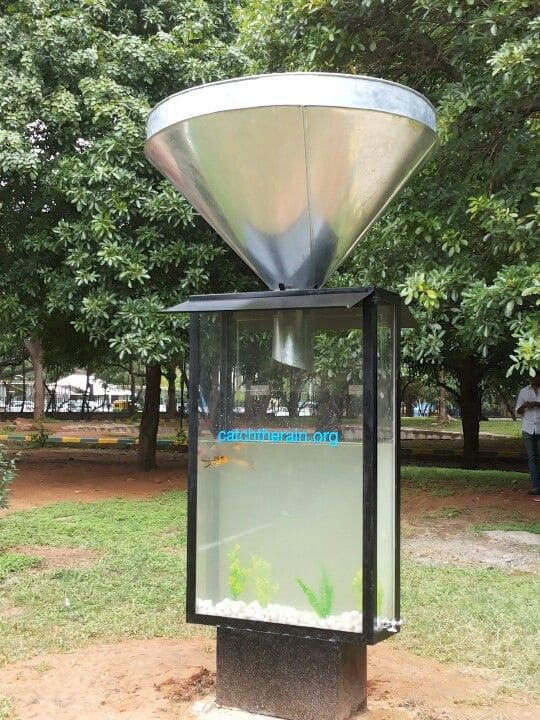
Ideal for parks, schools, or public gardens, this installation educates while it hydrates, showing that rainwater is more than runoff, it’s a life source.
Materials Needed:
- Large metal funnel (2–3 ft diameter)
- Transparent tank (100–200 gallons)
- Vertical steel
- PVC pipe
- Sealant, bolts
- White gravel, aquatic plants, optional fish
Step-by-step Guide:
Step 1: Install a raised frame or pedestal for the tank to ensure visibility and support. Position the funnel directly above the tank opening.
Step 2: Connect the bottom of the funnel to a short PVC pipe that leads into the top of the tank. Seal the connection tightly to prevent leaks.
Step 3: Fill the tank with white gravel and aquatic plants. If adding fish, ensure water is filtered and aerated appropriately.
Step 4 (Optional): Add a water outlet or filtration system near the base to prevent overflow or stagnant water issues.
#13. Tarp Tower Rain Collector with IBC Tank
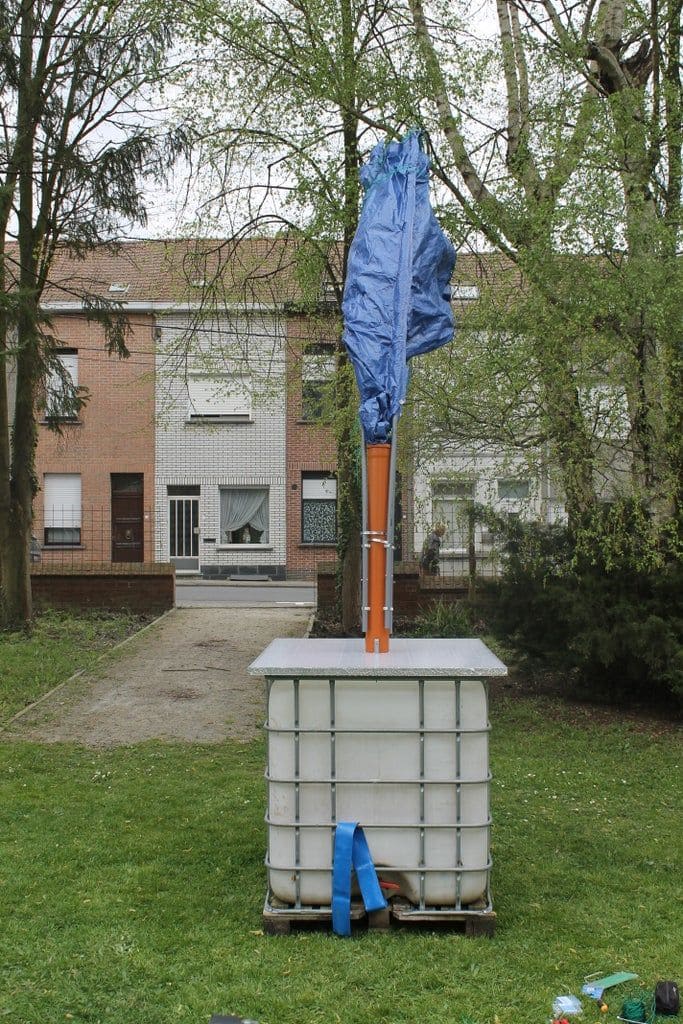
This offbeat yet genius setup captures rain directly from the sky using a suspended tarp that channels water down through a pipe into a large IBC tote.
Materials Needed:
- 1 IBC tote (275–330 gallons)
- Large plastic tarp (6’x8′ or bigger)
- PVC or plastic pipe (2″–3″ diameter)
- Rope
- Mounting post, pole, or sturdy tree limbs
- Drill, sealant
Step-by-step Guide:
Step 1: Stretch the tarp horizontally using rope or bungees between tall poles, trees, or a custom mount. Create a low point at the center to funnel water.
Step 2: Attach the bottom center of the tarp to a PVC pipe that runs downward into the IBC tote’s inlet. Secure tightly to avoid leaks or sagging.
Step 3: Cut a hole in the IBC tote’s top lid to fit the pipe and seal the joint with waterproof adhesive or rubber gasket.
Step 4: Add a spigot or hose at the base of the tank for easy access, and elevate slightly using bricks or a pallet to improve flow.
#14. Off-Grid Rain Roof Catcher
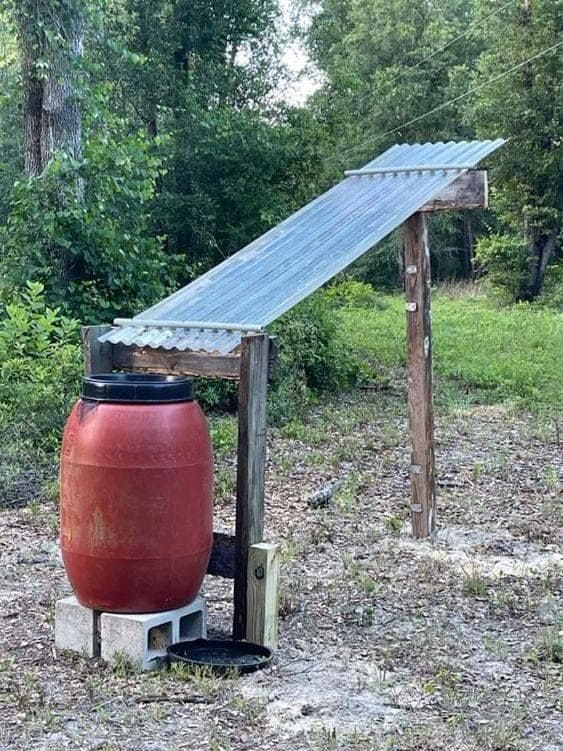
Built with basic wood posts and a few cinder blocks, this setup is perfect for remote gardens, cabins, or prepper zones.
Materials Needed:
- 1 red 55-gallon barrel with lid
- Corrugated metal or plastic roofing panel (6–8 ft long)
- 4 wooden posts (4″x4″, 6–8 ft)
- 2–3 support beams (2″x4″)
- Screws, bolts
- Cinder blocks (2–4, for base)
- Saw, drill, level
Step-by-step Guide:
Step 1: Set two tall posts into the ground for the high end of the roof, and two shorter posts for the lower end. Secure beams between them to hold the roofing panel.
Step 2: Attach the corrugated roofing, angling it downward toward where the barrel will be placed. Ensure the slope is steep enough for water flow.
Step 3: Position the barrel on cinder blocks at the base of the roof to raise it off the ground and improve pressure.
Step 4: Cut a hole in the barrel lid or remove it entirely to allow rain to collect. Optionally, add mesh or a filter to keep debris out.
#15. Zen Rain Chain Basin Catcher
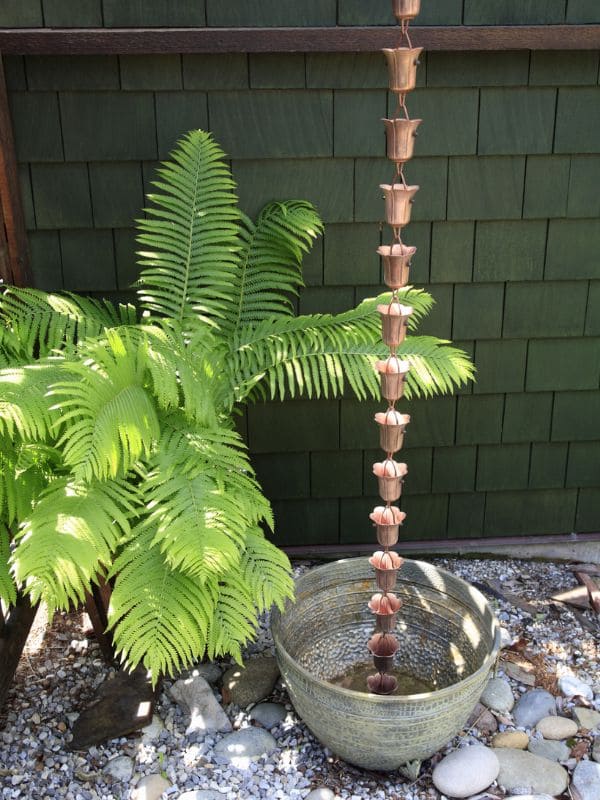
This serene rain-catching idea blends form and function with pure artistry. A copper rain chain funnels water gently into a wide, patterned basin below, framed by river stones and lush greenery.
Materials Needed:
- 1 copper rain chain (length depends on gutter height)
- 1 large decorative basin (15–20 gallons)
- Hook
- Gravel or small stones (optional)
- Downspout adapter
Step-by-step Guide:
Step 1: Choose a spot beneath an existing downspout. Remove the downspout section and install a hook or rain chain adapter in its place.
Step 2: Hang the rain chain so it’s centered over the basin. Adjust its length to reach just above the bottom of the bowl.
Step 3: Position the basin on level ground, adding gravel underneath if needed. You can also surround it with decorative stones for extra charm.
Step 4 (Optional): For cleaner water, place a mesh screen over the basin to catch leaves or debris before they enter.
#16. Gutter-to-Trough Rainwater Reservoir
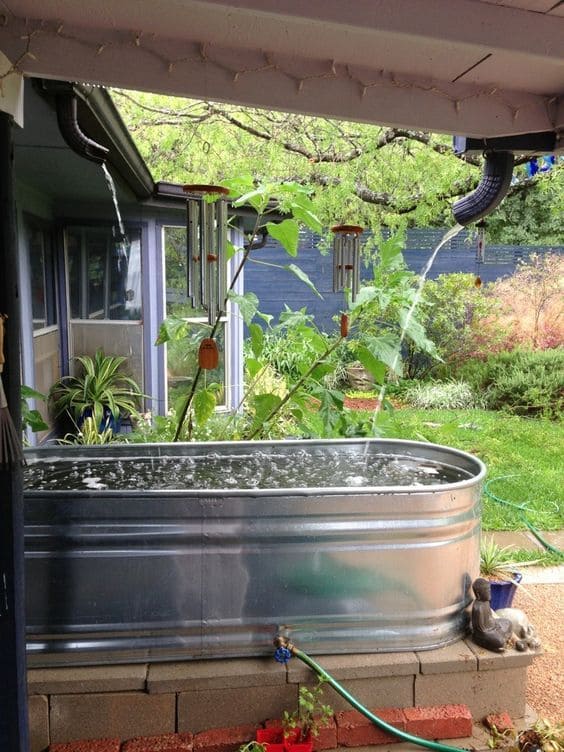
Nestled under the eaves, the tub fills quickly with every storm, and its elevated placement allows for easy hose access.
Materials Needed:
- 1 galvanized steel livestock trough (100–150 gallons)
- 2 flexible downspout extenders
- Concrete blocks or bricks (for raising)
- Hose bib/spigot with sealant
- Hose (optional)
- Drill
Step-by-step Guide:
Step 1: Place the trough on a raised platform made of concrete blocks or bricks. This provides gravity pressure and prevents ground contact.
Step 2: Attach a spigot near the bottom using a watertight seal or washer. Connect a hose if desired for garden use.
Step 3: Install downspout extenders on both sides of the roof, aiming the ends directly into the trough. Adjust for even water flow.
#17. Artistic Downspout Rain Sculpture
As rainwater flows down the abstract, vine-like form, it spirals and glides into a waiting planter below.
Materials Needed:
- Sculptural rain spout (handcrafted copper or weatherproof metal)
- Mounting brackets
- Waterproof sealant
- Planter
- Optional: stones or mesh screen
Step-by-step Guide:
Step 1: Remove the standard downspout from your gutter and install a secure mounting bracket to hold the sculptural rain diverter.
Step 2: Attach the sculptural piece, ensuring it’s angled to follow the natural path of water and flows into your chosen planter or basin.
Step 3: Position the planter or collection container below the final point of flow. Add stones or mesh if you want to filter leaves and debris.
#18. Sheltered IBC Rain Tank System
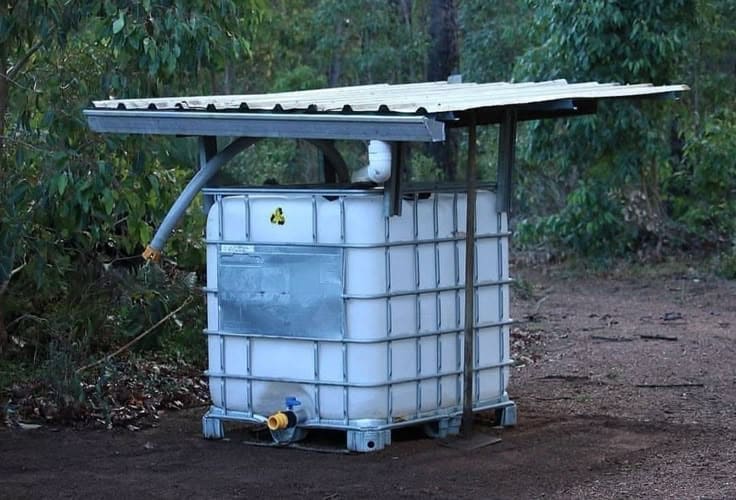
Designed for durability and efficiency, this system combines a large IBC tote with a sloped metal roof to create a high-capacity rainwater collector.
Materials Needed:
- 1 IBC tote (275–330 gallons)
- Corrugated metal roof panel (5’–6′ long)
- 4 support posts (4″x4″)
- PVC pipe or flexible downspout
- Screws, bolts, brackets
- Optional: debris screen, overflow hose
Step-by-step Guide:
Step 1: Build a basic roof structure over the IBC tank using posts and a sloped corrugated metal sheet. Ensure the slope directs water to one side.
Step 2: Connect a PVC pipe or downspout to the roof’s low end and route it into the IBC tank’s top inlet. Seal the joint to prevent splashing or leakage.
Step 3: Place the tote on blocks or pavers for stability and easier access to the bottom spout.
Step 4 (Optional): Add an overflow pipe at the top or a mesh filter over the opening to keep out leaves and insects.
#19. Schwerkraftgespeister erhöhter IBC-Wasserturm
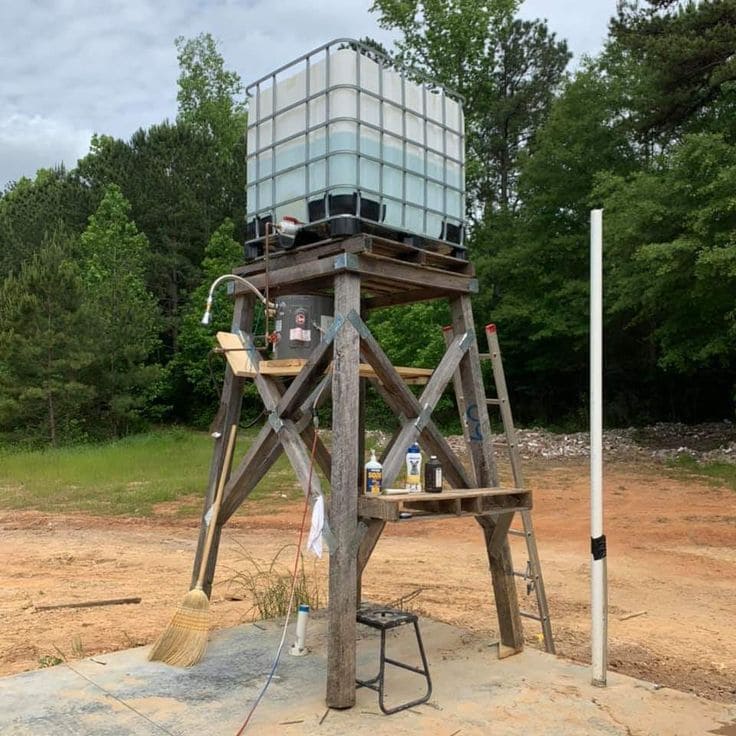
Diese DIY-Anlage ist wie ein Mini-Wasserturm aufgebaut und hebt einen IBC-Tank an, um einen hohen Wasserdruck und eine hohe Wasserspeicherung zu erreichen.
Benötigte Materialien:
- 1 IBC-Behälter (275–330 Gallonen)
- 4–6 druckimprägnierte Pfosten (4 x 4 Zoll, 2,44 m +)
- 8–10 Holzstreben (2″x4″ oder 2″x6″)
- Verzinkte Metallklammern und Bolzen
- Schlauch-, Zapfhahn- oder Wasserhahn-Set
- Bohrer, Säge, Schraubenschlüssel
- Leiter oder Gerüst
Schritt-für-Schritt-Anleitung:
Schritt 1: Bauen Sie einen hohen Stützrahmen mit den 4×4-Pfosten als Beinen und diagonalen Querstreben für mehr Stabilität. Verwenden Sie verzinkte Klammern und Schrauben, um alle Verbindungen zu sichern.
Schritt 2: Erstellen Sie oben eine ebene Plattform mit dicken Brettern, die breit genug ist, um den gesamten IBC-Containerboden zu tragen. Verstärken Sie die Plattform an der Unterseite mit zusätzlichen Streben.
Schritt 3: Heben Sie die Tragetasche vorsichtig an und stellen Sie sie auf die Plattform (verwenden Sie aus Sicherheitsgründen einen Lift oder mehrere Personen).
Schritt 4: Schließen Sie einen Schlauch oder ein Rohr an den unteren Auslass an. Installieren Sie bei Bedarf einen Hahn oder eine Düse für einen kontrollierten Wasserfluss. Sichern Sie das System gegen Wind und Kippen.