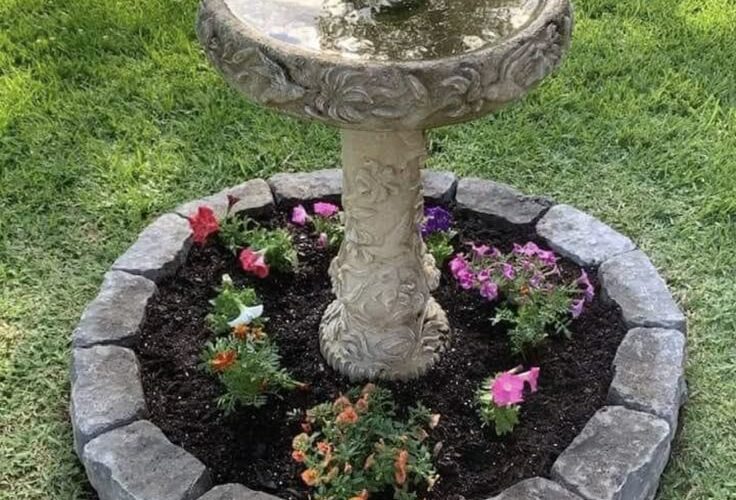
Wenn Ihr Garten etwas zu ruhig ist, fehlt ihm möglicherweise das fröhliche Gezwitscher der Vögel. Ein Vogelbad ist eine der einfachsten Möglichkeiten, Leben, Farbe und sanftes Zwitschern in Ihren Garten zu bringen.
Es geht nicht nur um Ästhetik: Vogelbäder bieten Vögeln einen sauberen, sicheren Ort zum Trinken und Abkühlen, insbesondere in den wärmeren Monaten. Und das Beste daran: Sie müssen nicht viel Geld ausgeben, um eines zu bauen.
Tatsächlich lassen sich viele der schönsten Vogeltränken selbst bauen – aus bereits vorhandenen Gegenständen. Von rustikal bis ausgefallen: Diese 30 einfachen DIY-Vogeltränken-Ideen inspirieren Sie dazu, Ihre eigene Oase für gefiederte Besucher zu gestalten.
Dieser Artikel enthält Affiliate-Links. Wenn du über diese Links einkaufst, erhalte ich möglicherweise eine kleine Provision, ohne dass dir dadurch zusätzliche Kosten entstehen. Vielen Dank für deine Unterstützung!
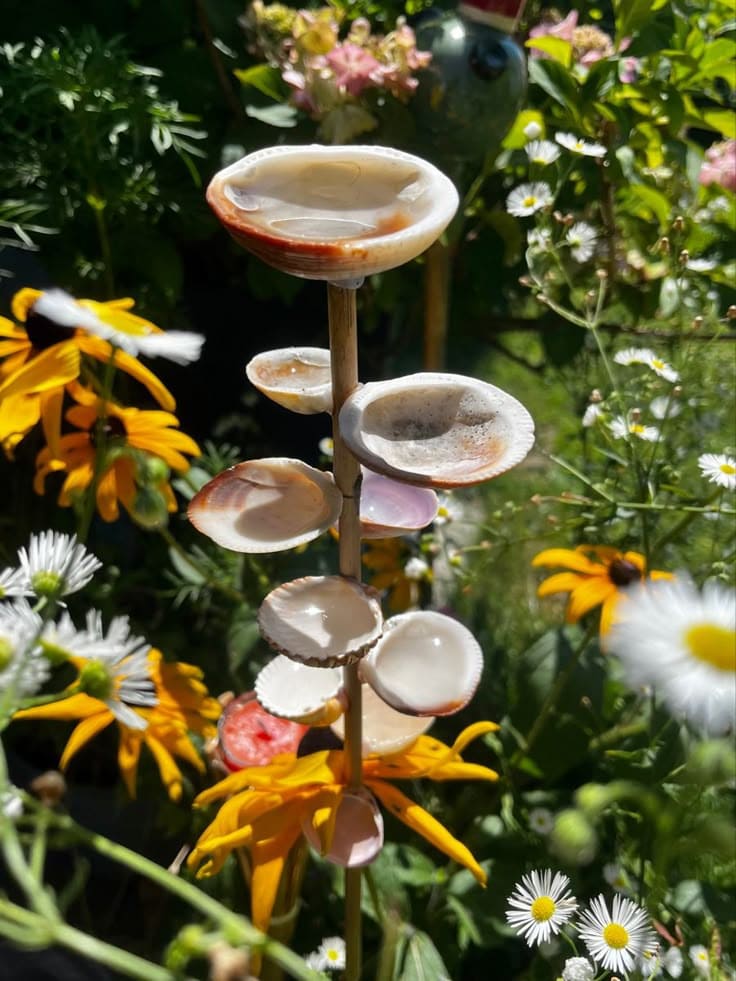
Dieses skurrile Vogelbad fühlt sich an wie ein märchenhafter Wasserturm für Schmetterlinge und kleine Vögel.
Benötigte Materialien
- 10–15 Jakobsmuscheln (5–7,5 cm)
- 1 Bambus-Gartenstab (91–122 cm)
- 1 Tube starker wasserfester Kleber
- Optional: UV-Versiegelungsspray
Schritt-für-Schritt-Anleitung
Schritt 1: Reinigen und trocknen Sie alle Schalen gründlich und entfernen Sie Sand oder Öle, um eine starke Haftung zu gewährleisten.
Schritt 2: Tragen Sie wasserfesten Kleber auf die Unterseite jeder Muschel auf und befestigen Sie sie in Abständen entlang des Pfahls, mit der Spitze nach oben, damit das Wasser nicht austritt.
Schritt 3: Stecken Sie die fertige Skulptur fest in die Erde zwischen Blumen oder Grünpflanzen. Füllen Sie jede Schale mit Wasser.
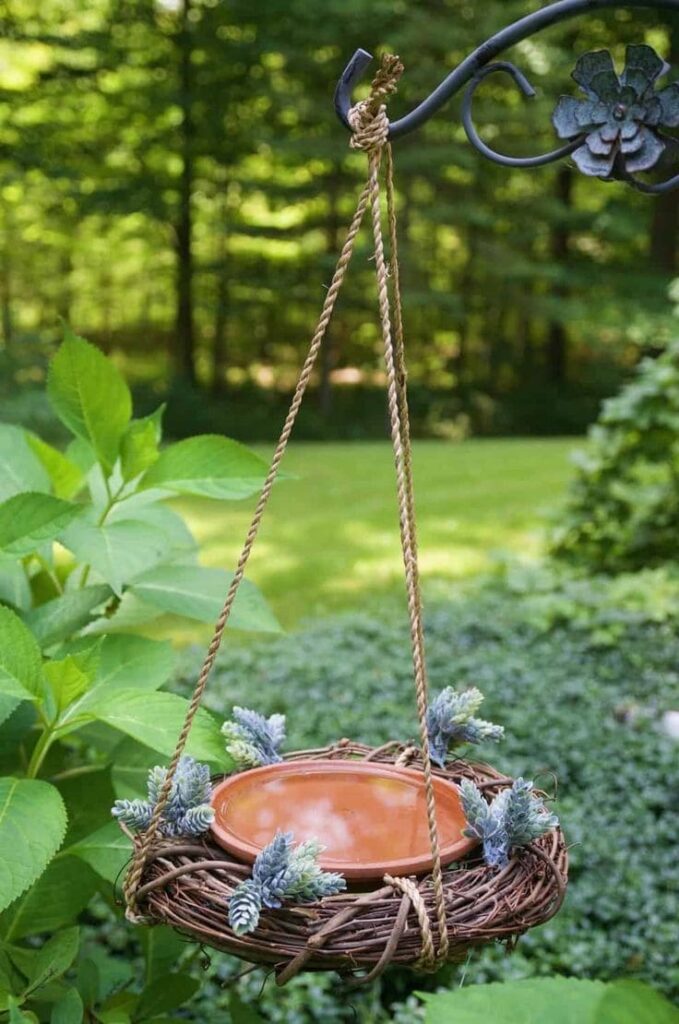
Es hat etwas Friedliches, Vögel zu beobachten, die um ein handgefertigtes Vogelbad herumflattern und sanft in der Brise schwanken.
Benötigte Materialien
- 1 Weinrebenkranz (30–35 cm breit)
- 1 Terrakotta-Untertasse (ca. 25 cm Durchmesser)
- 3 Stücke Juteseil (jeweils etwa 30–36 Zoll lang)
- 1 S-Haken
- Optional: künstliche Sukkulenten, Tannenzapfen
Schritt-für-Schritt-Anleitung
Schritt 1: Platzieren Sie den Terrakotta-Untersetzer in der Mitte des Weinrebenkranzes. Achten Sie darauf, dass er fest sitzt. Für zusätzliche Stabilität können Sie Heißkleber oder Silikonkleber darunter auftragen.
Schritt 2: Schneiden Sie drei gleichmäßige Stücke Juteseil ab und verteilen Sie sie gleichmäßig um den Kranz. Binden Sie sie fest, führen Sie die Enden zusammen und verknoten Sie sie zu einer Aufhängeschlaufe.
Schritt 3: Fügen Sie Verzierungen wie künstliche Sukkulenten oder Tannenzapfen hinzu und hängen Sie Ihr Vogelbad dann an einen stabilen Ast.
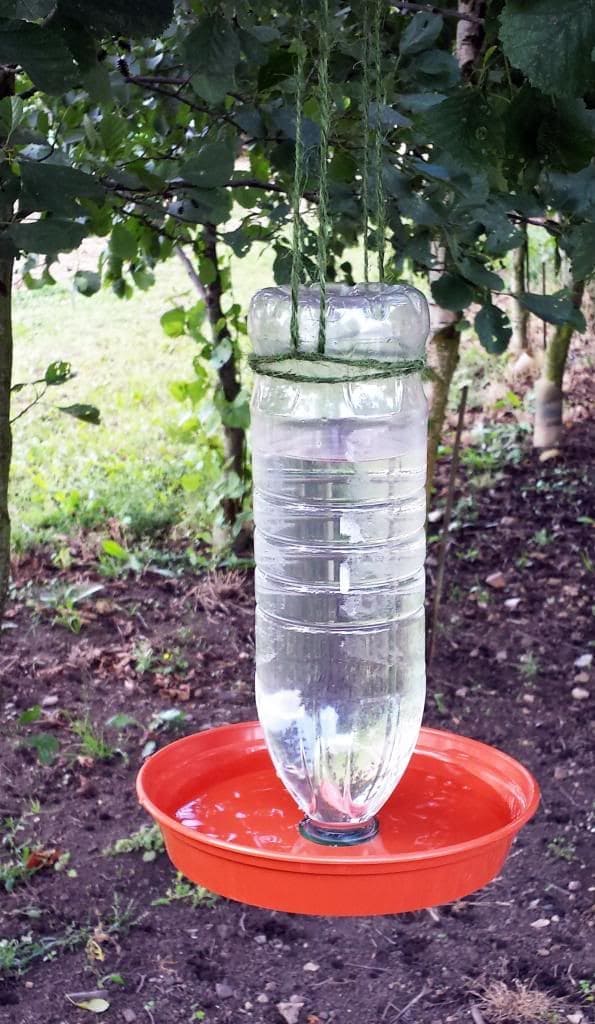
Dieses praktische und preisgünstige Vogelbad ist eine geniale Möglichkeit, eine Plastikflasche wiederzuverwenden und Vögeln gleichzeitig eine konstante Wasserquelle zu bieten.
Benötigte Materialien
- 1 saubere Plastikflasche, ca. 1–2 Liter
- 1 Plastikuntertasse (ca. 20–25 cm breit)
- Heißklebepistole
- Zeichenfolge
- Optional: kleine Schraube
Schritt-für-Schritt-Anleitung
Step 1: Clean and dry your bottle thoroughly. Drill or pierce a small hole in the center of the bottle cap to allow slow water release.
Step 2: Glue the bottle upside down to the center of the plastic saucer. Ensure the bottle’s mouth is slightly above the bottom of the saucer.
Step 3: Wrap twine around the top of the bottle securely and tie four strings to create a hanger. Knot them at the top to form a loop.
Step 4: Fill the bottle with water, screw the cap back on, flip it quickly, and hang it from a tree branch or hook.
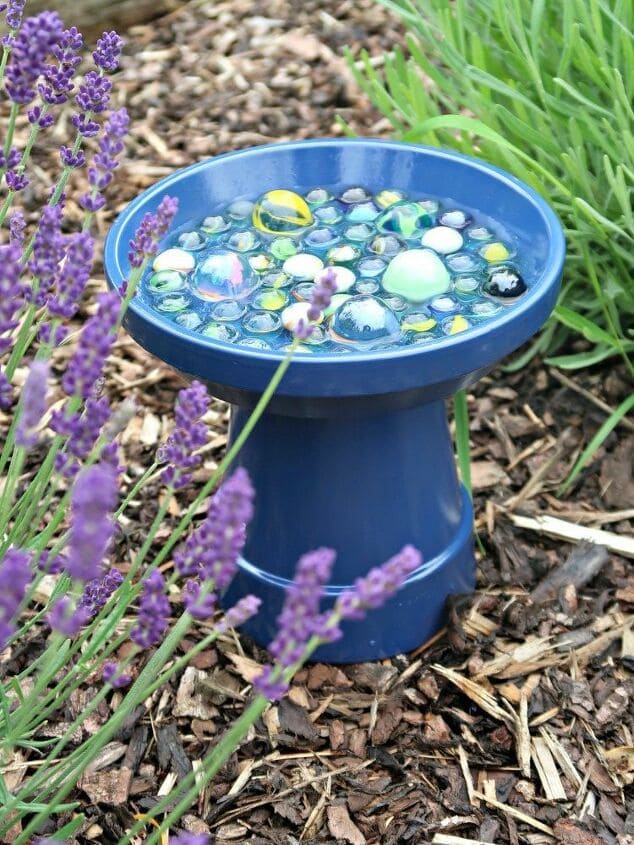
This colorful little gem is more than just a water feature, it’s a bee lifesaver. I added it to my flower bed, and now it sparkles in the sun while offering a safe sipping station for bees and butterflies.
Materials Needed
- 1 plant saucer (approx. 8–12 inches)
- 1 terracotta pot (6–8 inches tall)
- 1 bag of flat glass marbles
- Optional: outdoor adhesive
Step-by-step Guide
Step 1: Choose a sunny garden spot and place the pot upside down to serve as a stable base. Optionally glue the saucer to the bottom of the pot for wind resistance.
Step 2: Fill the saucer with the marbles or stones. These give bees a dry landing spot so they don’t drown.
Step 3: Add just enough water to cover the bottom layer of marbles. Refill regularly and clean as needed.
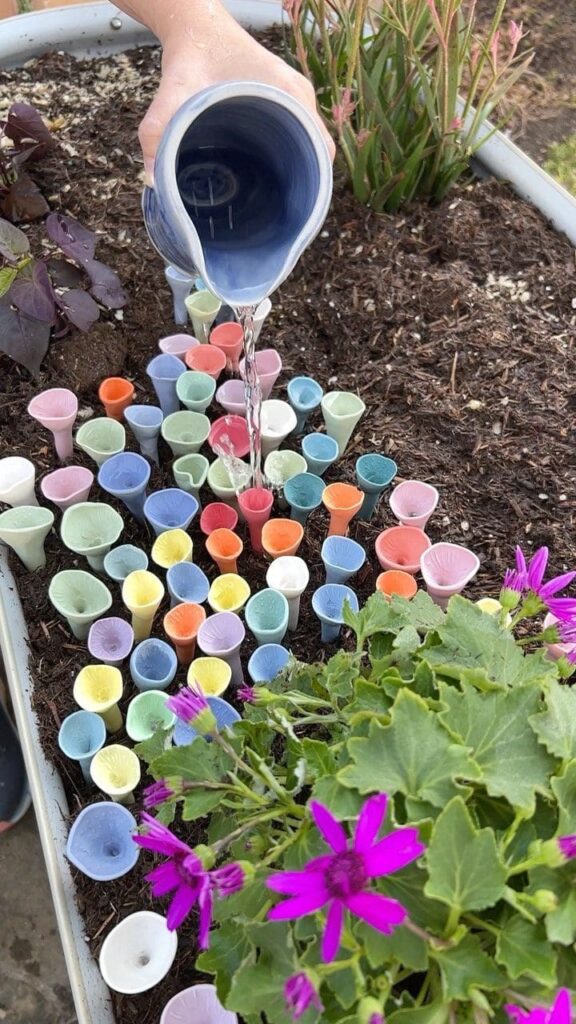
Each little cone becomes its own miniature watering hole, forming a mosaic-like gathering space for birds and pollinators.
Materials Needed
- 50 insect drinking cups
- Potting soil
- Watering pitcher
- (Optional) Clear waterproof adhesive
Step-by-step Guide
Step 1: Select a sunny, visible patch in your garden bed or planter box. Flatten and level the soil where the cones will sit.
Step 2: Press the bases of each ceramic cone firmly into the soil. Arrange them close together in a clustered pattern.
Step 3: Add a few drops of adhesive if needed for balance, especially if your area experiences heavy wind or animal activity.
Step 4: Pour water gently into the cones. Fill them halfway to prevent overflow and allow birds and bees to sip safely.
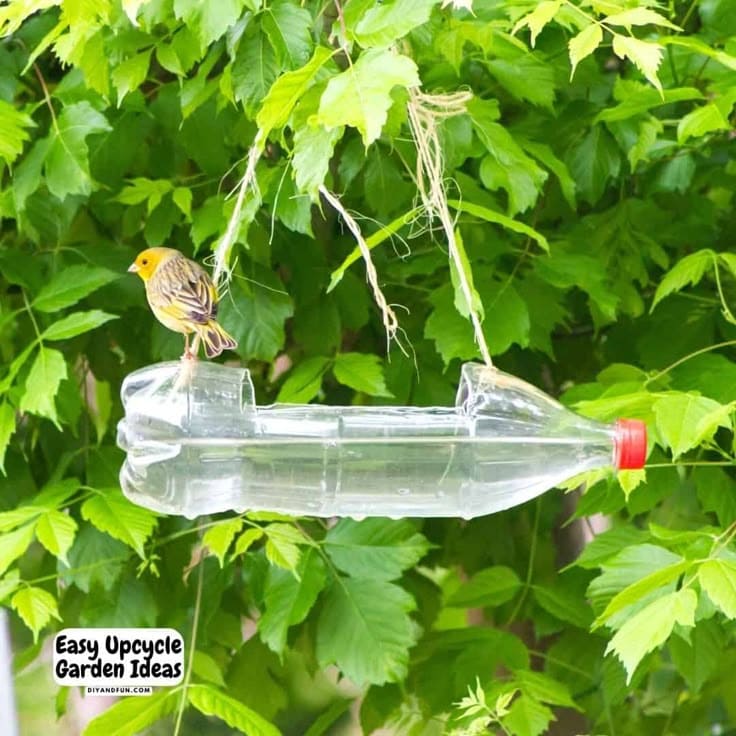
With just a used soda bottle and some twine, you can create a charming, functional birdbath that gives both birds and the environment a little love.
Materials Needed
- 1 empty 2-liter plastic bottle
- Sharp craft knife
- Twine (about 2–3 feet)
- Hole punch
- Optional: mini eye hooks
Step-by-step Guide
Step 1: Cut an oval section from one side of the bottle, leaving at least 2 inches of edge around the bottom for water retention. Smooth any rough edges.
Step 2: Punch or poke 2 holes at the top (neck area) and opposite side of the bottle for the string.
Step 3: Thread the twine through both holes and knot it securely. Create a loop for hanging, then fill with a shallow layer of clean water and hang it from a low tree branch.
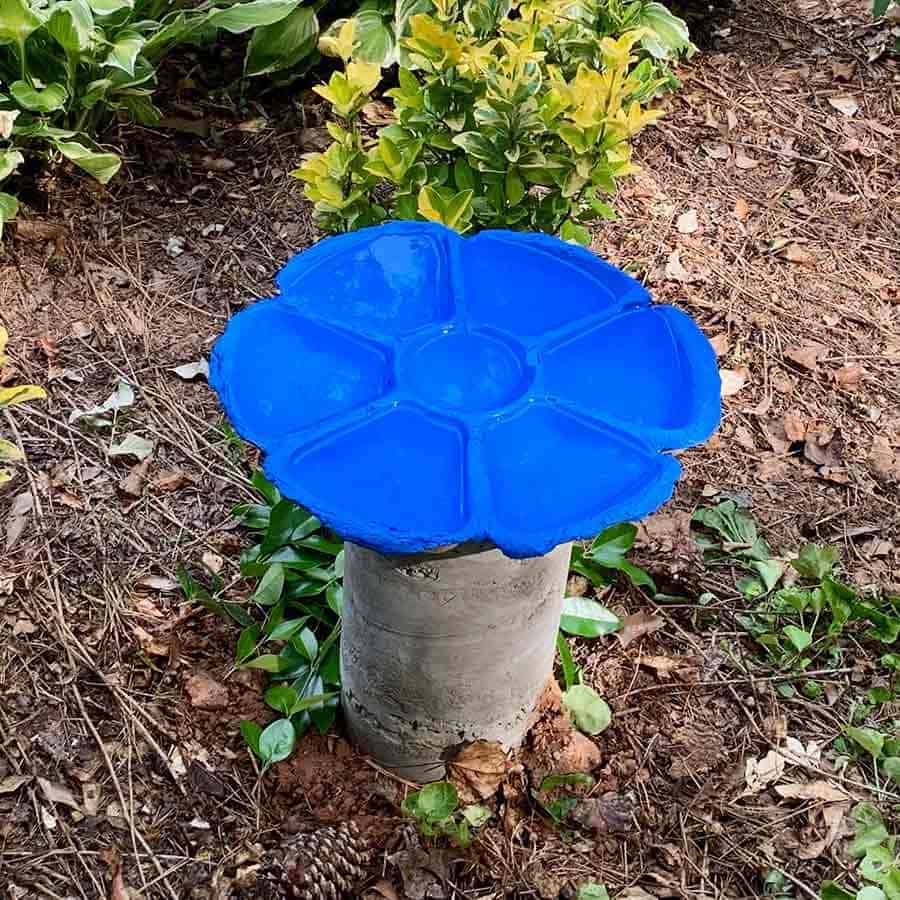
It’s crafted with concrete and a repurposed serving tray or mold, proving that garden decor can be both strong and striking.
Materials Needed
- Flower plastic serving tray
- 10–15 lbs concrete mix
- Large PVC pipe (about 10–12 inches tall)
- Outdoor acrylic paint
- Cooking spray
Step-by-step Guide
Step 1: Spray the flower tray with cooking oil so the concrete doesn’t stick. Mix the concrete and pour it into the mold, tapping it gently to remove bubbles.
Step 2: Pour another batch of concrete into your tube or form to create a sturdy base. Insert a piece of rebar in the center to connect with the top. Let both parts dry for 24–48 hours.
Step 3: Once cured, remove the mold and paint the flower top with your favorite bold color. Let it dry completely.
Step 4: Use strong outdoor adhesive to attach the top to the pedestal securely.
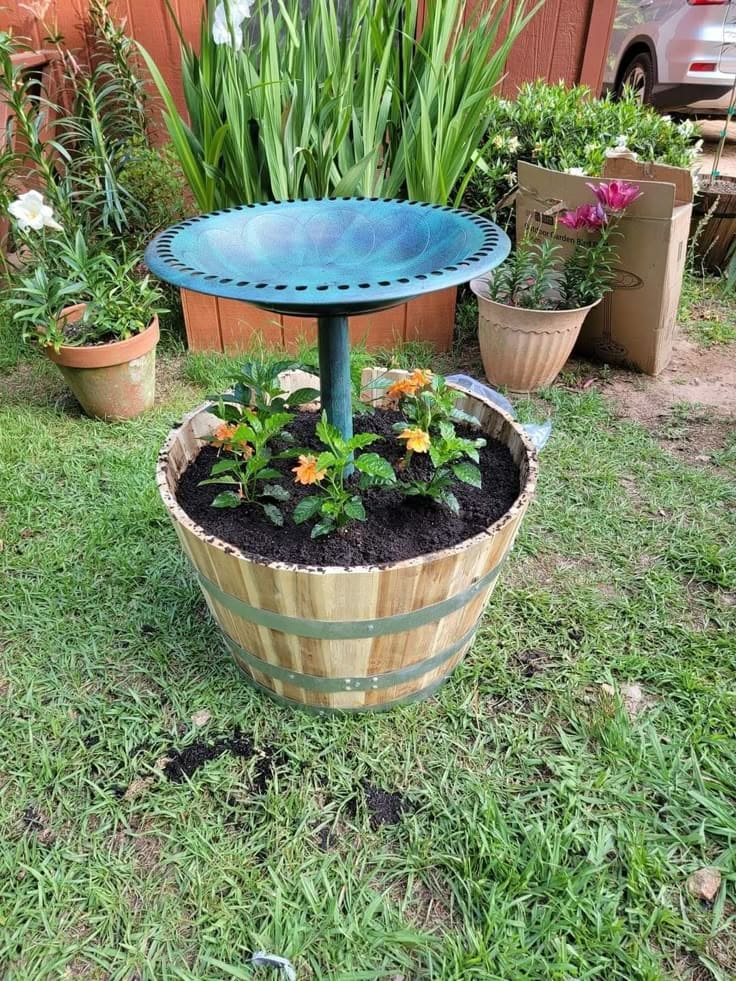
The raised dish gives birds a safe place to splash and sip, while flowers below add color and attract even more pollinators.
Materials Needed
- Wooden half barrel planter (approx. 18–24 inches wide)
- Shallow birdbath bowl
- Potting soil (2–3 cubic feet)
- 6-10 flowers
- Gravel (optional)
Step-by-step Guide
Step 1: Fill the bottom of the barrel with drainage material if needed, then add potting soil nearly to the top.
Step 2: Center the pole in the middle and stabilize it securely by packing soil around it, then place the birdbath dish firmly atop the pole. Make sure it’s level.
Step 3: Plant flowers or seeds around the base, water them, and fill the birdbath with fresh water. Position in a sunny, visible spot for both function and flair.
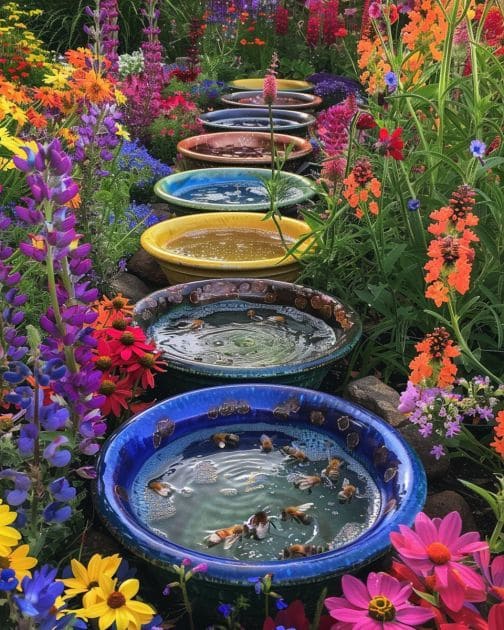
This striking row of brightly colored ceramic basins transforms a garden path into a sanctuary. Each bowl, filled with water and nestled among wildflowers, acts as a standalone birdbath and pollinator oasis.
Materials Needed
- 8 colorful plastic wash-tubs
- Smooth river stones (optional)
- Garden hose
- Mulch (optional)
Step-by-step Guide
Step 1: Clear a garden path or flower bed space, then nestle each bowl into the soil or atop mulch so they’re secure and slightly elevated.
Step 2: If desired, place a few river rocks inside each bowl for bees to land safely.
Step3 4: Fill with clean water daily, especially during warm months, and enjoy the stream of winged visitors this radiant layout attracts.
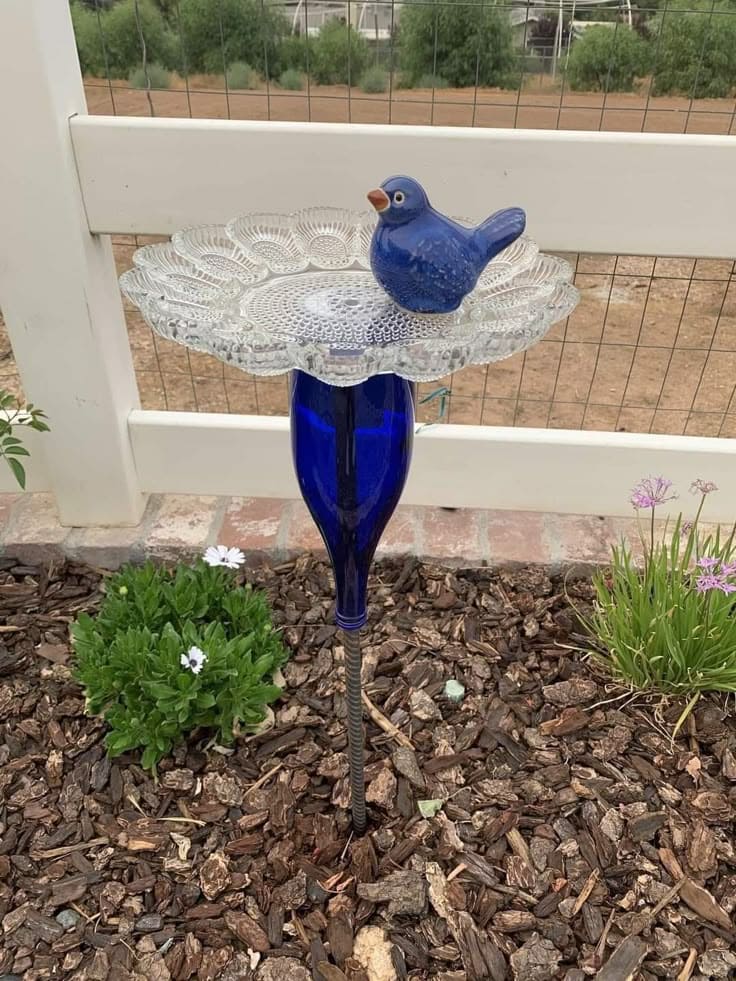
With a deep cobalt blue wine bottle as the stand and a vintage-look glass plate on top, it catches the light beautifully and offers birds a stylish spot to drink and dip.
Materials Needed
- 1 blue wine bottle (750ml or larger)
- 1 clear patterned glass plate (10–12 inch diameter)
- 1 small resin bird figurine (optional)
- Waterproof adhesive
- 1 sturdy garden stake
Step-by-step Guide
Step 1: Use waterproof adhesive to glue the center of the glass plate to the top of the bottle opening. Let it cure for at least 24 hours.
Step 2: Insert a metal rod into the ground for support, and slide the bottle securely over it. This prevents tipping.
Step 4: Optionally, glue a ceramic bird on the rim for a whimsical touch. Fill the plate with water and let your feathered visitors enjoy their new perch.
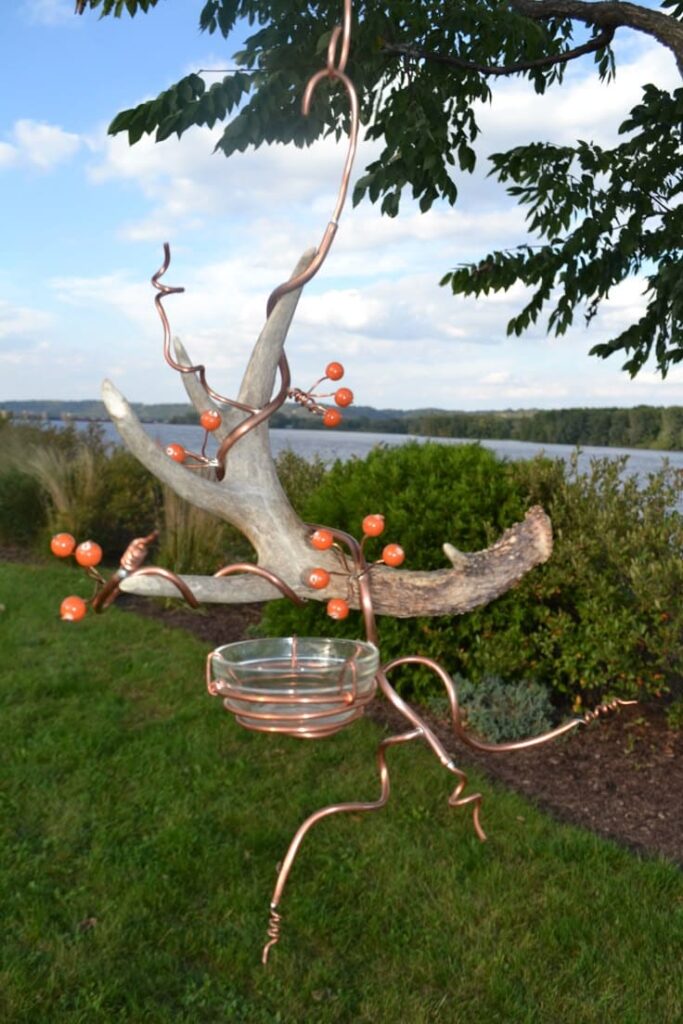
Wrapped in copper and accented with vibrant faux berries, the natural antler base gives it a woodland fantasy vibe.
Materials Needed
- 1 tree branch
- 1 glass bowl (about 4–6 inches in diameter)
- 3–5 ft of copper craft wire, 12–14 gauge
- Decorative berries
- Strong glue (optional)
Step-by-step Guide
Step 1: Wrap your antler with copper wire in a flowing, organic pattern. Use pliers to shape the wire securely around the antler’s curves.
Step 2: Wrap more copper wire into a ring to cradle your glass bowl. Make sure the bowl is snug and level.
Step 3: Add faux berries to the wire frame for decoration, then attach the wire ends to a hook and suspend the piece from a sturdy tree limb or pergola.
Hung near a window or in a quiet tree, it gives birds a safe nook for snacking and shelter.
Materials Needed
- 1 ceramic teapot
- 1 sturdy metal hook
- 1 nylon rope, approx. 12–24 inches
- Birdseed mix
- Optional: ceramic adhesive
Step-by-step Guide
Step 1: Thoroughly clean and dry the teapot, then tie or attach a ropesecurely around the handle, making sure the teapot hangs evenly.
Step 2: Fill the teapot’s base with birdseed. Avoid overfilling to prevent spillage through the spout.
Step 3: Hang the feeder from a tree branch in a quiet spot that gets some sun but offers cover from wind.
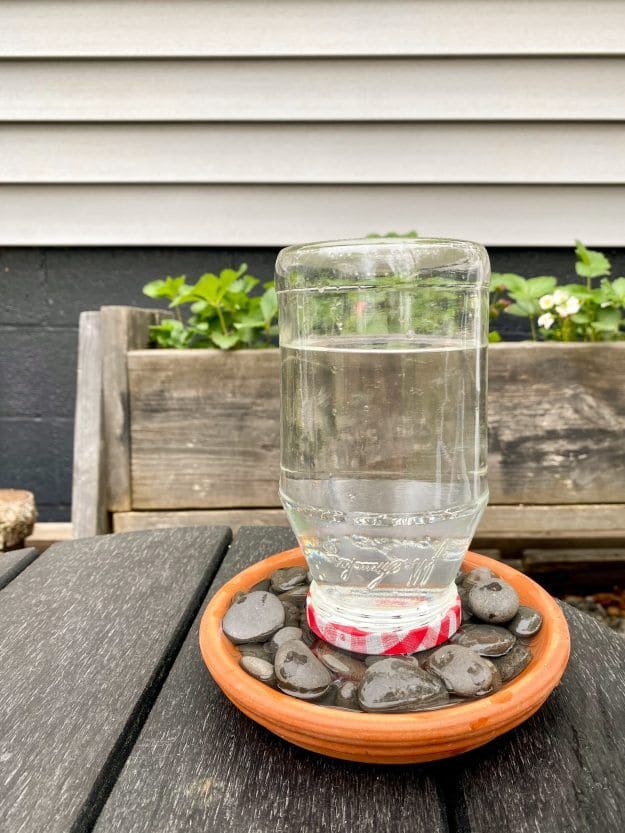
I made this simple auto-refill bird water station using a jar from my pantry and a plant saucer I already had. It’s a compact setup but incredibly helpful for hot days.
Materials Needed
- 1 glass jar with lid (preferably 16–32 oz)
- 1 small terra cotta saucer, approx. 6–8 inches wide
- River pebbles
- Optional: small hand drill
Step-by-step Guide
Step 1: Clean the jar thoroughly and fill it with water, then use a drill to make one or two small holes in the lid (this controls water flow).
Step 2: Flip the jar upside down and place it in the center of the saucer.
Step 3: Surround the base with smooth stones to hold the jar and create perches for birds.
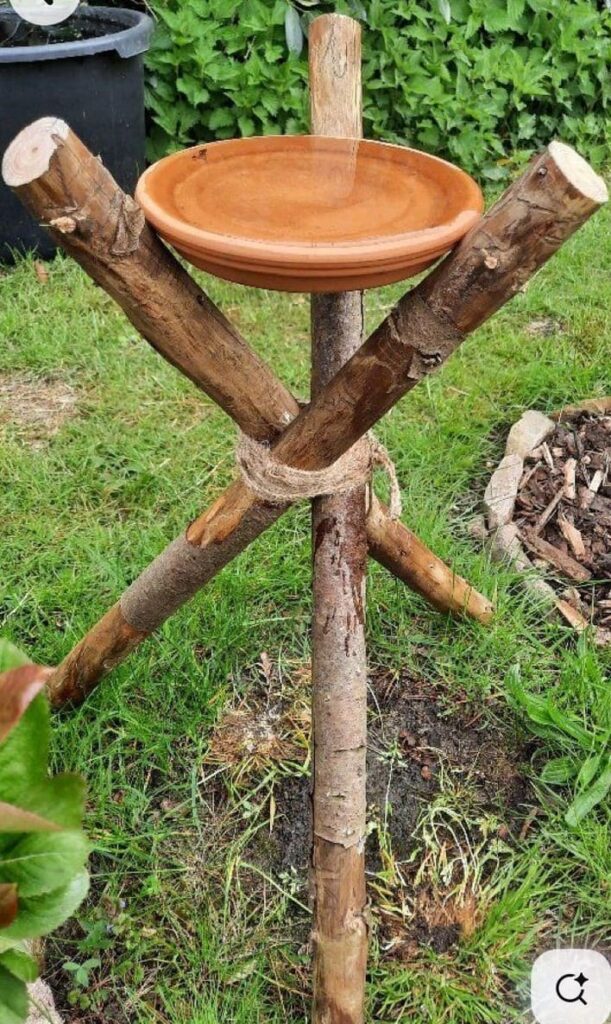
I built this in less than an hour using trimmed branches from a tree I pruned and an old terra cotta saucer.
Materials Needed
- 3 tree branches or thick sticks, approx. 3 ft long
- 1 terra cotta plant saucer, 12–14 inches wide
- Jute rope
Step-by-step Guide
Step 1: Select three straight branches of similar length and thickness. Arrange them in a tripod shape.
Step 2: Bind the top where they intersect using jute rope or strong twine. Wrap tightly and tie off securely.
Step 3: Place the terra cotta saucer on top so it rests inside the triangle of branches, then fill with fresh water and enjoy your rustic bird oasis.
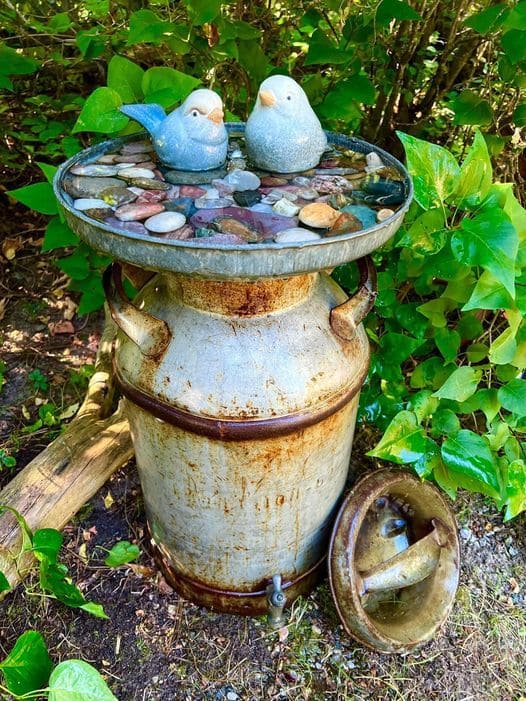
This birdbath is pure countryside charm. Using an old milk can and a galvanized pan, I gave a forgotten piece of metal a new, peaceful purpose.
Materials Needed
- 1 old milk can (approx. 12–18 inches tall)
- 1 shallow galvanized tray (12–14 inches wide)
- River rocks or pebbles
- Water
- (Optional) 1–2 ceramic bird figurines
Step-by-step Guide
Step 1: Place the milk can on a flat surface in your garden or patio, then set the galvanized tray securely on top of the can’s opening. It should sit flat and centered.
Step 2: Fill the tray with decorative rocks, covering the base with a layer that birds can perch on.
Step 3: Add water slowly until it just covers the tops of the stones and place ceramic birds on the rim for a playful touch.
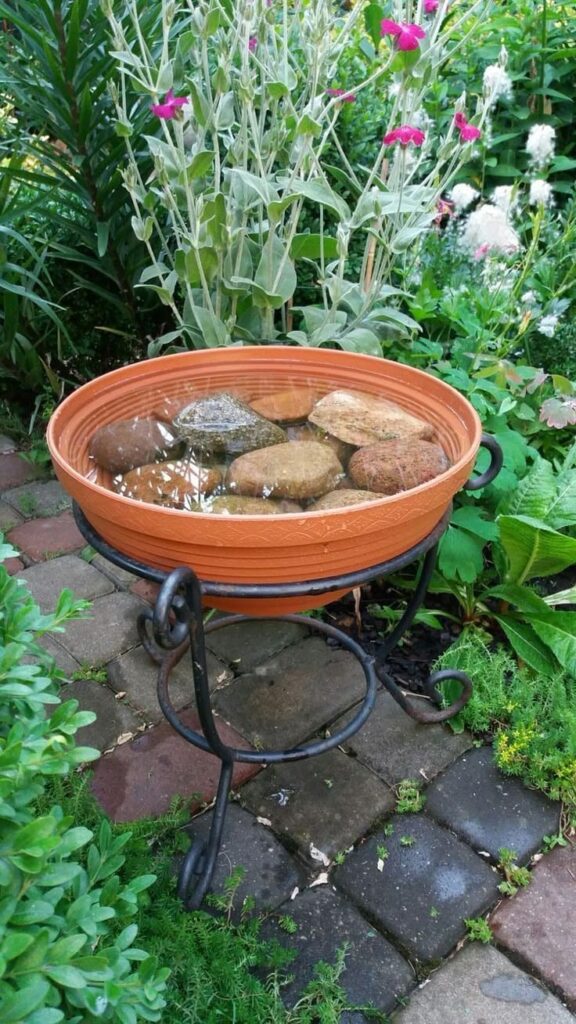
This simple birdbath was made with a plastic flower pot saucer and a plant stand I nearly tossed out.
Materials Needed
- 1 garden bowl planter
- 1 metal plant stand
- Large river rocks
- Water
Step-by-step Guide
Step 1: Set the planter saucer inside the top ring of the metal stand. Ensure it fits snugly and sits level.
Step 2: Add 5–7 large river rocks inside the saucer, spacing them apart to allow birds space to stand and drink.
Step 3: Fill the saucer with water until the rocks are halfway submerged.
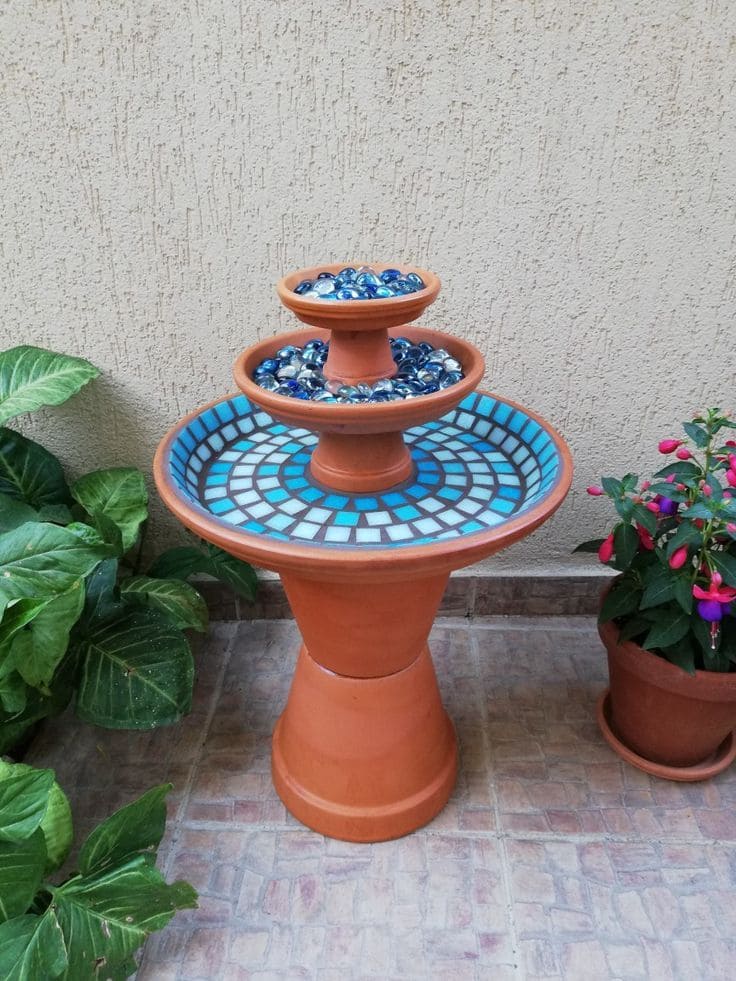
This colorful stacked terracotta birdbath brings a vibrant Mediterranean charm to any corner of your patio or garden.
SHOP LARGE TERRACOTTA POTSHOP LARGE SAUCERSHOP SMALL TERRACOTTA SAUCERSSHOP TERRACOTTA POT RISERSSHOP GLASS MOSAIC TILES
Materials Needed
- 2 large terracotta pot (12–14 inches tall)
- 1 large saucer (20-24 inches diameter)
- 2 small terracotta saucers (7 inch and 4 inch)
- 2 terracotta pot risers
- 100 glass mosaic tiles
- 60 glass gems
- Strong outdoor adhesive
- Grout (optional)
Step-by-step Guide
Step 1: Flip the large terracotta pot upside down as the base, and add another pot with the same side above, then attach the largest saucer to the base using adhesive. Let cure.
Step 2: Center and glue the risers or smaller pots on top, then layer each saucer. Let each level dry before stacking the next.
Step 3: Add mosaic tiles or arrange glass gems inside each saucer for sparkle and traction.
Step 4: Fill the top tiers with water, and place in a sunny spot.
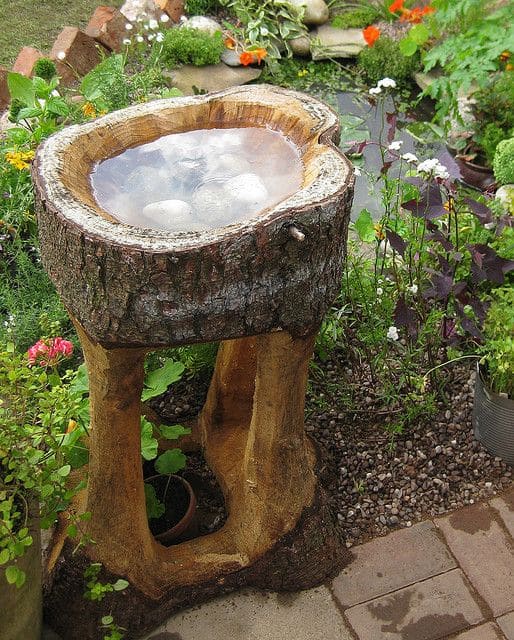
If you love woodwork or just admire timeless forest charm, this project brings a deep sense of grounded beauty to your yard.
SHOP CHISEL AND MALLET SETSHOP MARINE-GRADE SEALANT
Materials Needed
- Large tree stump (at least 18–24″ diameter)
- Chisel and mallet set
- Coat of marine-grade sealant (optional)
- Sandpaper
- Stones
Step-by-step Guide
Step 1: Choose a thick tree stump that stands sturdy or can be supported. Sand off the top until it’s flat and stable.
Step 2: Use a chisel and mallet to carve a bowl in the top center. Make it at least 2–3 inches deep, with a flat bottom for water stability.
Step 3: Smooth the interior with sandpaper or a sander. Apply a clear, waterproof wood sealant if you’d like to extend its life. Let dry fully.
Step 4: Set it in your garden and fill with fresh water. Add a few flat rocks inside to help birds perch while they bathe.
Birds love the shallow water and the shells provide safe perching, especially for bees and butterflies.
SHOP SEASHELLSSHOP DECORATIVE PEBBLES
Materials Needed
- 1 wide ceramic bowl (14–18 inches)
- 1 sturdy plant stand
- 2–3 cups of seashells in mixed sizes
- Small decorative pebbles
- Outdoor adhesive
Step-by-step Guide
Step 1: Clean the bowl and your stand. You paint them in white to match your garden style.
Step 2: Using strong outdoor adhesive, attach the seashells around the rim and layer them inward. Fill gaps with pebbles or tiny shells for a full, mosaic-like look. Let dry 24 hours.
Step 3: Mount the bowl securely on the stand. Add water, just enough to cover the center, keeping edges shallow.
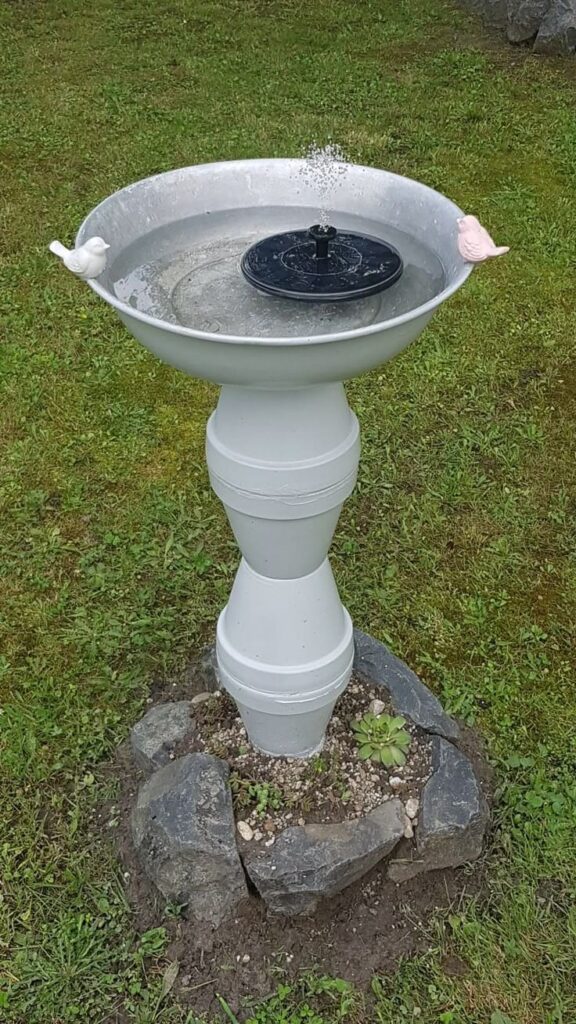
Turning a few old flowerpots into a graceful birdbath fountain gave my garden a quiet sense of motion and life.
SHOP SOLAR-POWERED FOUNTAIN PUMPSHOP WIDE METAL BOWL
Materials Needed
- 4 large terracotta flowerpots (at least 12–18 inches tall each)
- 1 wide metal bowl
- 1 solar-powered fountain pump
- Outdoor waterproof spray paint (optional)
- Decorative birds (optional)
Step-by-step Guide
Step 1: Stack the flowerpots upside down to create a stable pedestal. For added security, you can glue them together with heavy-duty outdoor adhesive.
Step 2: Spray paint the stacked base and bowl if desired. Then place the bowl on top of the stacked pots and ensure it’s level. Fill with clean water.
Step 3: Add the solar fountain pump in the center and position decorative rocks or figurines around the edges. The fountain will start bubbling once exposed to sunlight.
The reflections in the sun are magical, and the birds seem to enjoy the elevated view while bathing. It’s delicate, graceful, and surprisingly easy to make if you have unused glassware.
Materials Needed
- 1 large glass serving bowl
- 1–2 crystal decanters
- Strong glass adhesive
- Optional: glass marbles
Step-by-step Guide
Step 1: Clean all glass pieces thoroughly, then use the glass adhesive to stack and secure the decanters vertically as the pedestal. Let cure as instructed.
Step 2: Attach the glass bowl securely on top of the pedestal. Ensure it’s level and stable.
Step 3: Once dried, fill the bowl with water and add glass stones for a colorful touch. Nestle the birdbath into soil for support.
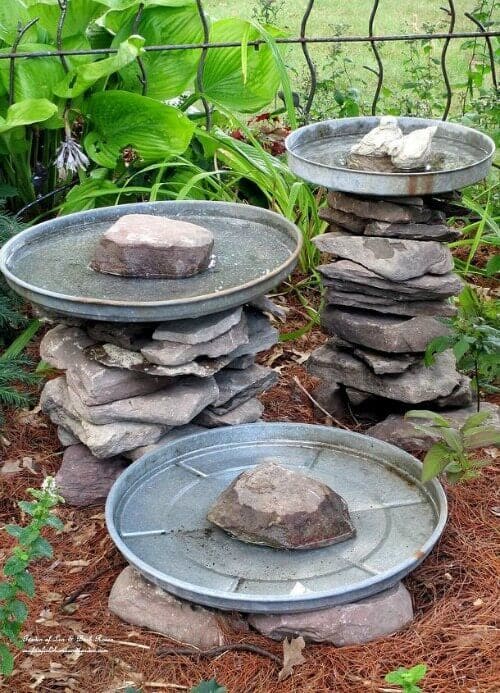
Built from what nature offers, these birdbaths sit atop stacked flat stones and invite birds in with an earthy, grounded charm.
Materials Needed
-
- 3 galvanized metal oil pans (around 16–20″ diameter)
- Flat landscaping rocks
- 3 large smooth stones
- Optional: Leveling sand
Step-by-step Guide
Step 1: Select a level area in your garden with good visibility. Lay down gravel or leveling sand if the ground is uneven.
Step 2: Stack flat rocks into stable towers. Test each one for balance, aim for about 12–24 inches high.
Step 3: Place a metal tray securely on top of each stack. Use heavier top rocks to help keep the trays steady if needed.
Step 4: Fill trays with fresh water and set a large smooth rock in the center of each for birds to perch on safely.
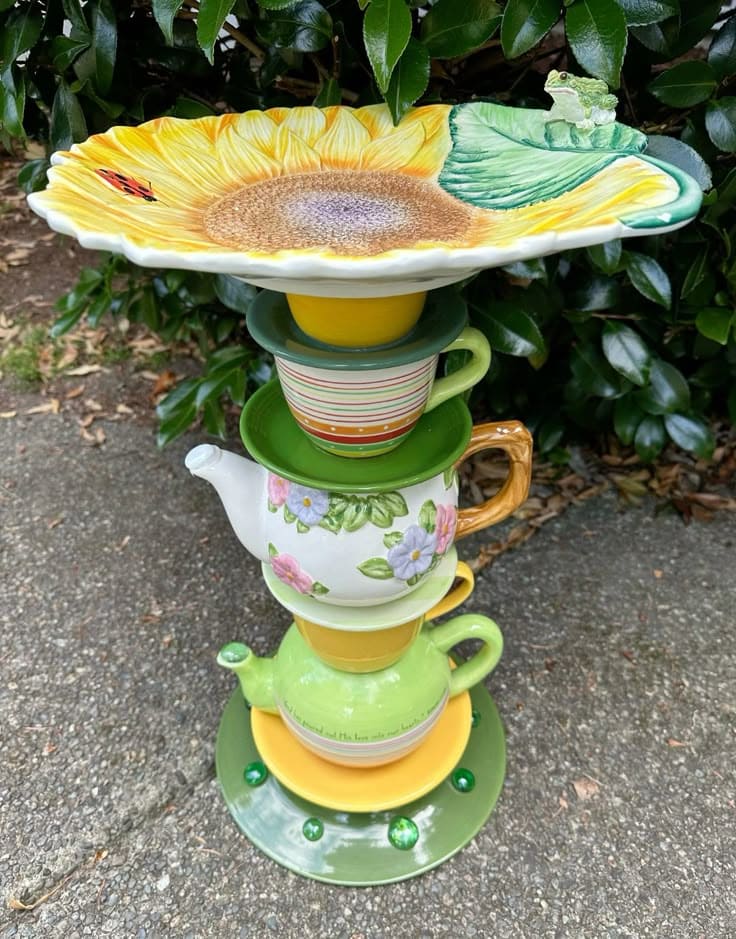
This joyful garden piece feels like it stepped out of a storybook.
SHOP SUNFLOWER-SHAPED PLATESHOP TEACUPSSHOP TEAPOTS
Materials Needed
- 1 sunflower-shaped plate
- 2 teacups and saucers
- 2 teapots and saucers
- Heavy-duty waterproof adhesive
- Flat ceramic plate
- Optional: decorative glass marbles
Step-by-step Guide
Step 1: Arrange the teacups, teapots, and saucers in a whimsical tower layout. Test the balance before gluing.
Step 2: Begin gluing one piece at a time from the bottom up. Allow each section to dry and cure for several hours.
Step 3: Once fully stacked, attach the sunflower plate to the top. Ensure it is centered and stable. Then add decorative accents like marbles around the base.
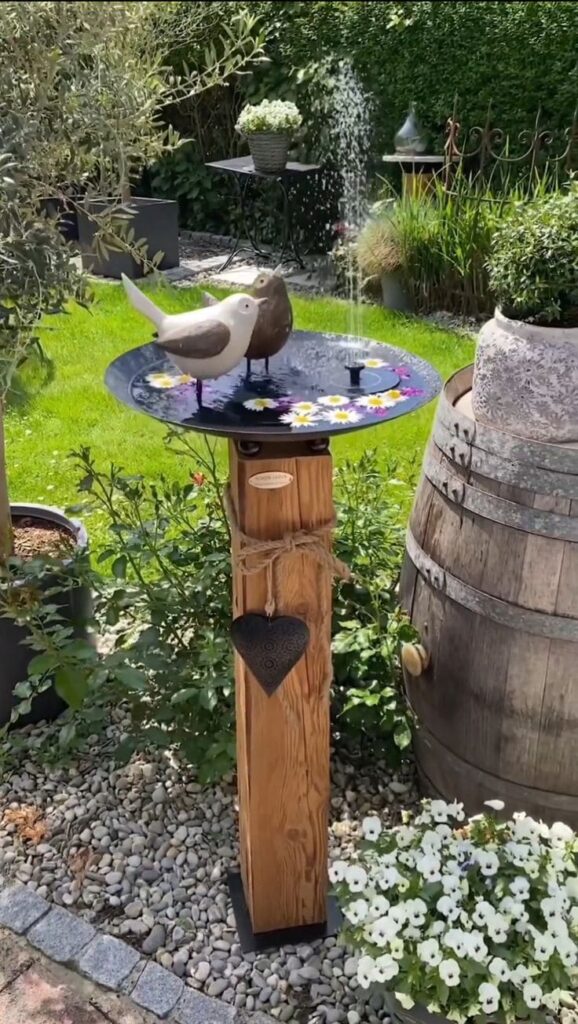
The solar fountain is what makes it special, birds come for a quick dip and stay mesmerized by the gentle spray.
Materials Needed
- 1 black metal dish, 12-14 inches wide
- 1 solar-powered fountain pump
- 1 4×4-inch wooden post, 36–42 inches tall
- 1 steel base plate
- Screws, drill, waterproof wood sealant, optional decor accents (heart ornament, twine)
Step-by-step Guide
Step 1: Sand and seal the wooden post to prevent damage from moisture, then secure the post upright using a heavy steel base or concrete anchor.
Step 2: Center the bowl on top and screw it to the post or use a strong adhesive for a non-drill solution.
Step 3: Fill the bowl with water and place the solar fountain in the center. It will activate with sunlight. Add decorative pebbles, figurines, or floating blooms if desired.
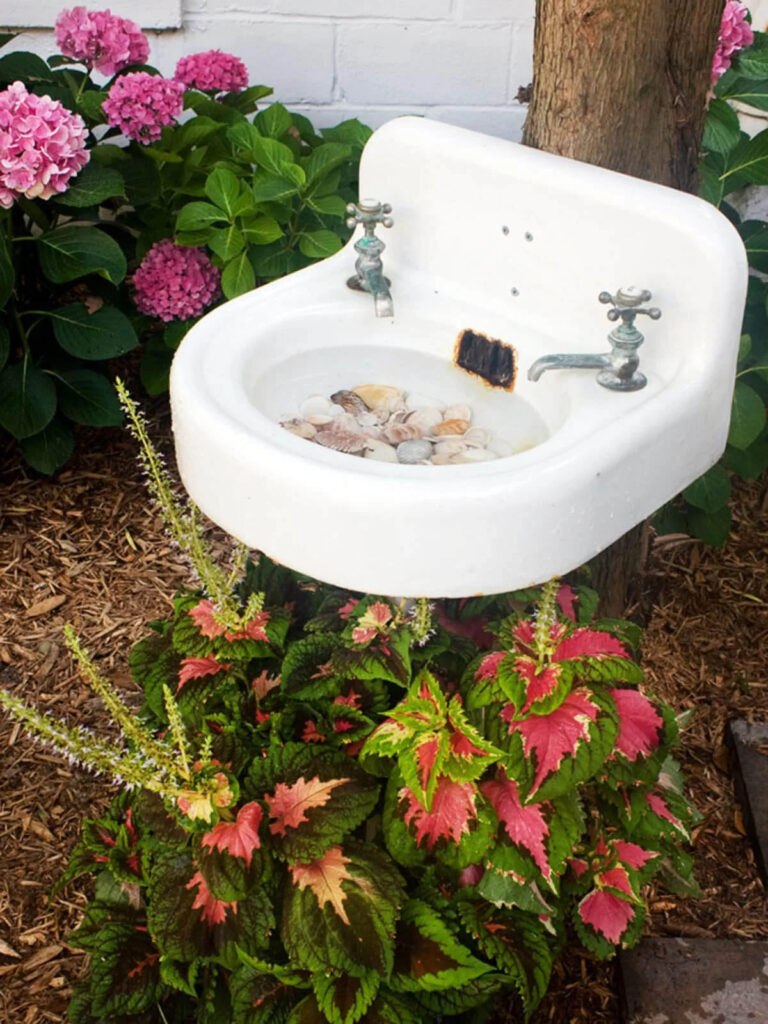
This upcycled project has both charm and eco-value. It’s perfect for gardeners who love surprises, and it brings a sense of playful elegance to any corner of the yard.
Materials Needed
- Old ceramic sink basin
- Mounting brackets
- Sealant
- Mixed seashells
Step-by-step Guide
Step 1: Choose a flat, shady garden wall or tree trunk for mounting. Use screws and heavy-duty brackets to secure the sink about 2–3 feet off the ground.
Step 2: Plug the drain hole using plumber’s putty, a drain cap, or a tightly fit cork to ensure water doesn’t escape.
Step 3: Fill the basin with clean water and line the bottom with decorative shells. This helps birds land safely and adds a beachy vibe.
This elegant hanging birdbath feels like something straight out of a secret garden. It’s shaded, simple, and timeless.
Materials Needed
- 1 shallow metal tray (10–14 inches)
- 1 matching metal dome lid
- 3 hanging chains (12–18 inches)
- 1 central hanging hook
- Optional: decorative birds
Step-by-step Guide
Step 1: Attach three chains evenly spaced around the edge of the tray using hooks, then connect the tops of the three chains to a central S-hook.
Step 2: Attach the canopy top above the tray using additional chain sections (make sure it sits high enough not to block access).
Step 3: Hang the structure securely from a sturdy branch or beam, then fill the tray with fresh water.
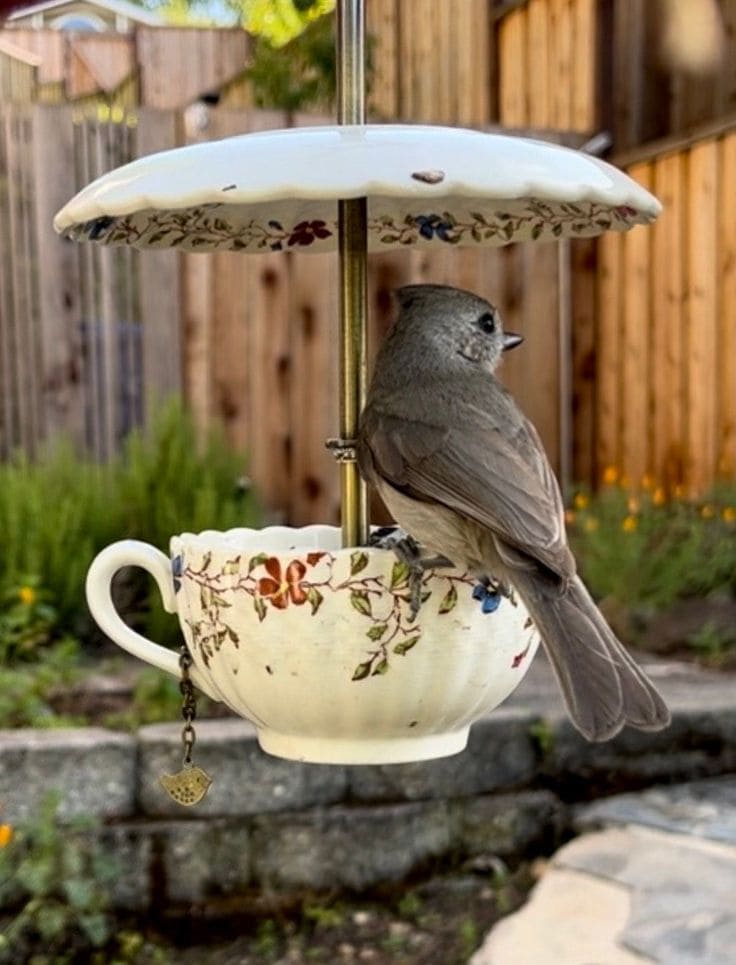
This delicate feeder made from a floral teacup and matching saucer is perfect for adding a whimsical vintage touch to any garden.
Materials Needed
- 1 vintage teacup and saucer set
- 1 metal rod (8–12 inches long)
- 1 small nut and washer set
- 1 drill with ceramic drill bit
- Strong epoxy glue (if not drilling)
- Optional: hanging chain
Step-by-step Guide
Step 1: Drill a hole through the center of both the saucer and the base of the teacup using a ceramic drill bit. Go slowly and carefully to avoid cracking.
Step 2: Slide the rod through the saucer (which will act as a shade) and then the teacup. Use nuts and washers to tighten and secure both in place.
Step 3: If you don’t want to drill, glue the cup onto the saucer and then attach a sturdy hanging wire to the handle.
Step 4: Fill the cup with birdseed and hang from a hook, tree branch, or garden pole.
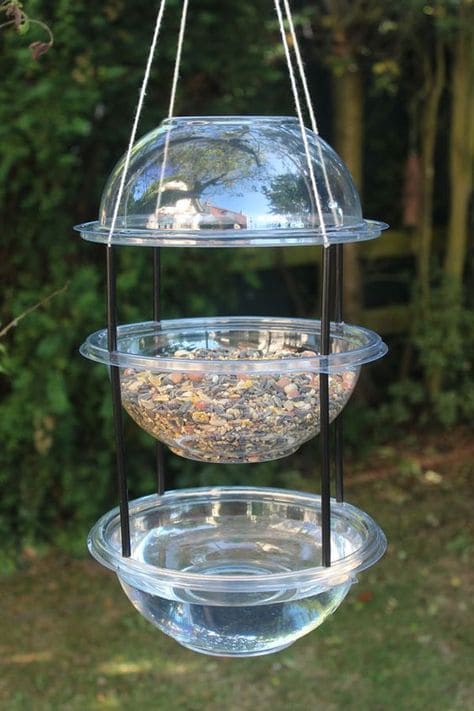
Sometimes function meets minimal beauty and this design nails it. Made with clear bowls and sturdy supports, this hanging system serves both food and water in one vertical unit.
Materials Needed
- 3 clear plastic bowls (equal sizes, around 8–10” diameter)
- 4 metal rods (approx. 12–18” long)
- Strong outdoor rope
- Drill and plastic-safe bit
- Nuts and washers (optional)
- Birdseed mix and fresh water
Step-by-step Guide
Step 1: Drill four evenly spaced holes around the rims of each bowl. Make sure they align vertically when stacked.
Step 2: Insert rods through all three bowls, starting from the bottom up. Secure each bowl with a nut/washer if needed.
Step 3: Tie and knot the rope around the top edge and through the rods to suspend the entire piece.
Step 4: Fill the middle bowl with seeds and the bottom one with water. Keep the top bowl upside-down for shelter or skip it if you prefer an open design.
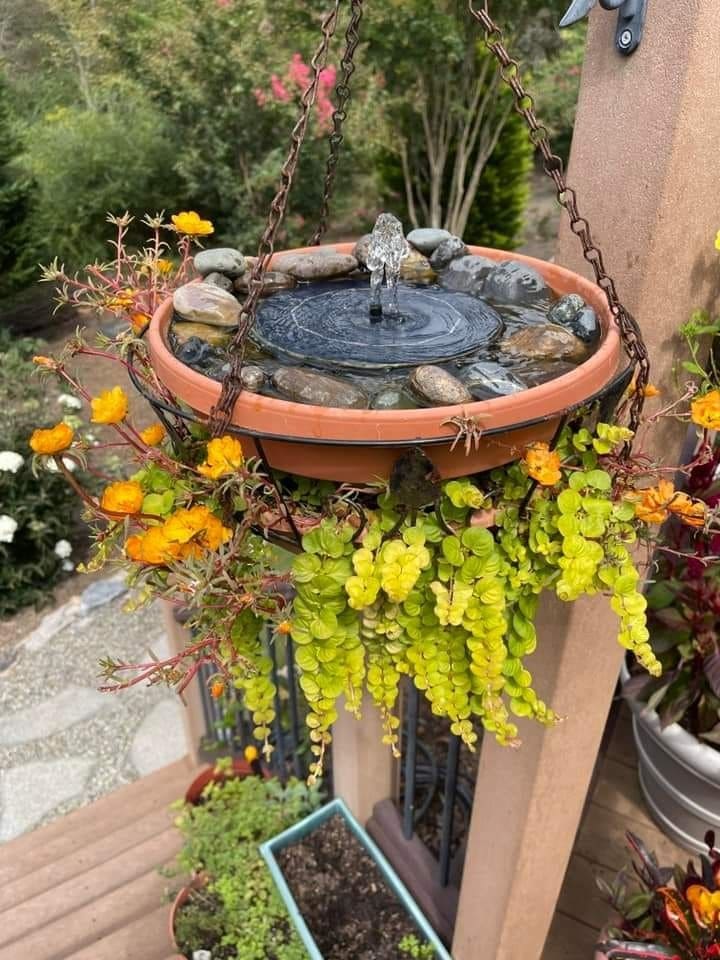
This lovely hanging birdbath adds a splash of charm and a gentle fountain sound to any outdoor nook.
SHOP HANGING BASKET PLANTER WITH CHAIN
Materials Needed
- 1 hanging basket planter with chain (at least 12″ diameter)
- 1 terracotta plant saucer
- 1 solar fountain pump
- A variety of river rocks
- Trailing plants
- Potting soil (if planting)
Step-by-step Guide
Step 1: Fit the saucer into the hanging basket snugly. Seal any gaps to hold water using a liner or sealant if needed.
Step 2: Add a layer of river rocks for aesthetics and to weigh it down. Make sure the surface is level.
Step 3: Position and place the solar fountain pump in the center, making sure it’s stable.
Step 4: Arrange your trailing plants around the rim or insert rooted ones in side openings of the basket using soil.
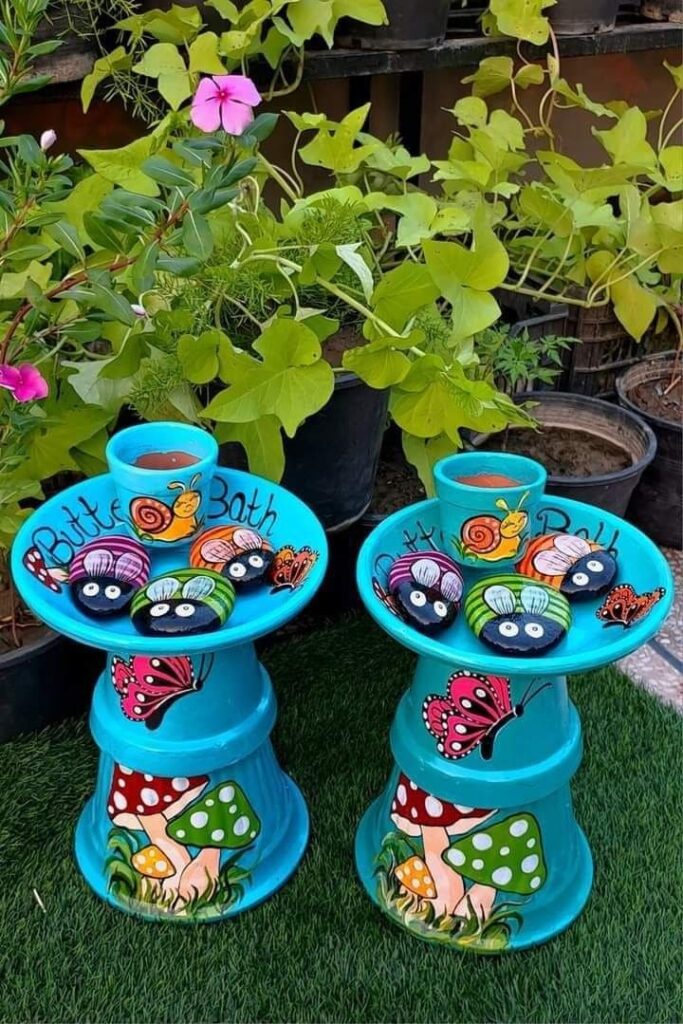
This colorful bug bath brings pure cheer to your garden corner. Bright blues, spotted mushrooms, painted rocks as bees and ladybugs, this one practically buzzes with charm!
Materials Needed
- 3 clay flower pots (sizes: small, medium, large)
- 1 large clay saucer (about 10–14 inches wide)
- Acrylic paint set
- Sealer spray
- 3 flat round rocks
Step-by-step Guide
Step 1: Paint each pot and saucer in a bold base color like aqua blue. Let dry.
Step 2: Decorate with mushrooms, butterflies, and bugs using paint pens or brushes. Seal with clear spray.
Step 3: Stack the pots upside down and glue together with outdoor adhesive. Add the saucer to the top as the basin.
Step 4: Paint small rocks as bees, butterflies, or ladybugs. Add to the basin for charm and safety landing zones for insects.