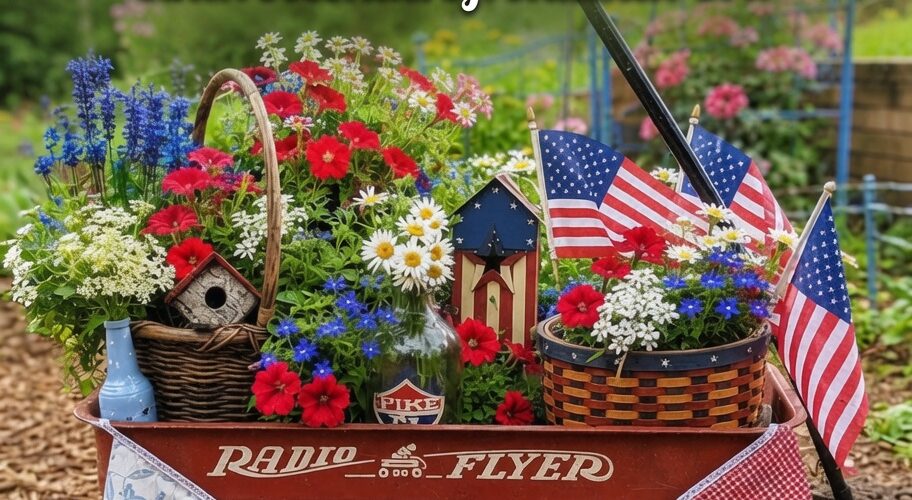
Ob Sie nun eine Gartenparty veranstalten oder Ihr Zuhause einfach nur festlich schmücken möchten, diese DIY-Dekorationen helfen Ihnen dabei, eine fröhliche, typisch amerikanische Atmosphäre zu schaffen.
Von charmanten Details für die Veranda bis hin zu funkelnden Tischdekorationen – jede Idee hier verleiht Ihrem Fest eine besondere Note. Verwandeln Sie jeden Winkel Ihres Zuhauses in eine kleine Oase der sommerlichen Freiheit.
Dieser Artikel enthält Affiliate-Links. Wenn Sie über diese Links einkaufen, erhalte ich möglicherweise eine kleine Provision, ohne dass Ihnen dadurch zusätzliche Kosten entstehen. Vielen Dank für Ihre Unterstützung!
#1. Rustikaler Wandbehang mit Schleifenfahne
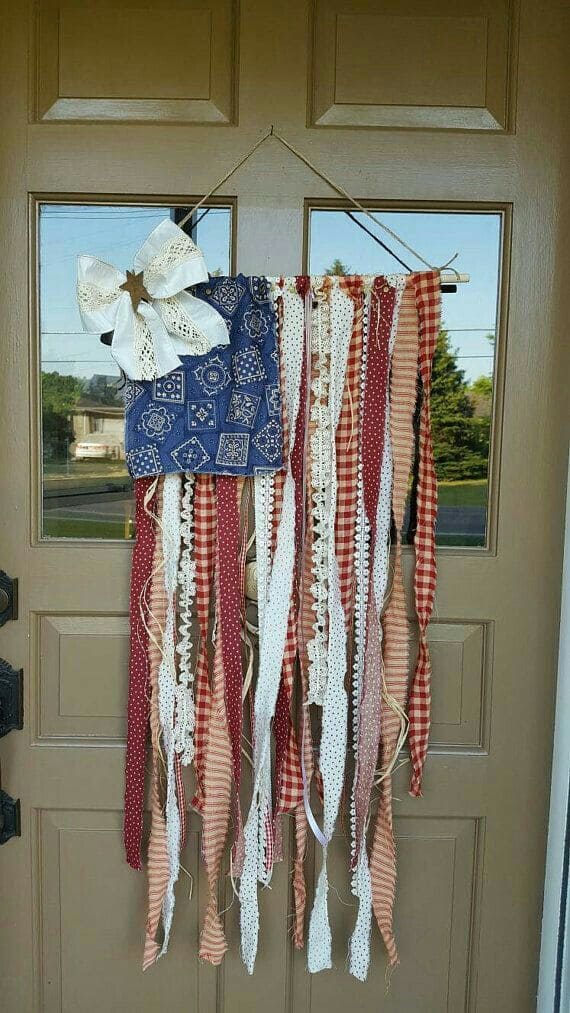
Wenn du, genau wie ich, Bastelarbeiten liebst, die gemütlich und nostalgisch wirken, ist das hier genau das Richtige für dich. Diese hängende Dekoration im Flaggenstil aus Stoffstreifen und Spitze verleiht deiner Haustür einen handgemachten, herzlichen Charme.
Benötigte Materialien
- 1 Holzdübel (ca. 18–20 Zoll lang)
- 1 blauer Bandana-Stoff (ca. 10″ x 10″)
- 12–15 Streifen roter Stoff, weißer Stoff oder Spitze (1,5 Zoll breit x 36 Zoll lang)
- Juteschnur oder -band
- Heißklebepistole und Klebesticks
- Optional: weiße Schleife oder Stern
Schritt-für-Schritt-Anleitung
Schritt 1: Binden oder kleben Sie die roten und weißen Streifen um den Holzstab, wobei Sie die Farben abwechselnd anordnen, um die Streifen einer Flagge nachzuahmen.
Schritt 2: Falten Sie das blaue Bandana-Quadrat über die obere linke Ecke und kleben Sie es fest, um den „Sternen“-Bereich der Flagge zu formen. Wenn Sie möchten, können Sie einen Stern aus Filz oder Holz daraufkleben.
Schritt 3: Befestigen Sie an jedem Ende des Rundstabs ein Stück Juteschnur und verknoten Sie diese in der Mitte, um eine Aufhängung zu erzeugen.
Schritt 4: Zum Schluss eine Schleife aus Spitze in die obere linke Ecke binden und das Ganze an die Haustür hängen – für eine perfekt rustikale, patriotische Atmosphäre.
#2. Patriotische Blumentöpfe
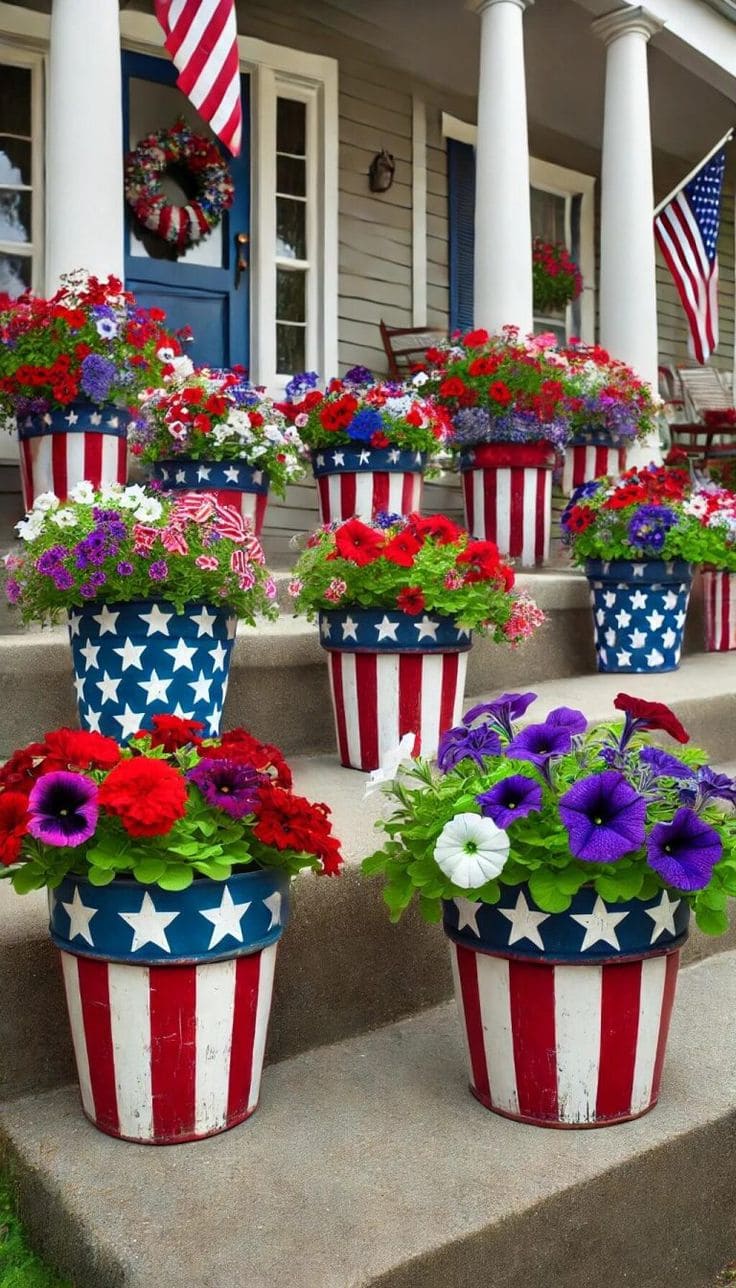
Diese rot-weiß-blauen Blumentöpfe haben meine Haustreppe in eine fröhliche, mit Flaggen geschmückte Festzone verwandelt. Sie sind leuchtend, kräftig und voller Leben, genau wie der 4. Juli selbst.
Benötigte Materialien
- 10–16 Terrakotta-Blumentöpfe (beliebige Größe)
- Rote, weiße und marineblaue Acrylfarbe
- Malerband oder Abdeckband
- Kleine Pinsel
- Versiegelungsspray für den Außenbereich (optional)
- Rote, weiße und blaue Blumen wie Petunien, Verbenen und Geranien
Schritt-für-Schritt-Anleitung
Schritt 1: Reinigen Sie Ihre Blumentöpfe gründlich und lassen Sie sie trocknen. Kleben Sie mit Malerkrepp senkrechte Streifen um jeden Topf. Bemalen Sie die freiliegenden Stellen zuerst rot, ziehen Sie dann das Klebeband ab und füllen Sie die Lücken weiß.
Schritt 2: Sobald die Streifen trocken sind, den oberen Rand marineblau anmalen. Vollständig trocknen lassen.
Schritt 3: Legen Sie die Sternschablone auf den blauen Rand und tupfen Sie mit einem kleinen Schwamm oder Pinsel vorsichtig weiße Farbe hindurch. Lassen Sie die Farbe einige Stunden trocknen.
Schritt 4: Optional: Sprühen Sie ein Versiegelungsmittel über das Design, um es vor Witterungseinflüssen zu schützen.
Schritt 5: Füllen Sie Ihre Töpfe mit frischer Erde und leuchtend roten, weißen und blauen Blüten. Stellen Sie sie auf Ihre Verandatreppe oder in den Eingangsbereich.
#3. Eingangsbereich im Landhausstil, inspiriert von der Flagge
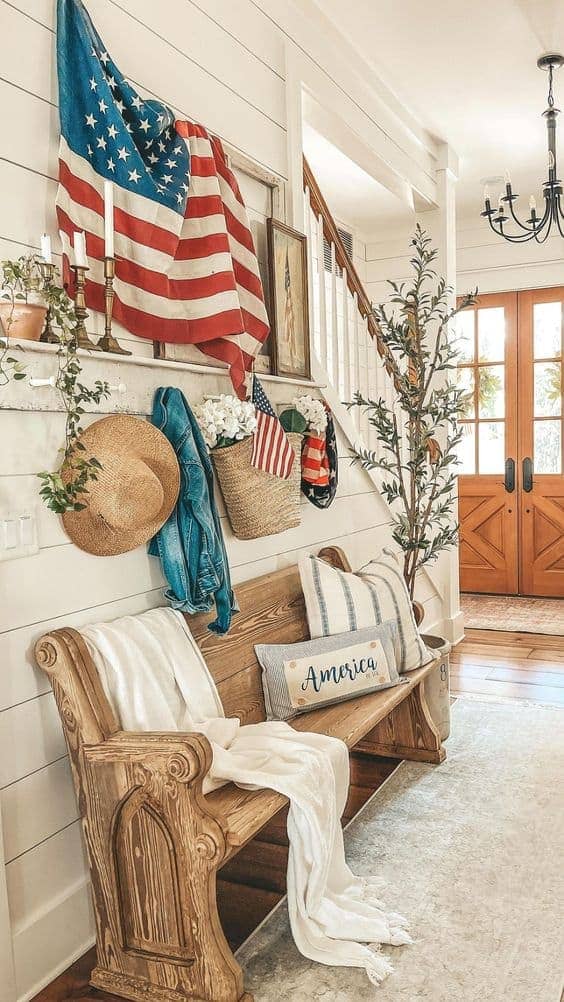
Dieser warme und einladende Flur ist einer jener Orte, die nicht „4. Juli“ schreien, sondern sanft „Zuhause“ flüstern.
Benötigte Materialien
- Holzbank
- Amerikanische Flagge im Vintage-Stil
- patriotisches Zierkissen
- Natürlicher, gewebter Hängekorb
- 4-5 Mini-US-Flaggen
- Kerzenständer
- Weiße Tagesdecke
Schritt-für-Schritt-Anleitung
Schritt 1: Hängen Sie die amerikanische Flagge schräg über einen Spiegel oder einen leeren Bilderrahmen, um einen weichen, fließenden Effekt zu erzielen. Befestigen Sie sie mit Stecknadeln oder dekorativen Haken.
Schritt 2: Stellen Sie eine Holzbank darunter und fügen Sie gemütliche Kissen mit Sternen, Streifen oder „Amerika“-Zitaten hinzu, um dem Raum eine entspannte, aber festliche Atmosphäre zu verleihen.
Schritt 3: Legen Sie eine weiche Decke über die Ecke der Bank, um die Holztöne auszugleichen und für Wärme zu sorgen.
Schritt 4: Hängen Sie ein paar Strohhüte und eine leichte Jeansjacke oder einen Schal an Wandhaken, um eine wohnliche Atmosphäre zu schaffen.
Schritt 5: Verwenden Sie einen geflochtenen Wandkorb, um weiße Kunstblumen und Mini-Fähnchen hineinzustecken und so eine verspielte Note zu verleihen.
Schritt 6: Stellen Sie Kerzenhalter mit Kerzen in neutralen Farbtönen auf das Regal darüber, um ein sanftes Abendlicht zu erzeugen.
#4. Patriotische Veranda mit Hund und Pflanzen
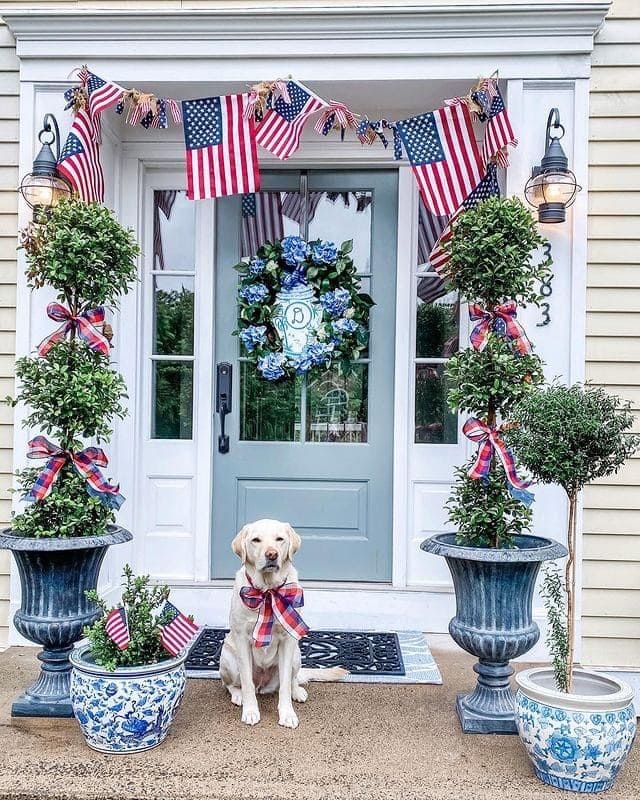
Diese Veranda-Dekoration vereint alles, was ich an sommerlicher Dekoration liebe: wehende Fahnen, geschmückte Buchsbäume, einen charmanten Kranz und einen Hund mit Fliege, der ganz offensichtlich weiß, dass er die Hauptattraktion ist.
Benötigte Materialien
- 7-8 Mini-Banner mit amerikanischer Flagge
- 2 hohe Pflanzgefäße
- 4 Mini-US-Flaggen
- Rot-weiß-blau kariertes Band
- Dekorative Töpfe
- Hundehalstuch
Schritt-für-Schritt-Anleitung
Schritt 1: Wickeln Sie jede Formgehölzpflanze mit kariertem Band ein und binden Sie großzügige Schleifen etwa ein Drittel und zwei Drittel des Stammes hoch, um ein optisches Gleichgewicht zu erzielen.
Schritt 2: Hängen Sie die Mini-Wimpelgirlande über Ihre Haustür und lassen Sie die Wimpel sich leicht überlappen, um einen verspielten Effekt zu erzielen. Verwenden Sie abnehmbare Haken für eine einfache Reinigung.
Schritt 3: Platzieren Sie kleine Fähnchen in dekorativen Blumentöpfen auf beiden Seiten der Stufen oder des Verandafußes, um zusätzliche Farbe und Symmetrie zu erzielen.
Schritt 4: Verleihen Sie dem Ganzen einen letzten patriotischen Touch – einen Welpen mit einer festlichen Schleife.
#5. Patriotischer Blumenkrug
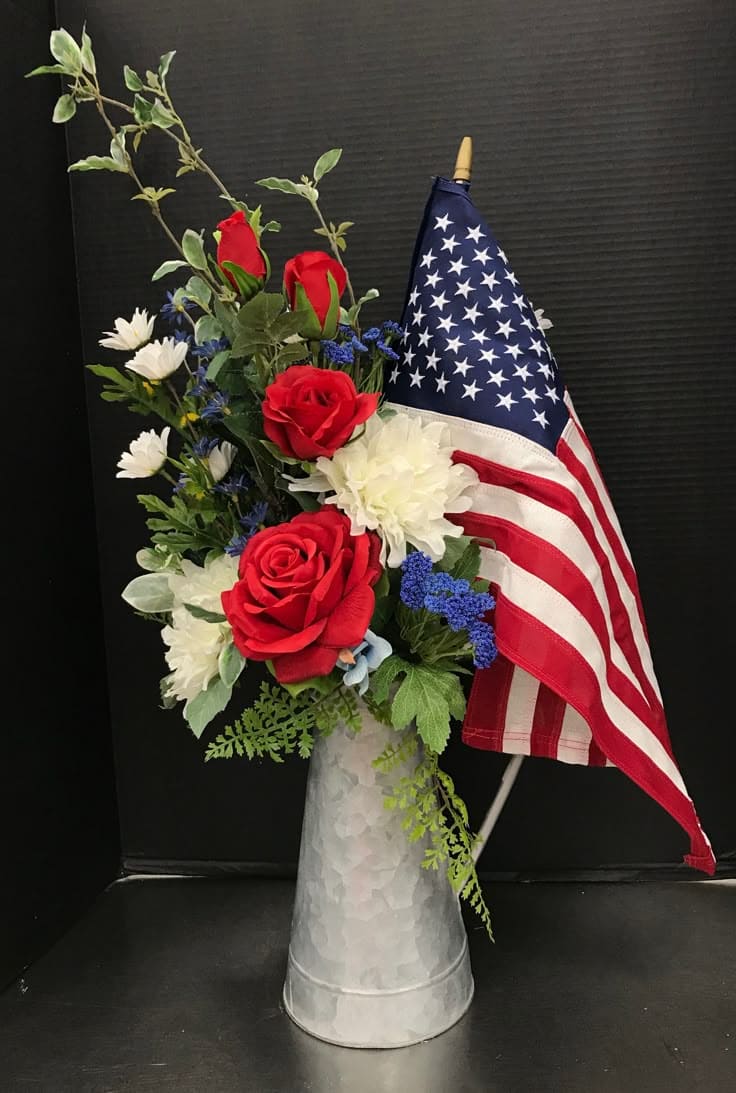
Zusammen mit einem klassischen Krug aus verzinktem Metall verleiht dieses unkomplizierte Deko-Element jedem Raum im Handumdrehen einen rustikalen Landhaus-Charme. Es gehört zu jenen Bastelprojekten, die viel teurer aussehen, als sie tatsächlich sind.
Benötigte Materialien
- 1 verzinkte Krugvase (ca. 25–30 cm)
- 1 kleine amerikanische Flagge
- 3–4 rote künstliche Rosen
- 3 weiße künstliche Chrysanthemen oder Gänseblümchen
- 3–4 blaue Akzentstängel (z. B. Lavendel oder Strandflieder)
- Grünpflanzen als Füllmaterial
Schritt-für-Schritt-Anleitung
Schritt 1: Beginnen Sie damit, die Stängel Ihrer Pflanzen im Krug anzuordnen und sie gleichmäßig zu verteilen, um eine volle Basis zu bilden.
Schritt 2: Ordnen Sie die roten Rosen in Dreiecksform an, um ein harmonisches Gesamtbild zu erzielen, und stecken Sie dann die weißen Rosen dazwischen, um die Lücken zu füllen.
Schritt 3: Verleihen Sie dem Brautstrauß mit blauen Zweigen einen besonderen Akzent. Konzentrieren Sie sich dabei auf die Mitte und den hinteren Bereich, um mehr Tiefe zu erzeugen.
Schritt 4: Führen Sie Ihre Flagge vorsichtig schräg nach hinten ein und achten Sie darauf, dass sie sich sichtbar auffächert.
#6. Charmante patriotische Küchenecke
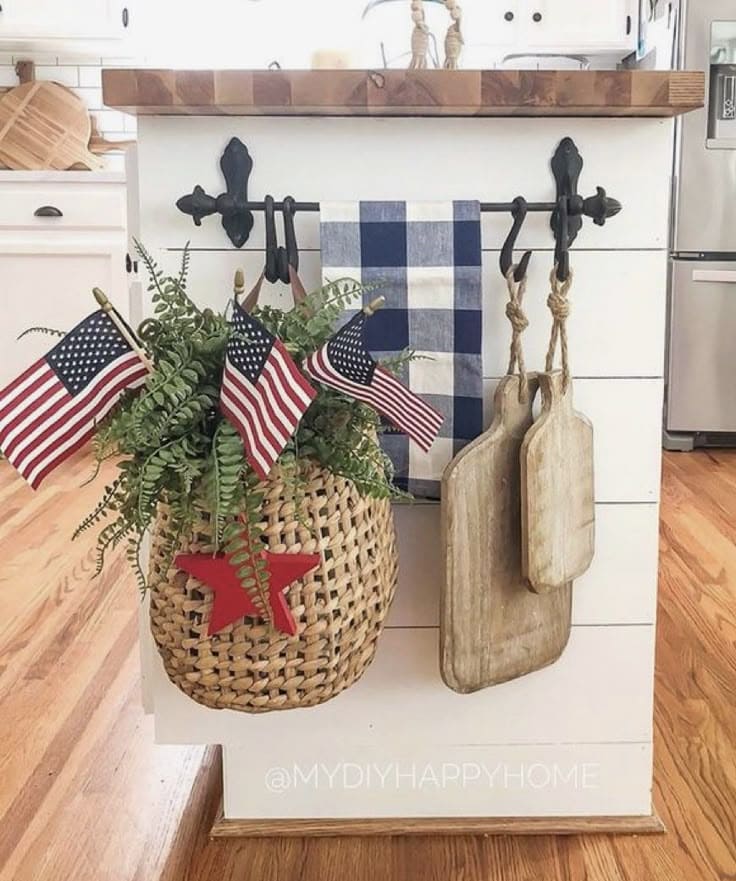
Ich liebe den Kontrast zwischen den kleinen Fähnchen und den gewebten Strukturen zu den rohen Holzbrettern. Es ist eines dieser kleinen Details, die die Atmosphäre der Küche komplett verändern.
Benötigte Materialien
- 3-4 kleine amerikanische Flaggen
- Gewebter Hängekorb
- Künstliches Farngrün
- Kleiner roter Holzstern
- Schwarze Metallstange mit Haken
- Optional: rustikale Schneidebretter, kariertes Handtuch, Kordel oder Band
Schritt-für-Schritt-Anleitung
Schritt 1: Hängen Sie eine stabile Stange mit Haken an die Seite Ihrer Kücheninsel. Achten Sie darauf, dass sie ein moderates Gewicht tragen kann.
Schritt 2: Füllen Sie den geflochtenen Korb mit Farnblättern oder künstlichem Grün und stecken Sie dann Minifähnchen in gleichmäßigen Abständen wie einen Fächer hinein.
Schritt 3: Bringen Sie mit einer Schnur, Heißkleber oder einer kleinen Klammer einen roten Holzstern an der Vorderseite an, um einen charmanten, patriotischen Blickfang zu schaffen.
Schritt 4: Verwenden Sie zusätzliche Haken, um rustikale Schneidebretter und ein blau-weißes Handtuch aufzuhängen, um das Thema auszugleichen.
#7. Für den 4. Juli herausgeputzt
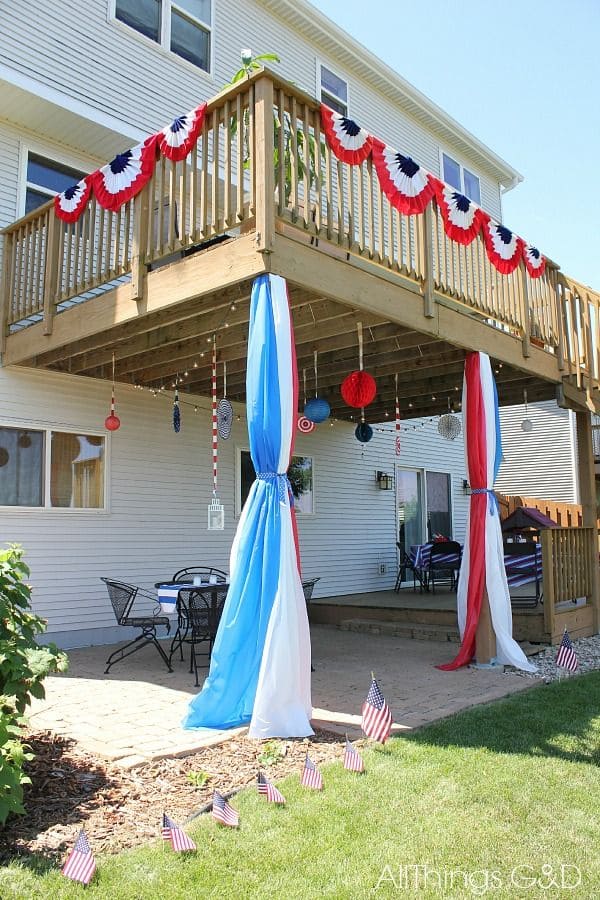
Die drapierten Stoffsäulen wirkten wie direkt von einer Sommerhochzeit, während die Wimpelketten einen Hauch Nostalgie verlieh. Es ist atemberaubend, erschwinglich und strahlt Freiheit aus (mit einem Hauch Glamour).
Benötigte Materialien
- 84 Zoll breite, transparente Vorhangschals in Rot, Weiß und Blau
- Weiße Kabelbinder
- 3–6 Fuß lange patriotische Wimpelketten
- 12–18 Mini-Amerikanische Stockflaggen
- Rote, weiße und blaue Papierlaternen oder Wabenbälle
- Transparente Lichterkette für den Außenbereich, 1–2 Stränge
- Command-Haken oder wetterfestes Klebeband
Schritt-für-Schritt-Anleitung
Schritt 1: Beginnen Sie damit, die transparenten Gardinenbahnen mit Kabelbindern oben an jedem Pfosten zu befestigen.
Schritt 2: Binden Sie den Stoff mit passenden Bändern oder Blumendraht bis zur Hälfte zusammen, um einen fließenden, eleganten Fall zu erzielen. Lassen Sie den unteren Teil leicht fallen, um eine romantische Note zu erzeugen.
Schritt 3: Hängen Sie Ihre Wimpelketten mit durchsichtigen Haken oder Bändern zum Anbinden an das Deckgeländer.
Schritt 4: Verlegen Sie die Lichterketten unter der Terrasse im Zickzackmuster, um eine gleichmäßige Beleuchtung zu erzielen. Hängen Sie Papierlaternen oder Wabenkugeln in abwechselnden Farben entlang desselben Weges auf.
Schritt 5: Zum Schluss können Sie noch kleine amerikanische Flaggen am Gartenrand oder in Pflanzkästen anbringen, um dem Ganzen einen patriotischen Touch zu verleihen.
#8. Patriotische Verandaschaukel-Umgestaltung
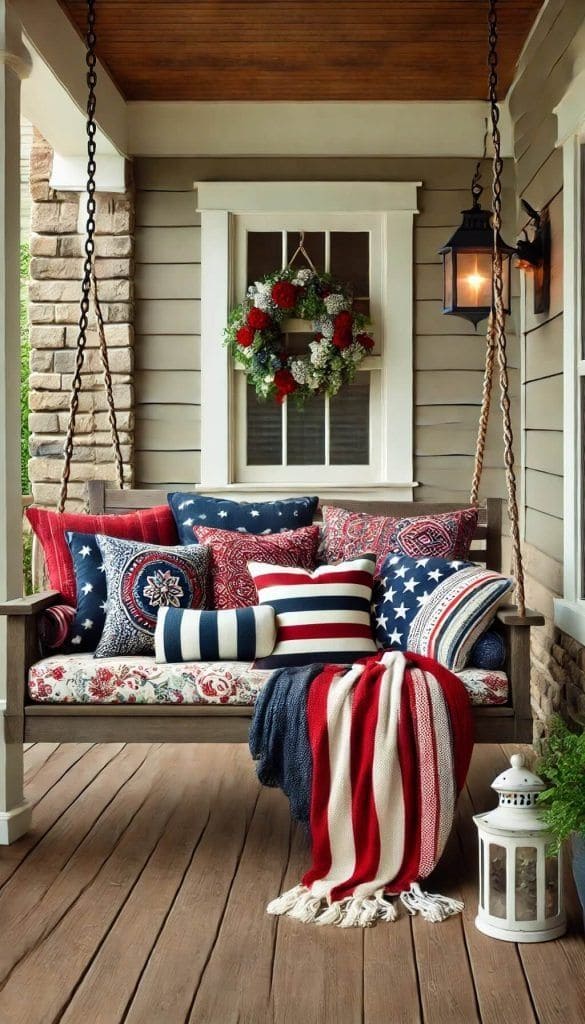
Wenn Sie sich jemals gewünscht haben, dass Ihre Veranda „amerikanische Eleganz“ ausstrahlt, dann ist diese vom 4. Juli inspirierte Schaukelanlage Ihr wahrgewordener Traum.
Benötigte Materialien
- Verschiedene rote, weiße und blaue Zierkissen
- 1 rot-weiß-blaue Strickdecke, mindestens 50″x60″
- Patriotischer Blumenkranz
- Für den Außenbereich geeignetes Schaukel- oder Bankkissen
- Weiße Laternendekoration
- Braune Jute
Schritt-für-Schritt-Anleitung
Schritt 1: Legen Sie zunächst das Basiskissen auf Ihre Schaukel oder Bank und schichten Sie dann die Kissen von groß nach klein darüber. Kombinieren Sie dabei einfarbige, patriotische Farbtöne mit Streifen, Blumenmustern und Sternen, um Kontrast und Tiefe zu erzeugen.
Schritt 2: Legen Sie Ihre Kuscheldecke über eine Armlehne der Schaukel, sodass sie locker darüber fällt. Das macht die Struktur weicher und lädt zum gemütlichen Hinsetzen ein.
Schritt 3: Hängen Sie den Kranz mit einem einfachen Juteband mittig über der Schaukel auf und stellen Sie dann eine Laterne in der Nähe auf, um bei Sonnenuntergang ein warmes Licht auf der Veranda zu erzeugen.
#9. Rustikale, patriotische Verandadekoration
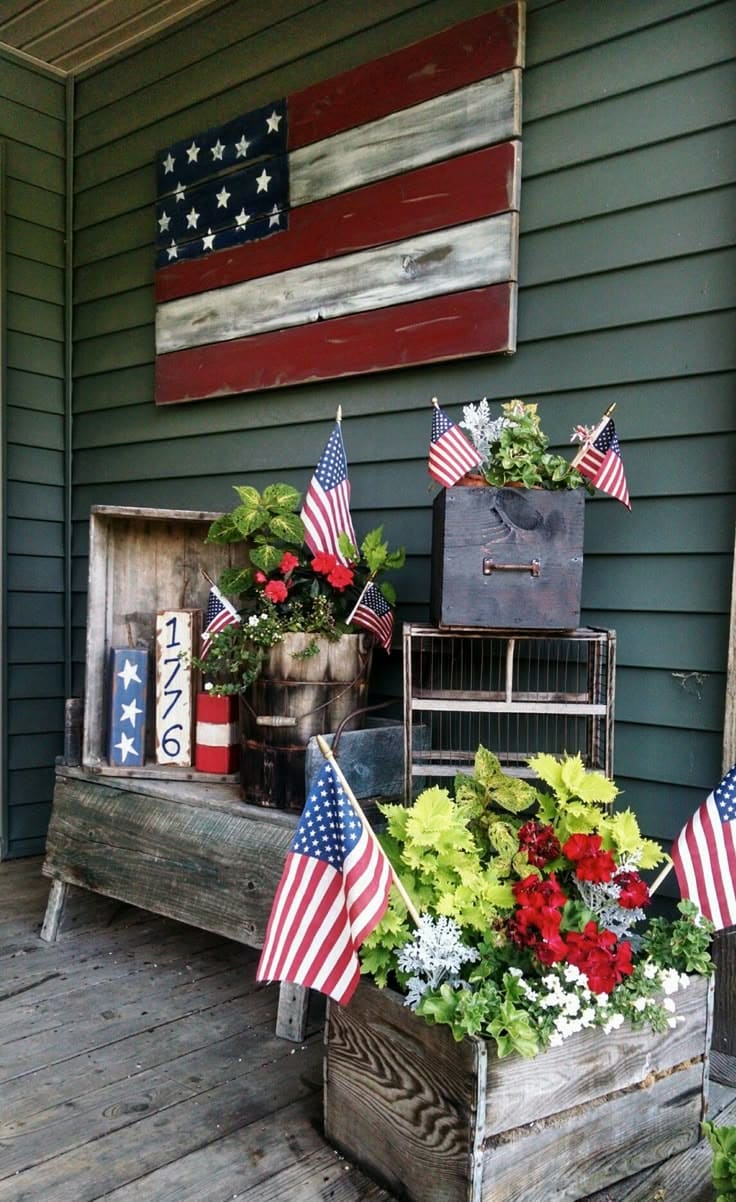
Ich habe das ganze Setup aus Flohmarktfunden, Restholz und ein bisschen rot-weiß-blauer Magie gebaut.
Benötigte Materialien
- 3–5 Holzkisten
- 6-8 Miniatur-US-Flaggen
- Rote, weiße und blaue Bastelfarbe
- Mischung aus roten Geranien, weißem Steinkraut, blauer Lobelie und Buntnessel
- Optional: 2-3 Altholzplatten
Schritt-für-Schritt-Anleitung
Schritt 1: Ordnen Sie Ihre Kisten und Pflanzgefäße in Schichten an – stapeln, neigen und stützen Sie sie ab, um Höhe und Dimension zu erzeugen.
Schritt 2: Bemalen Sie ein recyceltes Brett mit kräftigen roten und weißen Streifen und füllen Sie eine blaue Ecke mit aufgemalten weißen Sternen. Lassen Sie die Farbe trocknen und bearbeiten Sie das Brett anschließend mit Schleifpapier, um einen Vintage-Look zu erzielen.
Schritt 3: Füllen Sie jeden Pflanzkübel oder jede Kiste mit patriotischen Blumenarrangements und stecken Sie dann Mini-Fähnchen in jeden Pflanzkübel und um die Kisten herum.
Schritt 4: Fügen Sie kleinere bemalte Blöcke oder Schilder wie „1776“ oder „USA“ hinzu, um dem Ganzen eine besonders festliche Note zu verleihen.
#10. Fahrrad für die patriotische Parade
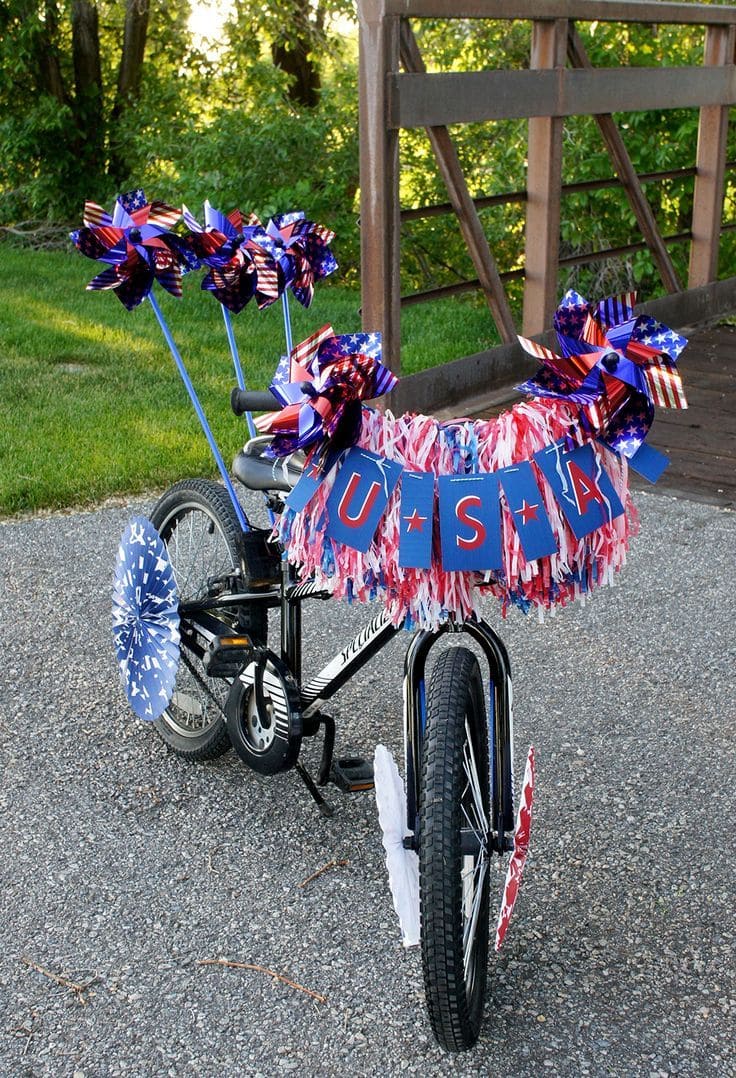
Es hat etwas Magisches, ein Fahrrad für den 4. Juli zu schmücken, vor allem, wenn das Ganze am Ende wie ein Feuerwerk auf Rädern aussieht.
Benötigte Materialien
- 5 rote, weiße und blaue Windräder
- 1 Packung rot-weiß-blaue Quastengirlande (9 Fuß lang)
- 4 dicke blaue Kartons
- Mini-Schaumstoffsterne
- Heißklebepistole und Klebestäbchen
- durchsichtiges Klebeband oder Kabelbinder
- Optional: 4 Papierfächer
Schritt-für-Schritt-Anleitung
Step 1: Wrap the tassel garland around the bike’s handlebars and secure the ends with tape or zip ties. Let it hang like a festive streamer curtain.
Step 2: Cut the blue cardstock into three rectangles and use white alphabet stickers to spell USA, placing each letter in the center. Add foam stars for a fun finish, then string the pieces together with twine and tie it across the front.
Step 3: Attach pinwheels to the handlebar grips and the rear of the bike using zip ties or strong tape. Add paper fans to the spokes for extra flair.
#11. DIY 4th of July Fabric Garland
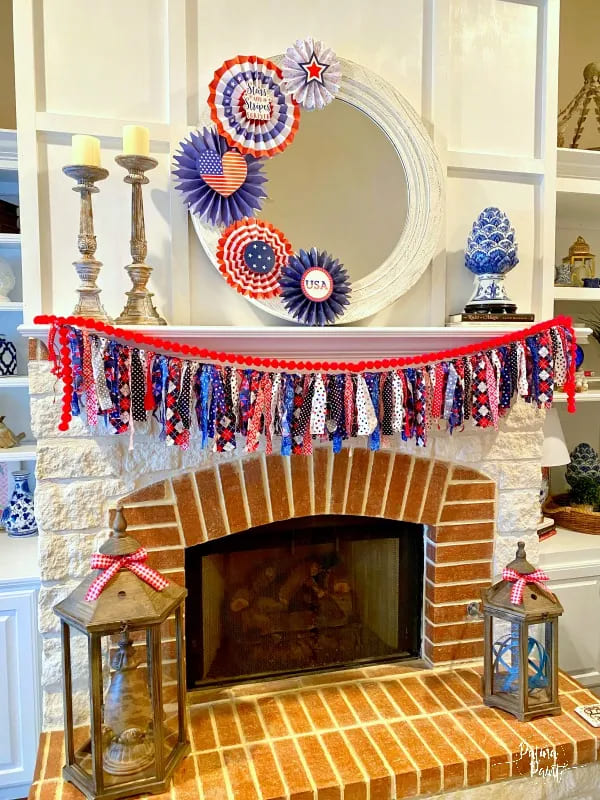
The mix of red, white, and blue scraps with patterns of stars, gingham, and polka dots makes this project both budget-friendly and wildly cheerful.
Materials Needed
- 80-100 assorted red, white, and blue fabric strips
- 6–8 ft. red pom pom ribbon
- 6–8 ft. twine
- Scissors
- Hot glue gun and glue sticks
Step-by-step Guide
Step 1: Start by cutting all your fabric strips to equal length and width. Vary the prints but keep the palette focused on red, white, and blue.
Step 2: Tie each fabric strip to your twine using a simple knot, sliding them snugly next to one another for a full look. Alternate colors and patterns to avoid clusters of the same print.
Step 3: Once finished, glue a strip of red pom pom ribbon across the top of the garland for a polished, cheerful trim.
Step 4: Drape it across your mantel and secure it with hooks or clear tape.
#12. Patriotic Rice Jar Flags
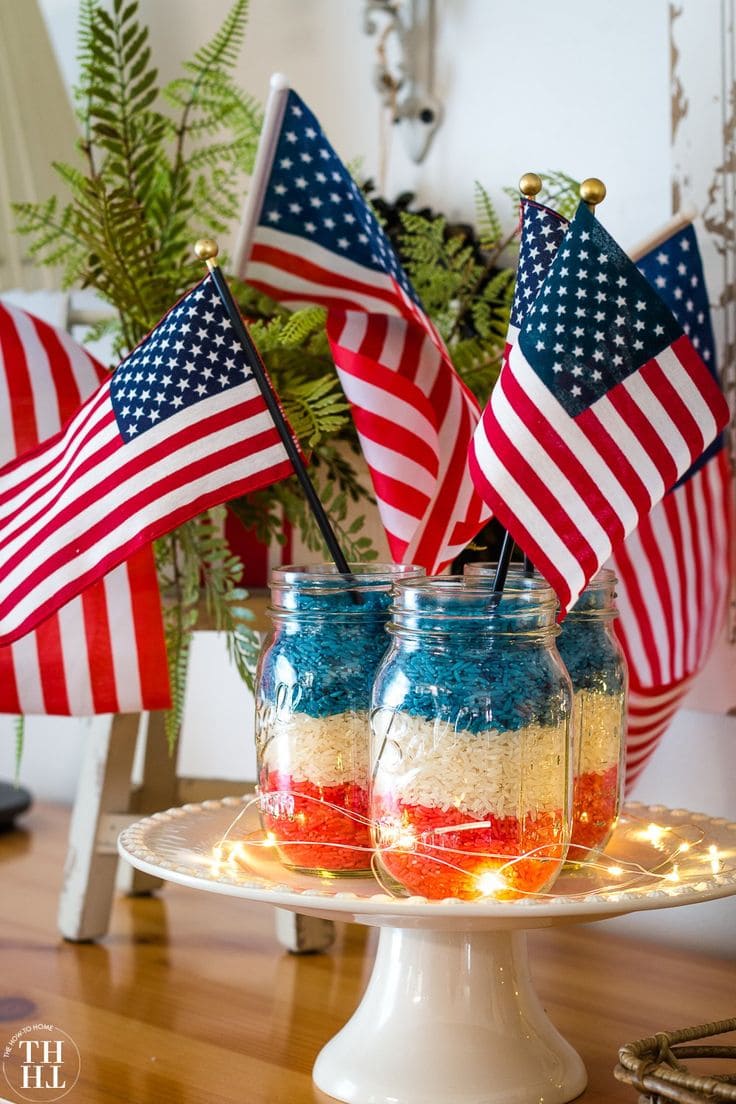
I had extra mason jars, a bag of rice, and some food coloring and boom, this layered flag look came to life!
Materials Needed
- 3 glass mason jars (16 oz)
- 1½ cups of uncooked white rice per jar
- Red and blue food coloring
- Plastic zip bags
- 4–6 inches tall mini American flags
- Twinkle fairy lights (battery-powered)
Step-by-step Guide
Step 1: Divide your uncooked rice evenly into three plastic bags. Leave one as-is (white), and add red coloring to one bag and blue to the other. Shake well and let dry completely on parchment.
Step 2: Once dry, layer the rice inside the jars in the order of red, white, and blue. Use a spoon to flatten each layer gently.
Step 3: Stick a mini flag into the center of each jar.
Step 4: For extra sparkle, wrap fairy lights around the base or set them beneath the jars on a cake stand for a glowing centerpiece effect.
#13. 4th of July Ice Cream Cone Door Hanger
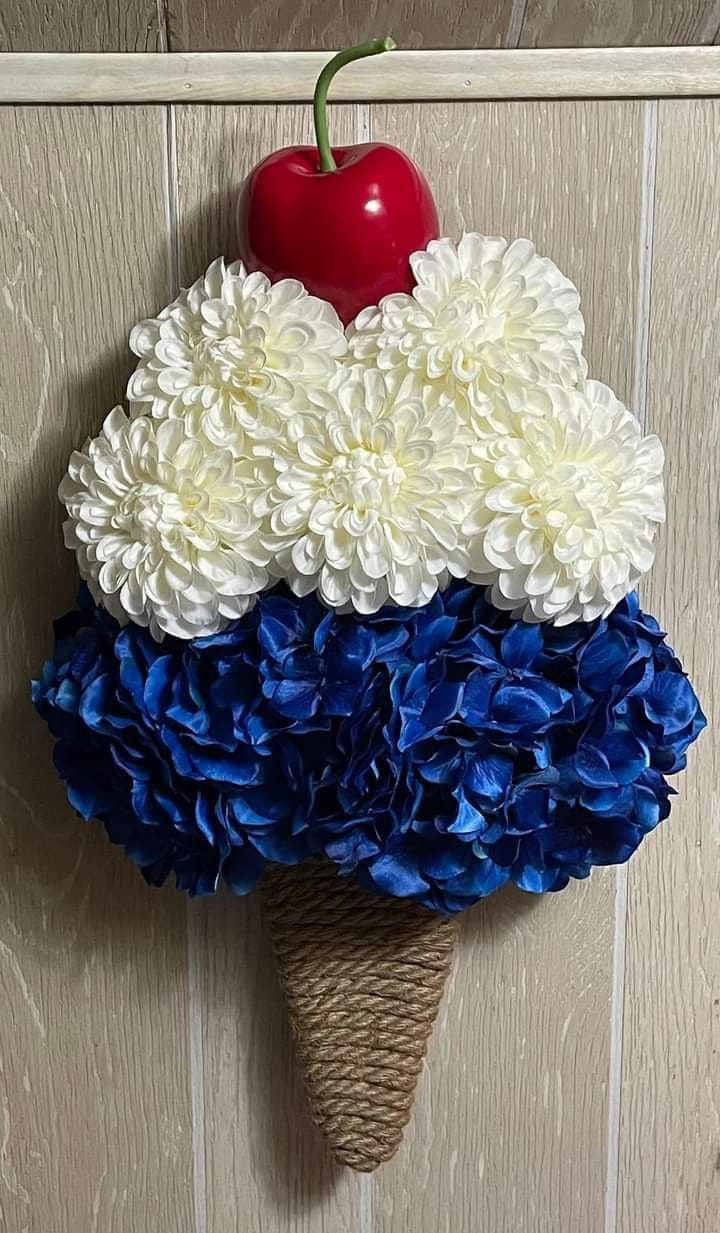
This one melts hearts, not in the sun! I made this adorable faux ice cream cone for my front door and it’s easily one of my favorite 4th of July crafts.
SHOP FOAM CONESHOP FAUX BLUE HYDRANGEA STEMSSHOP RED WHITE FLOWERSHOP RED FAUX CHERRY
Materials Needed
- 1 foam cone (6–8″ tall)
- 6 ft jute rope
- 4 faux white flowers (like dahlias or mums, approx. 4″ each)
- 4 faux blue hydrangea stems
- 1 large red faux cherry
- Hot glue gun and glue sticks
Step-by-step Guide
Step 1: Wrap your foam cone with jute rope from bottom to top, gluing as you go for a snug finish. Let it cool completely.
Step 2: Trim your faux flowers and glue the blue blooms onto the bottom half of the “ice cream,” followed by the white ones on top. Fluff them up a bit for extra volume.
Step 3: Add your cherry to the center top using a strong dab of hot glue.
Step 4: Glue a small loop of rope or ribbon to the back and hang it on your front door.
#14. Repurposed Shutter Flag Porch Statement
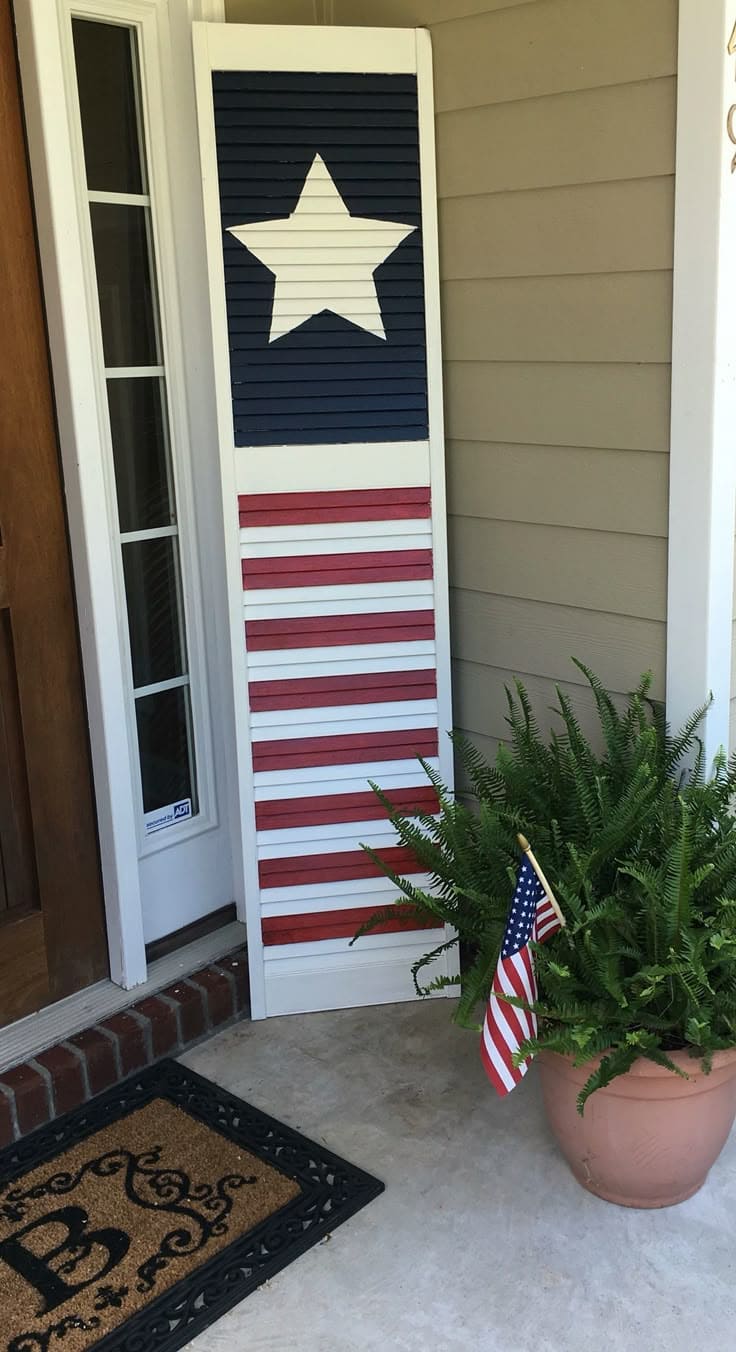
I found an old shutter in the garage and couldn’t bear to toss it, so this 4th of July, it got a bold Americana makeover. Now it stands proudly by the door, welcoming guests with its rustic charm.
Materials Needed
- 1 old shutter (approx. 48–60″ tall)
- Acrylic paint in navy blue, bright red, and white
- Wide painter’s tape (1.5″)
- Star stencil (or draw freehand)
- Small foam brushes or paintbrushes
- Optional: Clear spray sealer
Step-by-step Guide
Step 1: Clean and dry the shutter thoroughly. Use painter’s tape to mark off the top section for the blue star background and tape alternating slats for the red stripes.
Step 2: Paint the slats white first for a clean base. Then add red stripes and the navy blue upper panel. Let it dry in between coats to avoid bleeding.
Step 3: Place a star stencil in the center of the blue section and dab it with white paint.
Step 4: Once everything is dry, add a coat of clear sealer if the shutter will be outdoors.
#15. Vintage Window Flag Frame
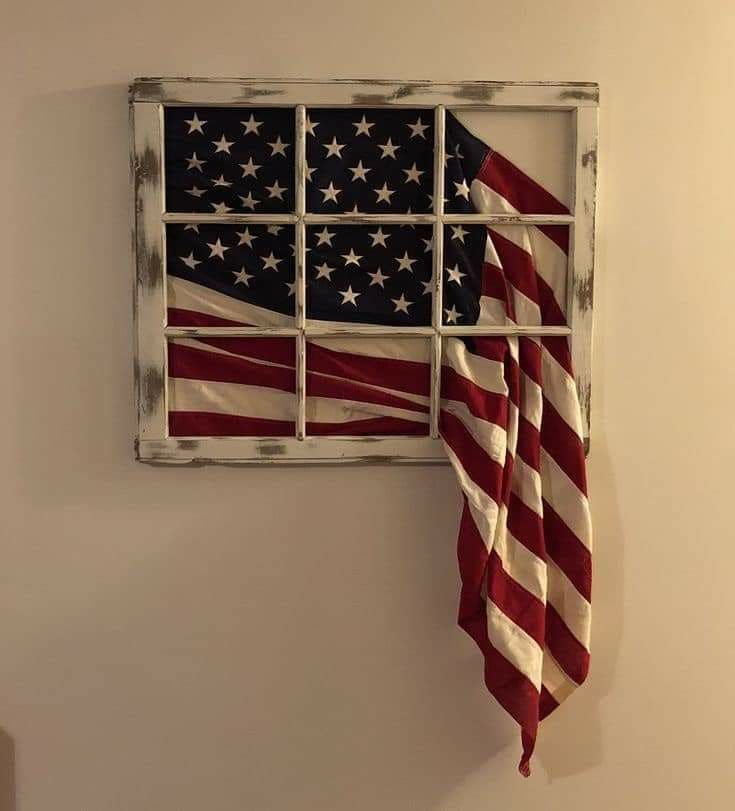
Using an old windowpane and a gently draped flag, this simple yet striking project brings rustic charm to any wall. I hung mine in the hallway and every guest comments on it.
Materials Needed
- 1 old window frame (6- or 9-pane recommended)
- 1 medium American flag (approx. 3ft x 5ft)
- Double-sided mounting tape or staples
- Optional: Chalk paint
- Optional: Sandpaper
Step-by-step Guide
Step 1: If your window frame needs a makeover, give it a coat of white chalk paint and lightly sand the edges for a weathered, farmhouse effect.
Step 2: Carefully fold or drape your flag so that the stars fit neatly into the top left panes and the stripes cascade through the rest. Let part hang down for a relaxed feel.
Step 3: Secure the flag behind the panes using mounting tape, staples, or a few small nails, make sure it stays smooth but not stretched.
Step 4: Hang your framed piece with sturdy wall hooks or lean it on a mantel.
#16. Rustic Patriotic Table Centerpiece
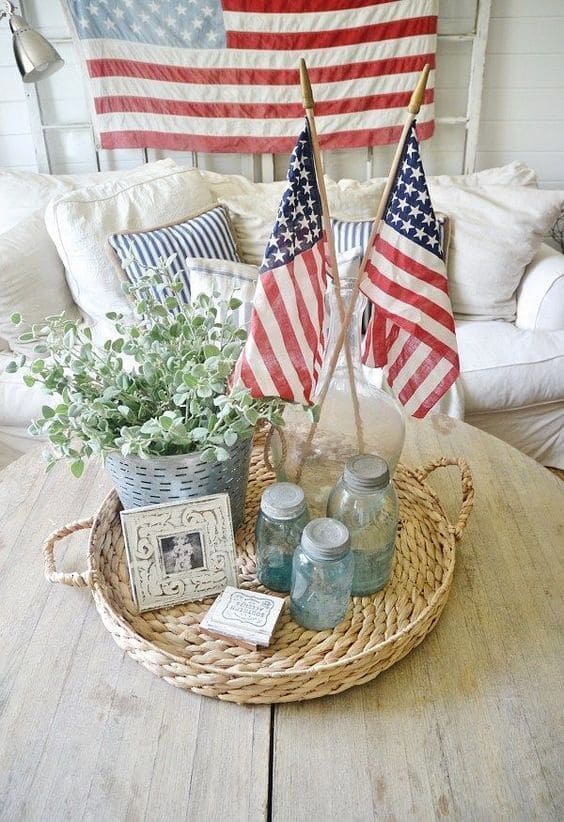
This soft-toned 4th of July tray brings all the charm of a farmhouse cottage into your living space. I love the calm palette, all tied together with two proudly waving flags.
Materials Needed
- 2 small vintage-style American flags (12″x8″)
- Glass jug (at least 10″ tall)
- 3 blue mason jars
- Faux eucalyptus bush
- Small metal planter
- Round woven tray (16–18″)
Step-by-step Guide
Step 1: Place your woven tray in the center of your table, couch console, or coffee table as a grounding base.
Step 2: Insert your faux eucalyptus bush into the metal planter and place it to one side of the tray.
Step 3: Fill the large glass jug with sand or pebbles and insert the two American flags inside for structure and height.
Step 4: Finally, line up your three mason jars in a cluster near the front corner.
#17. Patriotic Porch Chair Makeover
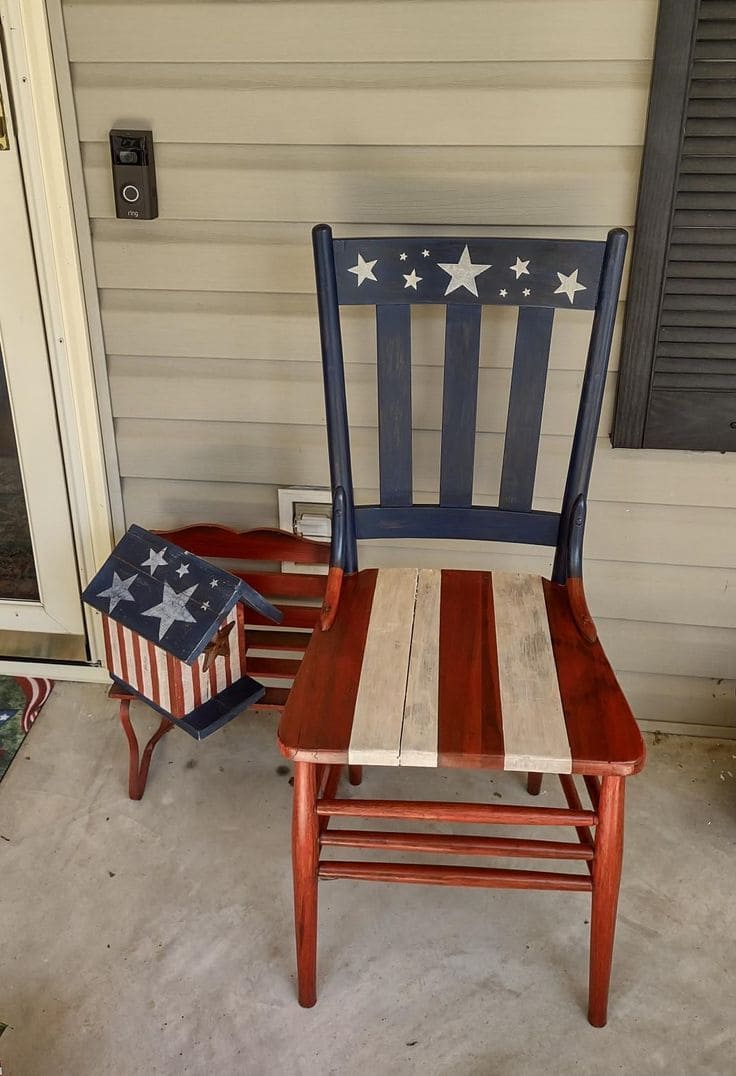
If you’ve got a wooden chair that needs a second life, this DIY is a fun and meaningful way to celebrate the 4th of July.
Materials Needed
- One old wooden chair
- Red, white, and navy acrylic paints
- Set of foam brushes or small paintbrushes
- Painter’s tape
- Star stencil or star-shaped stickers
- Matte clear sealant spray
Step-by-step Guide
Step 1: Lightly sand the chair and wipe it clean. Use painter’s tape to mark off the stripes on the seat and the navy section on the backrest.
Step 2: Paint the seat in alternating red and white stripes. Paint the top slat of the backrest navy blue. Let everything dry completely before removing the tape.
Step 3: Use a stencil or stickers to add white stars to the navy backrest. You can also hand-paint them if you’re feeling bold.
Step 4: Seal the whole chair with a matte clear coat so it holds up outdoors. Let it cure for 24 hours before using.
#18. Cozy Patriotic Nook Makeover
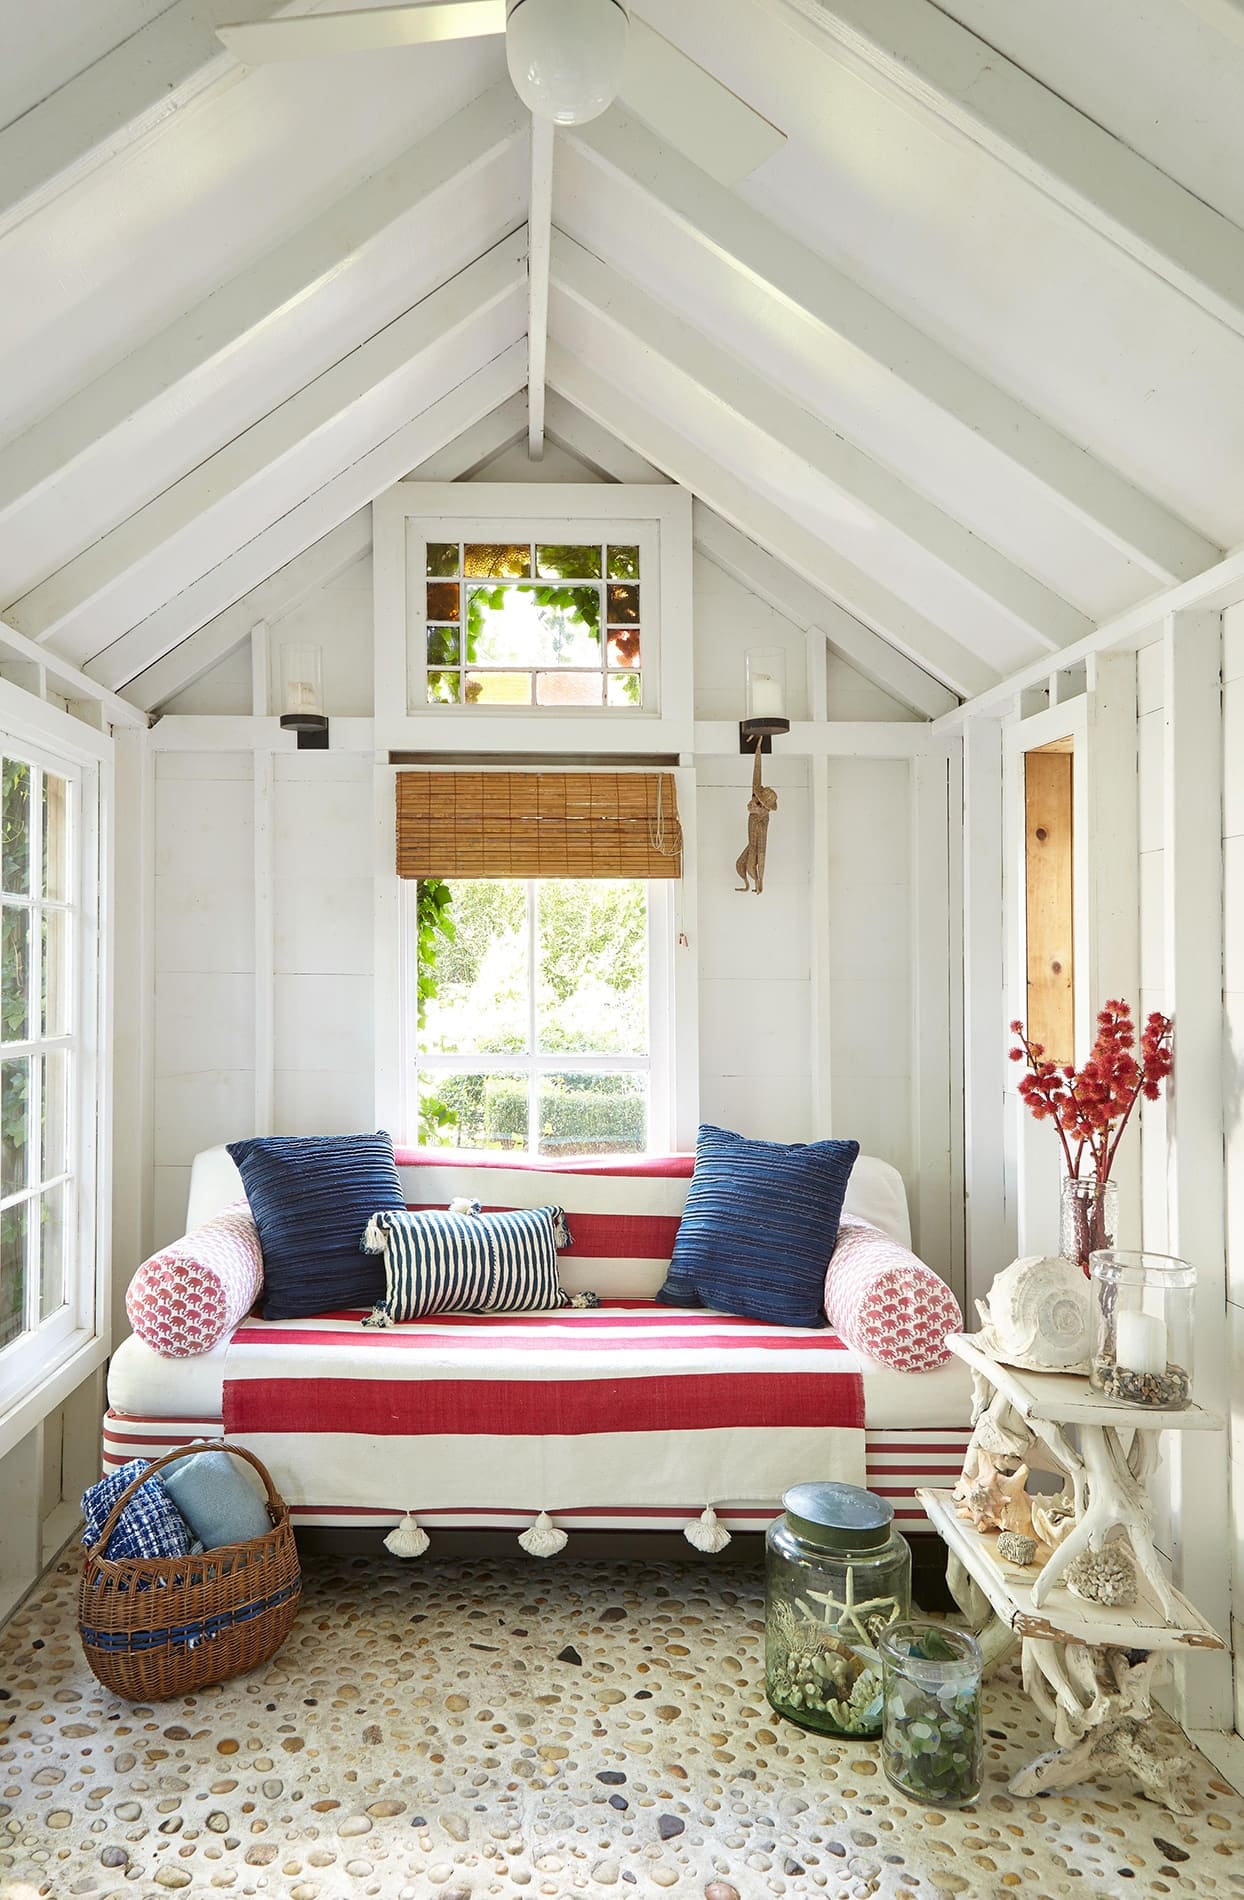
Tucked into a quiet garden shed or sunroom, this mini lounge space feels like summer patriotism wrapped in comfort.
Materials Needed
- Striped throw blanket (60″ x 80″)
- Navy blue throw pillows (2, 18″ x 18″)
- 2 Woven bolster pillows
- Wicker basket
- Mini driftwood shelf
- Glass jars with lids
- Natural fiber window shade
Step-by-step Guide
Step 1: Drape the striped throw across your couch or bench seat to act as a slipcover. Fold cleanly over the edges and let tassels hang front and center.
Step 2: Add two dark navy throw pillows and one smaller striped accent cushion for a layered, relaxed look.
Step 3: Place the bolster pillows on both arms to balance the setup visually and add lounging comfort.
Step 4: Arrange seashells, driftwood, and small treasures on a natural shelf or tabletop to bring in a beachy flair.
Step 5: Fill large glass jars with sand, starfish, or pebbles for subtle coastal nods, bonus points if collected from a family vacation!
Step 6: Complete the corner with a woven basket of rolled throws and a few patriotic textiles peeking out.
#19. 4th of July Mini Wagon Flower Display
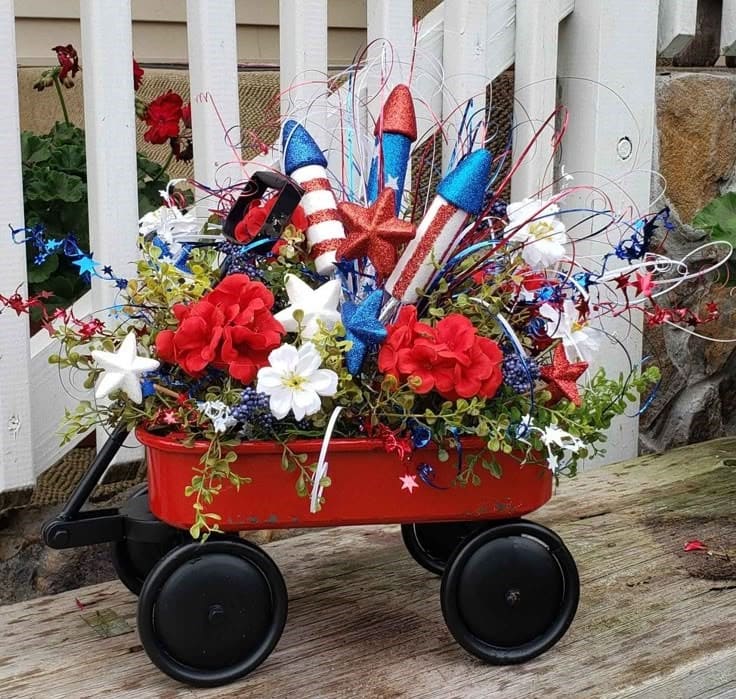
Overflowing with faux flowers, glittery rockets, and all the red-white-and-blue spark your heart can handle, this DIY project is cheerful, bold, and full of personality.
SHOP SMALL RED WAGONSHOP GLITTER STARSSHOP GLITTER ROCKET PICKSSHOP FLORAL FOAM
Materials Needed
- 1 small red wagon (around 12″ long)
- 4-6 red and white faux flowers (petunias, geraniums, or daisies)
- 3-4 glitter rocket picks or patriotic firework sprays
- Blue filler flowers (lavender or wildflowers)
- Assorted greenery sprigs (ivy, ferns, or eucalyptus)
- Floral foam
- Red, white, and blue glitter stars
Step-by-step Guide
Step 1: Fit a Styrofoam block inside the wagon to serve as your base. You can glue it down or leave it loose if you want to reuse the wagon later.
Step 2: Start with greenery and filler flowers to shape a full, lush bed. Keep some pieces flowing over the edge.
Step 3: Insert the red and white blooms evenly across the foam for a balanced, vibrant look.
Step 4: Add blue accents, focusing toward the front or sides for a pop of contrast.
Step 5: Finish by placing the rocket picks at an angle toward the back and surrounding them with glitter stars and curly wire sprays for a firework effect.
#20. Rustic Patriotic Star Wall Hanging
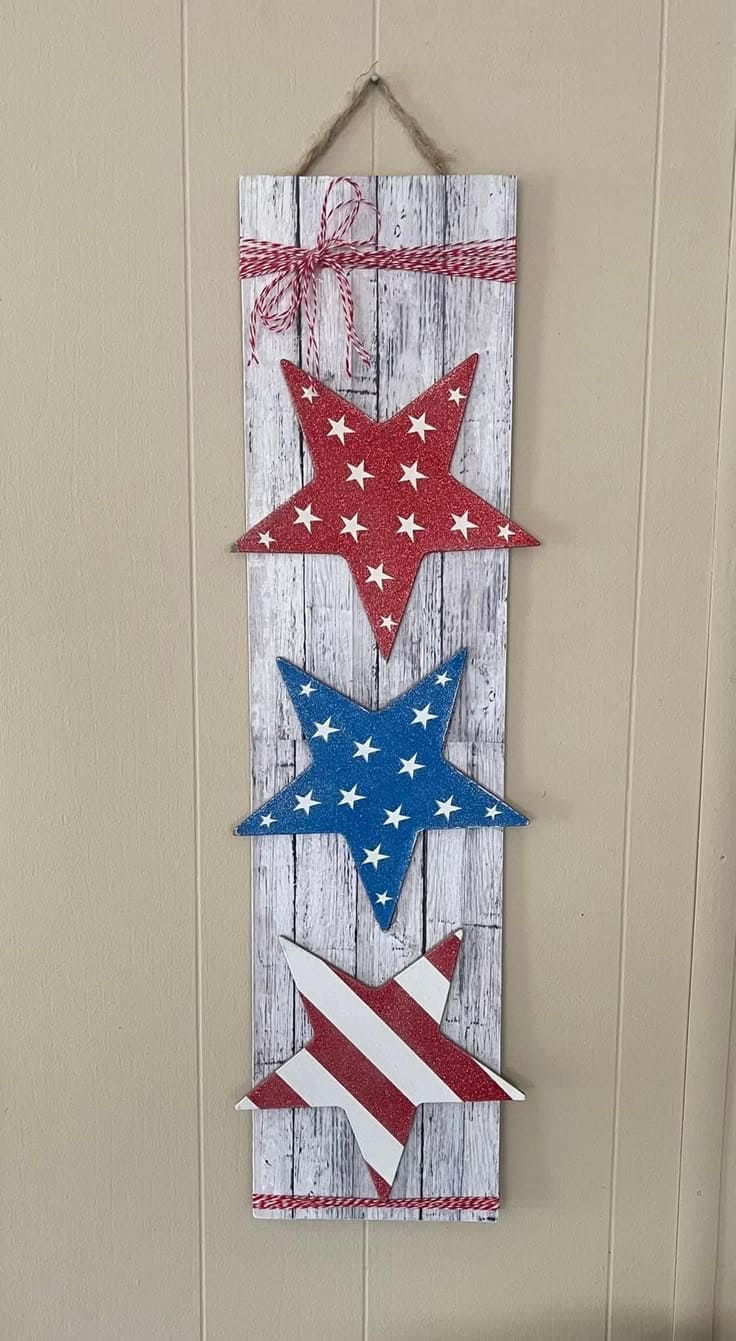
The weathered wood look, sparkly stars, and twine bow give it a mix of rustic and festive, and I loved how easy it was to personalize with glitter and paint.
SHOP WOOD BOARDSHOP WOODEN STAR CUTOUTSHOP STAR STICKERSSHOP RED AND WHITE TWINE RIBBON
Materials Needed
- 1 wood board (approx. 5″x18″)
- 3 wooden star cutouts (4″–5″ each)
- Red, white & blue acrylic paints
- Star stickers or white paint pen
- Red/white twine ribbon
- Jute rope
- Hot glue gun and glue sticks
Step-by-step Guide
Step 1: Paint the wood board with a distressed white-wash effect. Let it dry fully.
Step 2: Paint each star separately, one in red with white stars, one in blue with stars, and one in white with red stripes. Add glitter for sparkle.
Step 3: Once dry, hot glue the stars vertically down the center of the board.
Step 4: Add twine ribbon to the top and bottom of the board. Tie a bow with the same twine and glue it in the upper corner.
Step 5: Attach a jute rope hanger to the back and hang your star-spangled masterpiece with pride!
#21. Cozy Patriotic Porch Perfection
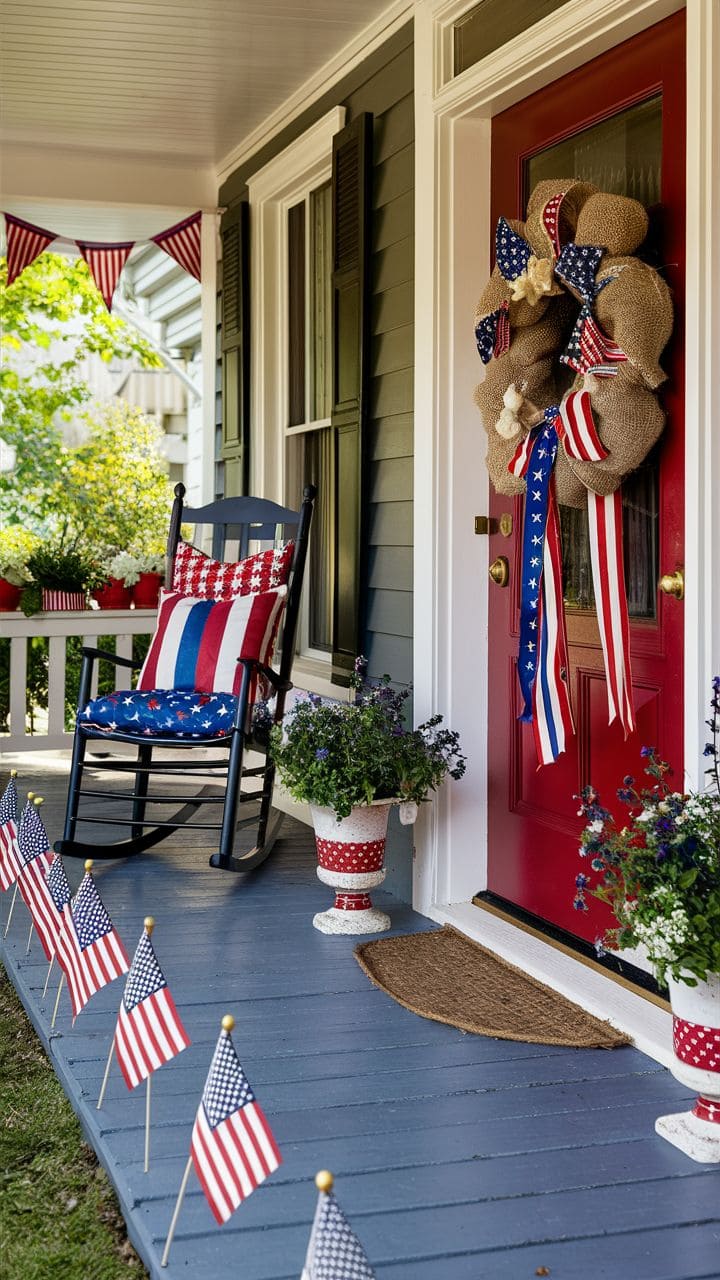
You’ll adore how the bold red door anchors everything, while the burlap wreath, festive rocker cushions, and flag-lined steps invite guests to pause and smile.
SHOP PATRIOTIC WREATHSHOP PATRIOTIC WIRED RIBBON
Materials Needed
- Burlap ribbon (about 6 yards)
- Patriotic wired ribbon (2–3 designs)
- Foam wreath base (14″)
- Mini American flags (10–12 pack)
- Pillows or covers (star, stripe, and red-white-blue patterns)
- Outdoor planters (red/white accents)
- Small U.S. bunting or garland
Step-by-step Guide
Step 1: Create the burlap wreath by looping and tucking your burlap into the foam base, alternating with wired patriotic ribbon for a layered look. Use floral pins or hot glue to secure.
Step 2: Dress your rocking chair with themed cushions – stars on the seat, stripes on the back, and red accents to pull it together.
Step 3: Line the porch walkway with small American flags. Push them into the ground or use floral foam in hidden planters to keep them upright.
Step 4: Use painted pots or wrap planters in red-and-white ribbon, then fill with blue and white flowers like lobelia, alyssum, or petunias.
Step 5: Add bunting above your porch rail or window for extra flair, and let the color wave proud.
#22. DIY Patriotic Table Setting
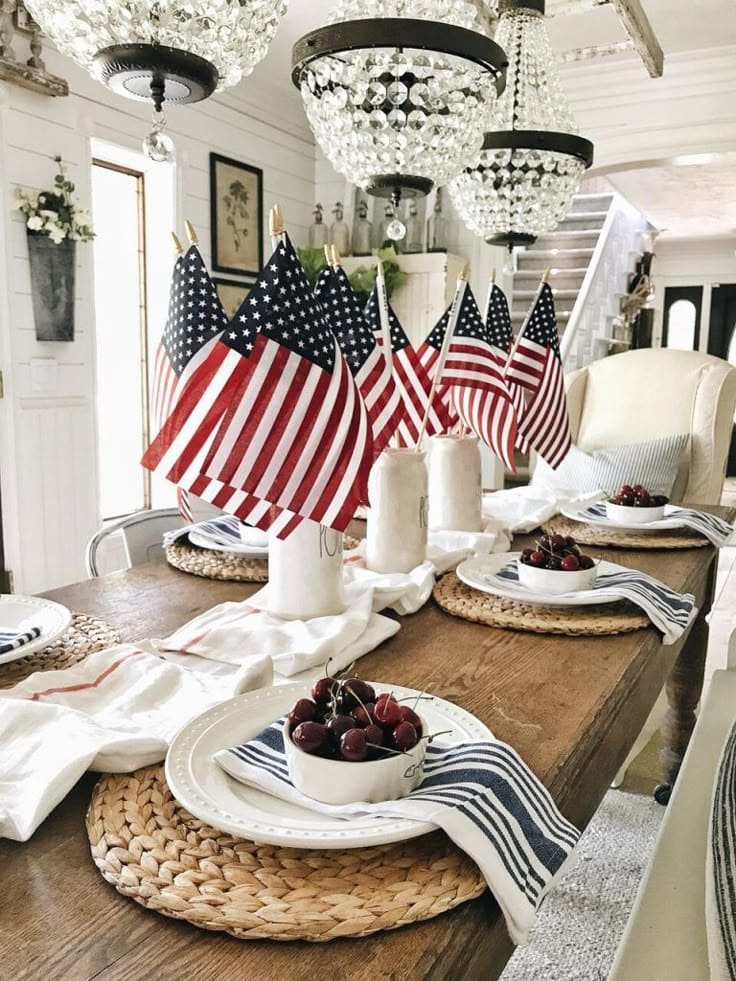
The combination feels warm and inviting, yet polished. It’s the kind of look that says, “You’re welcome here, let’s make memories.”
SHOP WHITE CERAMIC JARSSHOP STRIPED CLOTH NAPKINS
Materials Needed
- 8-10 mini American flags (12″x18″ size)
- 3 white ceramic jars
- Striped cloth napkins
- White dinner plates and shallow bowls
- Woven placemats
- Fresh cherries
- Light table runner
Step-by-step Guide
Step 1: Lay your runner or towel across the center of the table. Let it drape casually for a relaxed farmhouse feel.
Step 2: Arrange 3 white jars down the center and place one or two flags in each, fanned out slightly.
Step 3: Set each place with a woven placemat, white plate, and striped napkin folded or draped off the side.
Step 4: Nest a small bowl on top of the plate and fill it with cherries.
#23. DIY Patriotic Tiered Tray Display
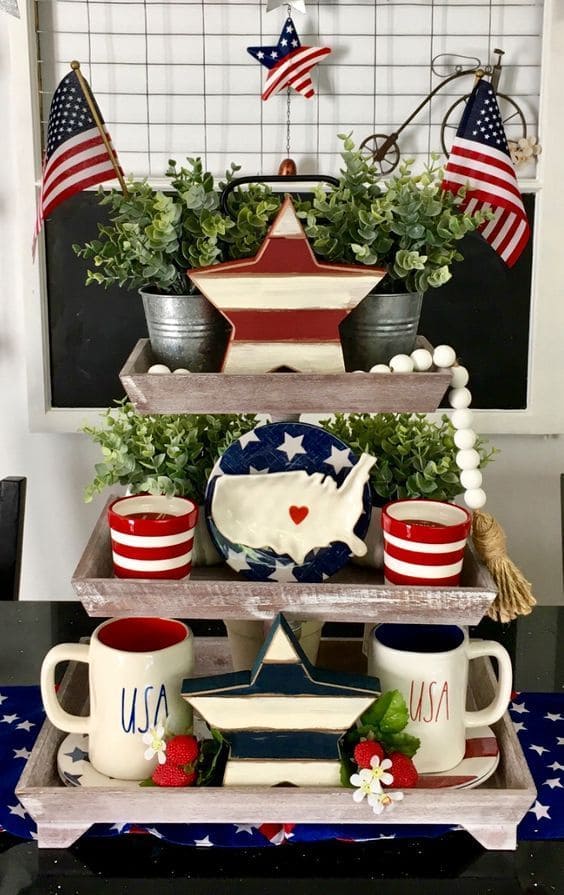
With just a few themed pieces, greenery, and some creative layering, you can build a mini celebration that brightens the whole room.
SHOP 3-TIER WOODEN TIERED TRAYSHOP PATRIOTIC WOODEN STARSSHOP FAUX PLANTSSHOP PATRIOTIC DISHSHOP PATRIOTIC MUGSSHOP WHITE WOODEN BEADS WITH TASSELSHOP FAUX STRAWBERRIES
Materials Needed
- 3-tier wooden tiered tray
- 2 small faux plants in galvanized pots
- 2 patriotic wooden stars
- 1 USA map-shaped dish or sign
- Red and white striped cups or ramekins
- USA mugs
- 2 mini stick American flags
- White wooden beads with tassel
- Faux strawberries
Step-by-step Guide
Step 1: Start by placing the faux greenery pots in the top tier corners, then prop a striped star or flag centerpiece in between.
Step 2: In the middle tier, nest the USA dish upright (leaned against greenery or backed with cardboard), flanked by striped cups or small decor pieces.
Step 3: On the bottom, arrange the mugs and a large patriotic star in the center. Add faux strawberries or florals for color pops.
Step 4: Drape the wood bead garland along the edge or hang it over the tray for a soft, finished look.
Step 5: Tuck in two American flags for a bold finishing touch.
#24. Stars and Stripes Burlap Bow Table Runner
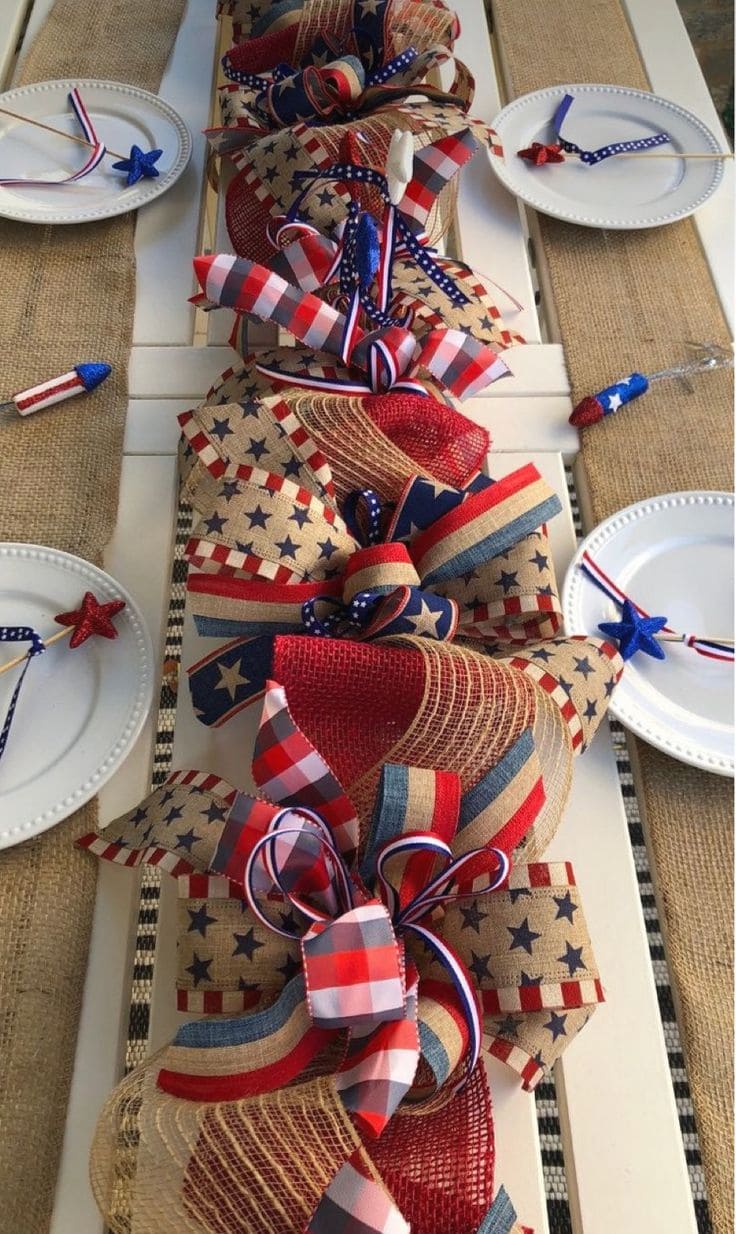
I made mine for under $15 using ribbon leftovers and a roll of mesh from last year’s wreath project—and honestly, it came out better than I imagined!
SHOP BURLAP DECO MESHSHOP RED DECO MESHSHOP PATRIOTIC RIBBONSHOP STAR RIBBONSHOP RED CHECKERED RIBBONSHOP NAVY AND RED STRIPED RIBBON
Materials Needed
- Burlap deco mesh (10-inch wide, 30 ft roll)
- Red deco mesh (10-inch, glittered or plain)
- Patriotic ribbon in 3 styles (1.5–2.5 inch width)
- Star ribbon
- Red checkered ribbon
- Navy/red striped ribbon
- Twist ties, pipe cleaners, or floral wire
- Hot glue gun + glue sticks
- Scissors and wire cutter
Step-by-step Guide
Step 1: Cut alternating strips of burlap mesh and red mesh into 10–12″ sections. Roll each piece loosely into a curl and pinch the center.
Step 2: Layer 3–4 mesh curls at a time and secure with a pipe cleaner to form a pouf. Repeat until you have enough poufs to stretch the full table length.
Step 3: Cut 12–15″ strips of ribbon and fold each into a loop or V-shape. Stack a few patterns together and twist into the center of each pouf.
Step 4: Use pipe cleaners to attach the poufs end-to-end in a straight line. You can also twist onto a central ribbon or mesh strip for easy placement.
Step 5: Fluff the bows and secure them in place with hot glue if needed.
#25. Rustic Americana Table Tray
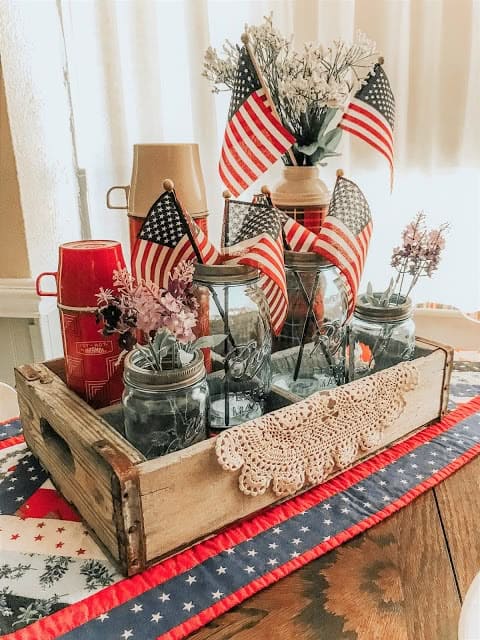
This vintage crate display is perfect if you love decorating with found objects and want to add personality without overdoing it.
SHOP ASSORTED-SIZE MASON JARSSHOP WOODEN CRATESHOP ARTIFICIAL WILDFLOWERSSHOP CROCHET DOILYSHOP PATRIOTIC TABLE RUNNER
Materials Needed
- Wooden crate approx. 14–18 inches wide
- 4–6 mason jars
- 4–6 Mini American flags
- Artificial wildflowers
- Crochet doily
- Red thermos (optional)
- Patriotic table runner
Step-by-step Guide
Step 1: Lay your table runner first, then center the wooden crate on top.
Step 2: Fill mason jars with faux flowers and flags. Mix tall stems with mini bouquets for natural variation.
Step 3: Tuck the thermos toward the back or center to anchor the eye.
Step 4: Add a folded crochet doily over one edge of the crate to soften the rustic wood.
4th of July4th of July decorIndependence Day
Share FacebookTwitterPinterestEmail
You may also like
How to Turn Old Table Lamps Into Solar Garden Lights
Anleitung zum Basteln eines Kieselstein-Familien-Kerzenhalters für gemütliche Wohndekoration
Wie man einen alten Aktenschrank in einen stilvollen Nachttisch verwandelt
Wie man einen Terrassentisch aus recycelten Glasplatten herstellt
Anleitung zum Selbermachen einer Eulen-Gartenskulptur aus recyceltem Metall
Wie man Steckenpferde aus Poolnudeln selber macht (für Kinder)
So basteln Sie einen Raffhalter aus Treibholz für einen gemütlichen, natürlichen Look
So basteln Sie ein patriotisches Hufeisen-Wandbild für Ihre Veranda oder Ihren Garten
Wie man eine atemberaubende Treibholz-Gartenskulptur mit farbenfrohen Glasakzenten herstellt
Ähnliche Beiträge

