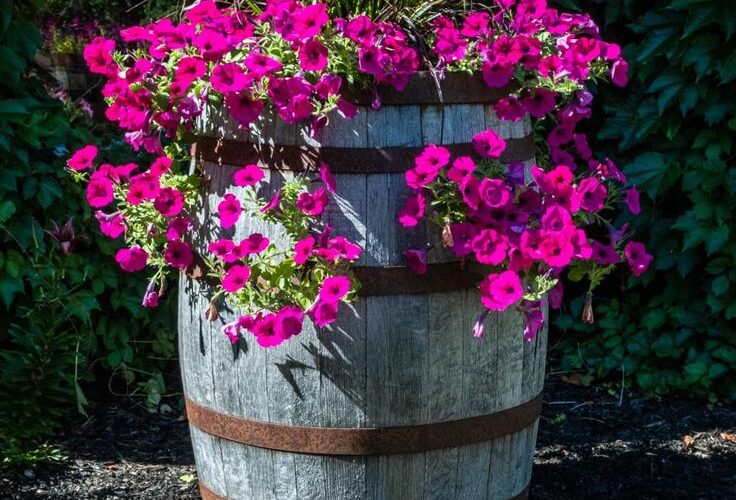
Haben Sie leere Whiskyfässer in Ihrer Garage oder in einer Ecke Ihres Gartens gefunden? Werfen Sie sie nicht gleich weg, denn sie bieten zahlreiche Möglichkeiten, Ihren Außenbereich mit einem Hauch von Vintage-Flair aufzuwerten. Diese Fässer, einst zum Reifen und Reifen edelster Spirituosen verwendet, können als faszinierende Blickfänge und funktionale Dekorationselemente ein zweites Leben erhalten.
Um Ihrem Haus und Garten einen zeitlosen und geschichtsträchtigen Reiz zu verleihen, krempeln Sie die Ärmel hoch und verwandeln Sie Fässer in einzigartige Stücke.
Dieser Artikel enthält Affiliate-Links. Wenn du über diese Links einkaufst, erhalte ich möglicherweise eine kleine Provision, ohne dass dir dadurch zusätzliche Kosten entstehen. Vielen Dank für deine Unterstützung!
#1. Whiskyfass-Pflanzgefäß
Dieser Pflanzkübel in Form eines Whiskyfasses strotzt nur so vor Farbe und bringt den Frühling direkt vor Ihre Haustür.
Benötigte Materialien
- 1 Pflanzgefäß aus einem Whiskyfass (ca. 66 cm Durchmesser, 40 cm hoch)
- Blumenerde (2 Kubikfuß)
- Blumenzwiebeln oder Baumschulblumen (Tulpen, Traubenhyazinthen, Narzissen oder saisonale Mischungen)
- Optional: Kokosnuss-Liner
- Bohrmaschine und 1/2″-Bohrer (optional)
Schritt-für-Schritt-Anleitung
Schritt 1: Wenn der Boden des Fasses noch keine Löcher hat, bohren Sie 5–6 gleichmäßig verteilte Abflusslöcher.
Schritt 2: Geben Sie zur besseren Entwässerung eine Schicht Steine oder Kies (ca. 5–7,5 cm) an der Basis hinzu.
Schritt 3: Füllen Sie den Rest mit hochwertiger Blumenerde und lassen Sie dabei etwa 5 cm bis zum Rand frei.
Schritt 4: Pflanzen Sie Blumenzwiebeln oder arrangieren Sie Ihre Baumschulblumen. Packen Sie sie eng, aber nicht zu dicht, ein. Gießen Sie großzügig und stellen Sie die Pflanze an einen sonnigen Platz.
#2. Whiskyfass-Wasserbrunnen
Das sanfte Blubbern des Wassers über dem verkohlten Holz bringt die Naturgeschichte des Fasses zum Vorschein; es fühlt sich an, als würde eine Märchenszene zum Leben erwachen.
Benötigte Materialien
- 1 Whiskyfass (ca. 15 Zoll Durchmesser) und 1 kleinerer Fasseimer (7–8 Zoll Durchmesser)
- Tauchbrunnenpumpe (120–200 GPH empfohlen)
- Rustikales Wasserauslauf-/Wasserhahndekor
- Durchsichtiger Vinylschlauch (½ Zoll Durchmesser, ca. 1,2–1,5 m)
- Versiegelung (optional)
Schritt-für-Schritt-Anleitung
Schritt 1: Versiegeln Sie die Innenseite des/der Fasses/Fässer mit wasserfestem Dichtmittel, um ein Auslaufen zu verhindern. Lassen Sie es mindestens 24 Stunden aushärten.
Schritt 2: Setzen Sie die Tauchpumpe in das untere Fass ein und führen Sie den Vinylschlauch durch den oberen Eimer und befestigen Sie ihn hinter Ihrem dekorativen Ausguss.
Schritt 3: Befestigen Sie den oberen Eimer sicher über der Basis (Sie können gestapelte Ziegel, Holzklötze oder einen im Fass montierten Ständer verwenden).
Schritt 4: Füllen Sie das untere Fass mit Wasser, schließen Sie die Pumpe an und genießen Sie Ihren neuen rustikalen Brunnen.
#3. Whiskyfass-Bartisch
Ich habe dies für ein Herbsttreffen in unserem Hinterhof gebaut und alle haben immer wieder kommentiert, wie zeitlos es aussieht.
Materials Needed
- 2 whiskey barrels (height approx. 35″, diameter 24″)
- 1 reclaimed wooden board (6 ft x 2 ft)
- Sandpaper
- Optional: wood stain
Step-by-step Guide
Step 1: Clean and sand the barrels to remove grime, but leave the rustic character if you love that aged look.
Step 2: Cut and sand the wooden top to your desired length and width. You can use pallet planks or a solid slab for a more farmhouse effect.
Step 3: Center the tabletop across the two barrels and secure with mounting brackets underneath if it will be permanent-or leave it loose for easy disassembly.
Step 4: Decorate your table with fruits or snacks to invite your guests.
#4. Whisky Barrel Ice Chest
This cooler stole the show at our last summer BBQ. It’s more than a conversation starter, it’s practical, stunning, and ridiculously fun to roll out on a hot day.
Materials Needed
- 1 half-size whiskey barrel (cut height ~18–24″)
- 1 round plastic tub insert
- Outdoor beverage spigot kit
- Optional: metal stand
- Ice and your favorite drinks
Step-by-step Guide
Step 1: Cut the barrel in half horizontally if not already pre-cut. Sand the rim smooth to avoid splinters.
Step 2: Drill a hole at the base of the barrel for the spigot, following the spigot kit’s diameter guide. Insert and seal it with waterproof sealant.
Step 3: Insert the plastic tub inside the barrel for leak-proof insulation. Fill the gap around it with foam insulation spray if needed.
Step 4: Mount the barrel onto a metal stand to give it height and rollability. Fill with ice and drinks and let the party begin.
#5. Whisky Barrel Sink Vanity
I wanted a sink that felt like it belonged in a garden shed or backyard bar.
Materials Needed
- 1 full-size whiskey barrel (approx. 35″ tall)
- 1 hammered copper bowl (diameter ~14–16″)
- 1 vintage-style faucet
- Hole saw
- Optional: drain pipe kit
Step-by-step Guide
Step 1: Mark the center top of the barrel and cut a hole slightly smaller than your basin’s diameter.
Step 2: Drop in the basin and mark where the faucet and drain will go. Drill/cut those openings accordingly.
Step 3: Mount the faucet onto the barrel top or nearby wall and connect to a water source if possible.
Step 4: Insert the basin, seal edges with waterproof adhesive, and attach the drain hose or pipe beneath.
#6. Whisky Barrel Fire Pit
There’s something about gathering around fire that just draws people in. You can build this barrel fire pit table for your patio, and it will be everyone’s favorite spot.
Materials Needed
- 1 sturdy whiskey barrel
- 1 round wooden tabletop, 36″–48″ wide and 1 round wood base, 30”
- 1 compact gas fire bowl kit with propane hook-up
- Heat-resistant glass rocks or lava rocks
- Basic wood sealant and fireproof adhesive
Step-by-step Guide
Step 1: Center and cut a circular hole in your tabletop to snugly fit the fire bowl insert.
Step 2: Attach the tabletop securely to the top of the barrel using corner brackets or wood screws from underneath.
Step 3: Place the fire bowl insert into the tabletop and fill it with glass or lava rocks.
Step 4: Connect the propane source and test for leaks before lighting. Add stools and enjoy your new fire-side gathering spot.
#7. Barrel Wine Rack
With its built-in cross-rack for bottles and smooth tabletop for glasses, it’s both charming and wildly practical, ideal for anyone who wants their wine within arm’s reach on summer evenings.
Materials Needed
- 1 whiskey barrel (standard 35″ height, 24″ diameter)
- 18 ft of 1″x2″ cedar wood slats
- Sandpaper
- Wood stain
- Electric jigsaw and drill set
- Wood glue and screws (¾ inch)
- Optional: 4 stemware holders
Step-by-step Guide
Step 1: Cut out a large front-facing section from the barrel using a jigsaw, preserving the structure. Sand all edges smooth to prevent splinters.
Step 2: Measure the inside and build an X-grid rack using the 1″x2″ wood slats, cut diagonally and notched to fit like lattice. Secure with glue and a few wood screws.
Step 3: Lightly sand the entire barrel and stain it evenly. Allow to dry, then coat with two layers of polyurethane sealant for weather protection.
Step 4: Attach optional under-shelf glass holders inside the top rim. Finally, set it upright, place your favorite wine.
#8. Barrel Pet Bed
Turning a discarded whiskey barrel into this dog bed was one of the most heartwarming projects I’ve done.
Materials Needed
- 1 whiskey barrel (standard 35″ height × 24″ diameter)
- 2 wooden planks (approx. 18″ long × 3″ wide)
- 1 qt of wood stain
- 1 qt of polyurethane sealant
- 1 dog bed cushion
- Sandpaper
- Electric saw, drill, screws (1½”)
- Optional: brass brackets
Step-by-step Guide
Step 1: Cut the whiskey barrel in half lengthwise using a circular saw. Sand the inside and outside thoroughly until smooth.
Step 2: Stain the wood to bring out the grain and match your decor. Let it dry fully before sealing it with polyurethane.
Step 3: Cut and attach two wooden planks as legs underneath the barrel base. Secure with screws and wood glue for added strength.
Step 4: Place a soft cushion or foam bed inside.
#9. Barrel Cabinet
Whether it’s for storing spirits or simply as a conversation piece, this mini bar cabinet feels bold, practical, and full of soul.
Materials Needed
- 1 whiskey barrel (approx. 35″ height × 24″ diameter)
- 2 barrel door hinges
- 1 locking hasp with vintage key
- 2 interior shelves cut to 20″ diameter, ¾” plywood or oak
- 1 qt of wood stain
- 1 qt polyurethane clear coat
- Sandpaper
- Electric jigsaw, drill, screws (1½”), measuring tape
Step-by-step Guide
Step 1: Sand the barrel surface until smooth, removing any rough patches or splinters. Stain and seal the outside and let it dry for 24 hours.
Step 2: Using a jigsaw, cut out two vertical door panels on the front. Sand the edges clean and attach them back with metal barrel hinges.
Step 3: Install two interior circular shelves by securing them with wood brackets or mounting hardware. Make sure to leave space for bottles or glasses.
Step 4: Attach a hasp lock and key set to the doors, giving it a vintage, functional finish.
#10. Barrel Coffee Table
he warm charred wood contrasts beautifully with the clear glass top, and it holds its own in a room filled with leather and books.
SHOP ROUND GLASS TABLETOPSHOP RUBBER BUMPERS
Materials Needed
- 1 whiskey barrel (approx. 18″ height × 24″ diameter)
- 1 round glass tabletop (30″ diameter × ½” thick)
- 4–6 rubber bumpers
- 1 qt of wood stain
- 1 qt of clear polyurethane sealer
- Sandpaper
- Drill, clamps, cleaning cloth
Step-by-step Guide
Step 1: Cut the whiskey barrel in half horizontally and thoroughly sand the exterior. Remove dust and wipe clean.
Step 2: Apply wood stain evenly with a brush or rag, then let dry fully. Apply a protective coat of polyurethane to seal the grain and prevent moisture damage.
Step 3: Once sealed, add rubber bumpers or table grips evenly around the top edge of the barrel to prevent the glass from sliding.
Step 4: Gently place the glass tabletop on top. Make sure it’s centered and level before decorating it with books or small plants.
#11. Barrel Bookshelf
Made from just a few reclaimed barrel staves and weathered boards, this compact shelf holds everything from wine glasses to hardbacks.
Materials Needed
- 6–8 whiskey barrel staves (30–36″ long)
- 4 wooden shelves (24″ wide × 10″ deep × ¾” thick)
- 8 metal L-brackets
- 1 qt of wood stain
- 1 qt polyurethane finish
- Screws (1½”), wood glue, drill, level
- Sandpaper
Step-by-step Guide
Step 1: Sand all the barrel staves and shelf boards to remove roughness and reveal the grain. Stain each piece and seal with polyurethane. Let dry overnight.
Step 2: Arrange the staves on each side to create the frame, securing them in pairs for balance. Use clamps and glue at contact points for sturdiness.
Step 3: Attach the shelves across the staves using L-brackets underneath for support, then use a level to ensure everything aligns properly.
#12. Barrel Smoker
If you’ve ever dreamed of infusing your meats with a deep, smoky flavor straight from a whiskey-scented barrel, this is your sign.
Materials Needed
- 1 whiskey barrel (standard 35″ height × 24″ diameter)
- 1 22″ charcoal grill grate
- 1 charcoal basket
- 2 metal chains
- 1 thermometer gauge
- 2 barrel hinges and a lid handle
- 1 qt of heat-resistant sealant
- Drill, jigsaw, screws, fire-safe gloves
Step-by-step Guide
Step 1: Carefully cut the barrel lid using a jigsaw to create a hinged top. Sand any rough edges and attach the hinges and handle.
Step 2: Inside the barrel, mount the charcoal tray at the base using fire-resistant supports. Seal around it with heat-resistant sealant.
Step 3: Install the grill grate about 12″ above the charcoal tray. Mount a thermometer gauge on the lid to monitor cooking temps.
Step 4: Secure the lid chains on each side to prevent it from swinging too far when opened, then light charcoal, let it heat, and place your meat on the grate.
#13. Rain Barrel
Every time it rains, I feel a quiet pride knowing I’m capturing something natural in something historic.
Materials Needed
- 1 whiskey barrel (standard 35″ height × 24″ diameter)
- 1 brass spigot kit
- 1 flexible downspout diverter kit
- 1 3/4″ spade bit and drill
- 1 screen mesh circle
- 1 qt of exterior wood sealer
- Cinder blocks
- Safety gloves, level, wrench
Step-by-step Guide
Step 1: Drill a hole near the bottom of the barrel using a ¾” spade bit. Insert the spigot and secure it tightly with a wrench and washer.
Step 2: Place the barrel on cinder blocks or pavers to raise it off the ground for easier water access.
Step 3: Seal the outside with exterior-grade wood sealer to weatherproof the barrel and extend its life. Let it cure fully.
Step 4: Install the downspout diverter and route it into a hole at the top of the barrel. Cover the opening with mesh to filter debris.
#14. Wine Barrel Clock
This clock might be small, but it holds a lot of heart.
Materials Needed
- 1 whiskey barrel stave (28–36″ long × 4–5″ wide)
- 1 quartz clock movement kit
- 4 large decorative clock numbers (2″–4″)
- 1 qt of wood stain
- 1 qt polyurethane finish
- Drill
- Strong adhesive
- Sandpaper
Step-by-step Guide
Step 1: Sand the stave until smooth and wipe it clean. Apply wood stain to enhance the grain and finish with a polyurethane coat, then let dry fully.
Step 2: Measure and mark the center point on the stave, then drill a hole for the clock mechanism. Install the movement and attach clock hands per kit instructions.
Step 3: Arrange and affix the numbers (12, 3, 6, 9) with adhesive or small screws for a bold, minimal look. Ensure spacing is even before securing.
#15. Barrel Wall Shelf
I built this shelf for my husband’s bourbon corner, but now I catch myself admiring it more than he does.
Materials Needed
- 1 whiskey barrel head (approx. 21″–24″ diameter)
- 1 whiskey barrel steel hoop (cut to ¾ circle)
- 1 wooden shelf board (approx. 20″ × 6″ × ¾”)
- 2 support braces cut from barrel staves
- 1 qt of wood stain
- 1 qt of polyurethane sealer
- Wood screws (1½”), anchors, wall-mounting hardware
- Sandpaper, power drill
Step-by-step Guide
Step 1: Sand the barrel head and shelf board smooth. Stain both pieces and seal with polyurethane. Let dry completely before assembling.
Step 2: Attach the shelf to the barrel head using wood screws through the support braces underneath. Ensure it’s centered and level.
Step 3: Curve and mount the steel band along the front edge of the shelf, securing it with small screws into the side of the board.
Step 4: Install mounting brackets or D-ring hangers on the back of the barrel head. Secure the entire piece to a wall stud or use heavy-duty wall anchors.
#16. Half Barrel Planters
Built from a split whiskey barrel and raised on sturdy legs, it brings my greens to eye level and keeps my knees happy.
Materials Needed
- 1 whiskey barrel (standard 35″ height × 24″ diameter)
- 2 wooden legs
- 1 qt of wood stain
- 1 qt polyurethane
- 1 roll of weed barrier fabric
- Drainage gravel
- Potting soil and your choice of plants or herbs
- Screws (1½”), electric drill, landscape staples
Step-by-step Guide
Step 1: Cut the barrel in half lengthwise. Sand thoroughly, then apply wood stain and sealant. Let dry completely.
Step 2: Build an H-frame base from 2×6 boards and screw the barrel onto the frame for a stable, raised design.
Step 3: Line the interior with weed barrier fabric and staple it along the inner rim. Add a 2–3″ layer of gravel for drainage.
Step 4: Fill with quality potting soil and start planting. This setup works great for vegetables, herbs, flowers, or even a miniature fairy garden.
#17. Barrel Ottoman
The curve of the barrel holds your back just right, the nailhead trim adds a vintage edge, and the soft linen upholstery turns a rustic relic into a luxe retreat.
Materials Needed
- 1 whiskey barrel
- 1 round upholstery foam cushion (20–22″ diameter × 4–5″ thick)
- 1½ yards of upholstery fabric
- 3 wooden support beams, 2×4″ lumber cut into 8–10″ pieces
- 1 set of decorative upholstery tacks
- 1 qt wood stain
- Heavy-duty staple gun, wood glue, screws, drill
- Optional: swivel base hardware
Step-by-step Guide
Step 1: Cut the barrel to seat height (approx. 20–24″). Sand, then stain and seal the outer surface. Let cure completely.
Step 2: Cut a round wooden base to fit inside the barrel bottom. Attach support beams as feet or add a swivel base if desired.
Step 3: Wrap the foam cushion in your chosen fabric and staple it tightly to the wood base. Add the seat inside the barrel using glue and screws or brackets.
Step 4: Cut and upholster a padded backrest panel. Attach it inside the barrel’s curve and secure with upholstery tacks or nailhead trim around the edges for a classy finish.
#18. Barrel Dog House
This snug doghouse turned out better than I imagined. The barrel keeps it cool in the summer, warm in the winter, and endlessly stylish year-round.
Materials Needed
- 1 whiskey barrel (standard 35″ height × 24″ diameter)
- 2 wooden base runners (24″ length)
- 1 personalized nameplate (optional)
- 1 indoor/outdoor pet mat
- 1 qt of exterior wood stain
- 1 qt polyurethane sealant
- Jigsaw, drill, screws (1½”), measuring tape, sandpaper (medium + fine)
Step-by-step Guide
Step 1: Cut an entry hole into the barrel about 14–16″ wide and 16–18″ tall, depending on your dog’s size. Sand all cut edges until smooth.
Step 2: Attach the barrel to two base runners using screws through the barrel base for stability and ground clearance.
Step 3: Stain the entire surface with exterior wood stain and seal with polyurethane for weather resistance. Let dry thoroughly.
Step 4: Place a washable mat inside and finish with a nameplate above the entry for a custom look.
#19. Barrel Side Cabinet
I wanted something that felt rustic and intimate, but still sleek enough to hold a few bottles, glasses, and a cozy lamp.
Materials Needed
- 1 full-size whiskey barrel
- 2 interior shelves (20″ diameter, ¾” thick)
- 1 set of barrel hinges
- 1 cabinet knob
- 1 qt wood stain + polyurethane finish
- 1 battery-powered LED strip light kit
- Screws (1½”), drill, jigsaw, measuring tape
- Optional: Power outlet hole grommet
Step-by-step Guide
Step 1: Sand the outside of the barrel, then stain and seal it. Let it cure completely before making cuts.
Step 2: Use a jigsaw to carefully cut a cabinet-style opening on the front. Save the cut panel to reattach as a door with hinges.
Step 3: Install two circular shelves inside at desired heights using wooden cleats or corner brackets for support.
Step 4: Attach the door with barrel hinges and screw in the knob or handle. Mount the LED strip lights to the top shelf or door interior for a warm glow, then add bottles, glasses, or decor.
#20. Barrel Candle Holders
Whether holding a candle, a tiny succulent, or just standing on its own, it glows with handmade charm.
Materials Needed
- 1 whiskey barrel stave (approx. 30″–36″ long)
- 1 small wood block shelf (6″ × 4″ × ¾”)
- 1 curled barrel hoop metal (approx. 8–10″ long)
- 2 metal L-brackets
- 1 pillar candle
- 1 qt of wood stain
- Polyurethane sealant
- Screws (¾” and 1½”), drill, wall anchors
Step-by-step Guide
Step 1: Sand the stave and small shelf block. Apply wood stain and seal both with polyurethane. Allow to dry overnight.
Step 2: Attach the shelf block to the stave using wood glue and two screws from the back or L-brackets underneath.
Step 3: Bend a strip of barrel hoop into a decorative curl and attach it under the shelf for support and aesthetic appeal.
Step 4: Mount the sconce to the wall using screws and anchors through the back of the stave. Place your candle or accent item on the shelf and enjoy the glow.
#21. Barrel Chandelier
- Pin It
Crafted from a single curved barrel stave and vintage-style bulbs, it blends warmth with drama.
SHOP VINTAGE-STYLE PENDANT LIGHT KITSSHOP CEILING HOOKS
Materials Needed
- 1 whiskey barrel stave (34″–36″)
- 5 vintage-style pendant light kits
- 2 heavy-duty ceiling hooks and chain links (each 18″–24″)
- 1 qt of wood stain and polyurethane sealer
- Electrical wiring tools
- Sandpaper, protective gloves, eye protection
Step-by-step Guide
Step 1: Sand the stave, then stain and seal it. Let dry fully. Measure and mark evenly spaced points for the pendant cords.
Step 2: Drill holes through the stave to thread the cords, and install the pendant sockets securely with lock rings or metal washers.
Step 3: Attach two chain links at each end of the stave using metal eye bolts or mounting screws. Hang it from ceiling hooks anchored to studs.
Step 4: Connect the pendant wires to a ceiling plate, following your kit instructions.
#22. Barrel Ottoman With Storage
- Pin It
Whether it’s coffee, wine, or a board game night, this table has seen it all. It’s not just furniture, it’s a toast to the craft of slow living.
Materials Needed
- 1 half whiskey barrel (standard 35″ height × 24″ diameter)
- 1 solid tabletop (approx. 48″ × 28″ × 1″ thick)
- 2 wooden support frames (20” height)
- 1 qt of wood stain + polyurethane
- Optional: 2 metal L-straps
- Screws (2”), drill, sander, clamps
- Felt pads
Step-by-step Guide
Step 1: Sand and stain the barrel half and wooden tabletop. Seal all wood with a clear polyurethane finish and let it dry completely.
Step 2: Build the H-frame wooden base from two vertical 2×6s and one horizontal crosspiece. Attach the barrel onto the base using interior brackets or wood screws.
Step 3: Center and attach the tabletop using wood glue and long screws from inside the barrel. Be sure to clamp and let set firmly.
Step 4: Add decorative brackets or straps to the outside edges if desired. Finish with protective pads underneath.
#23. Barrel Serving Tray
- Pin It
I made it using a few staves and a personalized wood base, and now it lives on our coffee table, often holding wine, cheese, or weekend mail.
Materials Needed
- 2 whiskey barrel staves (approx. 18–20″ long)
- 2 small wooden handles
- 1 wooden base board (approx. 20″ × 10″ × ¾”)
- Optional: custom wood burning kit
- 1 qt food-safe wood finish
- Wood glue, clamps, screws or brads, drill
Step-by-step Guide
Step 1: Sand all wooden parts. If personalizing, engrave or burn the desired name or monogram into the center of the base board.
Step 2: Attach the two curved staves to the longer edges of the tray base using wood glue and clamps. Reinforce with small nails or screws if needed.
Step 3: Attach handles to each end or cut out grip holes in the base before assembly.
Step 4: Apply food-safe finish or wax to protect the wood. Let cure fully before use.
#24. Barrel Coat Rack
- Pin It
This rack is mounted right by the entryway, and somehow, it’s the first thing everyone compliments.
Materials Needed
- 1 whiskey barrel stave (approx. 30″–36″ long)
- 3–5 wooden pegs (3″ long)
- 1 qt of wood stain + polyurethane sealer
- Wood glue, drill, ⅜” drill bit, screws, wall anchors
- 2 keyhole hangers
- Sandpaper
Step-by-step Guide
Step 1: Sand the stave to remove any splinters, but keep the character marks. Stain and seal it, then let it dry completely.
Step 2: Mark evenly spaced positions for the pegs, drill holes about ½” deep with a ⅜” bit, and secure pegs with wood glue.
Step 3: Attach keyhole hangers or D-rings to the back of the stave near each end for wall mounting, then screw the rack into wall anchors or studs.
#25. Barrel Decor Display
- Pin It
With just a few tweaks, you can turn it into a charming tabletop and a sneaky little storage space.
Materials Needed
- 1 whiskey barrel (standard 35″ height × 24″ diameter)
- 1 circular wooden lid (optional)
- 1 wood knob
- Optional: hinges
- 1 qt wood stain and matte sealer
- Sandpaper, screws, drill
- Optional: 2 interior wooden shelves
Step-by-step Guide
Step 1: Clean and sand the barrel gently, preserving the weathered finish if desired. Apply stain and sealant for protection.
Step 2: Decide if you want a fixed or removable top. For storage access, cut the lid using a jigsaw and attach it back with two small hinges and a knob handle.
Step 3: Add shelves or storage baskets inside for organization, then style the top with pinecones, candles, a wire basket, or framed print.
#26. Barrel Chair
- Pin It
These stools were the ultimate upgrade to our kitchen island. Built from solid barrel staves and finished with smooth round tops, they hold a touch of old-world soul with every curve.
Materials Needed
- 3-4 whiskey barrel staves per stool (24″–30″ each)
- 1 round wooden seat (14″–16″ diameter × 1″ thick)
- 1–2 short staves
- 1 barrel hoop ring
- 1 qt wood stain and polyurethane sealant
- Screws (2″), wood glue, brackets, drill, sander
- Optional: swivel base
Step-by-step Guide
Step 1: Cut 4 staves to equal leg lengths, sand them, and stain/seal each piece. Allow to dry thoroughly.
Step 2: Attach legs to the underside of the seat using angle brackets or wooden cleats. Position them evenly for stability.
Step 3: Use part of a barrel hoop to create a footrest ring near the bottom, screwing it into each leg for support and style.
Step 4: Attach a short stave or wine-soaked board across two vertical supports as the backrest. Finish with a second coat of sealer for durability.
#27. Barrel Hammock
- Pin It
Made from wine-stained staves, the seat hugs your body naturally, and the thick ropes give it a dreamy, old-world charm.
Materials Needed
- 5–7 whiskey barrel staves (approx. 28–30″)
- 2 solid wood support rails (1.5″×2″×28″)
- 20–25 ft of 1″ natural fiber rope
- 2 heavy-duty eye bolts
- 1 qt outdoor wood sealant
- Screws (1½”), drill, wood glue, sandpaper
Step-by-step Guide
Step 1: Sand each stave until smooth. Stain if desired, then seal all wood with an exterior-grade or marine polyurethane. Let cure fully.
Step 2: Lay out staves side by side, curved side up. Attach the front and rear wood support rails underneath using screws and wood glue.
Step 3: Drill holes near both ends of each support rail. Thread rope through and tie secure knots underneath. Repeat for both sides.
#28. A Towel Rack From Barrel
- Pin It
This towel rack added the perfect rustic-meets-industrial touch to our bathroom.
SHOP METAL WINE BOTTLE HOLDERS
Materials Needed
- 2 whiskey barrel staves (approx. 30″–32″ long)
- 4 metal wine bottle holders
- Screws (¾” or 1″), washers, drill
- 1 qt of wood stain and matte polyurethane
- Optional: rubber pads
Step-by-step Guide
Step 1: Sand the staves and apply wood stain, then seal with polyurethane. Let dry completely.
Step 2: Lay the staves side by side vertically and evenly space your metal brackets across them (leave 6–8″ between holders).
Step 3: Attach the brackets to both staves using screws and washers for extra support. Ensure alignment before tightening.
#29. Umbrella Holder
- Pin It
You can use a clean, sealed whiskey barrel as a sturdy base for a large umbrella, and it’s become our go-to spot for iced tea, chats, or quiet reading.
Materials Needed
- 1 sealed whiskey barrel (standard 35″ height × 24″ diameter)
- 1 patio umbrella pole (1.5″–2″ diameter)
- 1 hole saw attachment
- 1 qt of exterior-grade polyurethane
- Optional: 1 bag of pea gravel
- Optional: round serving tray, decor accents, or cup holders
Step-by-step Guide
Schritt 1: Bohren Sie mit einer Lochsäge ein zentriertes Loch durch den Fassdeckel, das etwas breiter als die Stange Ihres Schirms ist.
Schritt 2: Schleifen Sie die Öffnung ab und versiegeln Sie das Holz um den Schnitt herum erneut mit Polyurethan, um es vor Feuchtigkeit zu schützen.
Schritt 3: Füllen Sie den Boden des Fasses mit Kies, um es zu beschweren und dem Schirmmast einen aufrechten Halt zu geben.
Schritt 4: Setzen Sie den Schirm ein und stellen Sie die Spannung ein. Dekorieren Sie die Oberseite mit einem Getränketablett, einer kleinen Laterne oder einem Serviettenhalter und genießen Sie schattige Nachmittage im rustikalen Stil.
#30. Fasslichthalter
- Pin It
Indem Sie einen hohen Terrassenheizer in der Mitte eines Whiskyfasses befestigen, können Sie aus einem Schandfleck ein Prachtstück machen.
Benötigte Materialien
- 1 volles Whiskyfass (35″ Höhe × 24″ Durchmesser)
- 1 Propan-Terrassenheizer
- 1 qt wetterfestes Holzversiegelungsmittel
- 1 Lochsägenbohrer (ca. 2,5–3 Zoll)
- Optional: Innenhalterungen
- Optional: Dekoratives Füllmaterial wie Kies, Rinde oder Tannenzapfen
Schritt-für-Schritt-Anleitung
Schritt 1: Schneiden Sie mit einem Lochsägenbohrer ein zentriertes Loch in die Oberseite des Fasses, das dem Stangendurchmesser Ihres Heizgeräts entspricht.
Schritt 2: Schleifen und versiegeln Sie die Kanten und beschichten Sie dann das gesamte Fass mit wetterfestem Dichtungsmittel, um es vor Feuchtigkeit und Sonne zu schützen.
Schritt 3: Stecken Sie den Heizstab durch das Loch im Fass und verankern Sie ihn mit der Originalbeschlägen oder zusätzlichen Stützen im Inneren (wie Pflastersteinen oder Klammern).
Schritt 4: Füllen Sie den umgebenden Fassraum mit Kies oder Dekorationsmaterial, um Stabilität und optische Veredelung zu erzielen.